Quantcast
Channel: resources – Noise
Viewing all 771 articles
Browse latest View live

Compliance in the Cloud for New Financial Services Cybersecurity Regulations

$
0
0

Post Syndicated from Jodi Scrofani original https://aws.amazon.com/blogs/security/compliance-in-the-cloud-for-new-financial-services-cybersecurity-regulations/

Financial regulatory agencies are focused more than ever on ensuring responsible innovation. Consequently, if you want to achieve compliance with financial services regulations, you must be increasingly agile and employ dynamic security capabilities. AWS enables you to achieve this by providing you with the tools you need to scale your security and compliance capabilities on AWS.

The following breakdown of the most recent cybersecurity regulations, NY DFS Rule 23 NYCRR 500, demonstrate how AWS continues to focus on your regulatory needs in the financial services sector.

Cybersecurity Program, Policy, and CISO (Section 500.02-500.04)

You can use AWS Cloud Compliance to understand the robust controls AWS uses to maintain security and data protection in the cloud. Because your systems are built on top of the AWS Cloud infrastructure, compliance responsibilities are shared. AWS uses whitepapers, reports, certifications, accreditations, and other third-party attestations to provide you with the information you need to understand how AWS manages the security program. To learn more, read an Overview of Risk and Compliance for AWS.

Penetration Testing and Vulnerability Assessments (Section 500.05)

Because security in the AWS Cloud is shared, both you and AWS are responsible for performing penetration testing and vulnerability assessments. You can read about how AWS performs its own testing and assessments in the Overview of Security Processes whitepaper.

Penetration testing and other simulated events are frequently indistinguishable from actual events. AWS has established a policy for you to request permission to conduct penetration tests and vulnerability scans to or originating from the AWS environment. To learn more, see AWS Simulated Event Testing.

Audit Trail (Section 500.06)

AWS CloudTrail is a web service that records AWS API calls associated with your account, including information such as the identity of the API caller, the time of the API call, the source IP address of the API caller, the request parameters, and the response elements returned by the AWS service.

CloudTrail stores this information in log files, which you can access from the AWS Management Console, AWS SDKs, command line tools, and higher-level AWS services such as AWS CloudFormation. You can use the log files to perform security analysis, resource change tracking, and compliance auditing. See the AWS CloudTrail website to learn more, and remember to turn on logging! If you need even more help, you can use one of our AWS Security Partner Solutions.

Access Privileges (Section 500.07)

AWS Identity and Access Management (IAM) enables you to securely control access to AWS services and resources for your users. Using IAM, you can create and manage AWS users and groups, and use permissions to allow and deny access to AWS resources. IAM is a feature of your AWS account offered at no additional charge. To get started using IAM or if you have already registered with AWS, go to the IAM console and get started with IAM best practices.

Application Security (section 500.08)

Moving IT infrastructure to AWS services creates a model of shared responsibility between you and AWS. AWS operates, manages, and controls the components from the host operating system and virtualization layer down to the physical security of the facilities in which the service operates. You assume responsibility and management of the guest operating system (including updates and security patches), other associated application software, and the configuration of the AWS-provided security group firewall. You should carefully consider the services you choose because your responsibilities vary depending on the services used, your integration of those services into your IT environment, and applicable laws and regulations. It is possible for you to enhance security or meet your more stringent compliance requirements by leveraging technology such as host-based firewalls, host-based intrusion detection and prevention, encryption, and key management. The nature of this shared responsibility also provides the flexibility and control that permits the deployment of solutions that meet industry-specific certification requirements.

The AWS system development lifecycle incorporates industry best practices that include formal design reviews by the AWS Security Team, threat modeling, and completion of a risk assessment. See the AWS Overview of Security Processes for further details.

Risk Assessment (Section 500.09)

AWS management has developed a strategic business plan that includes risk identification and the implementation of controls to mitigate or manage risks. AWS management reevaluates the strategic business plan at least biannually. This process requires management to identify risks within its areas of responsibility and to implement appropriate measures designed to address those risks.

In addition, the AWS control environment is subject to various internal and external risk assessments. AWS Compliance and Security teams have established an information security framework and policies that are based on the Control Objectives for Information and Related Technology (COBIT) framework and have effectively integrated the ISO 27001 certifiable framework based on ISO 27002 controls, American Institute of Certified Public Accountants (AICPA) Trust Services Principles, the PCI DSS v3.1, and the National Institute of Standards and Technology (NIST) Publication 800-53 Rev 3 (Recommended Security Controls for Federal Information Systems). AWS maintains the security policy, provides security training to employees, and performs application security reviews. These reviews assess the confidentiality, integrity, and availability of data, as well as conformance to the information security policy.

Finally, AWS publishes independent auditor reports and certifications to provide you with considerable information regarding the policies, processes, and controls established and operated by AWS. AWS can provide the relevant certifications and reports to you. Continuous monitoring of logical controls can be executed by you on your own systems. See the AWS Compliance Center for more information about the Assurance Program.

Cybersecurity Personnel and Intelligence (Section 500.10)

AWS manages a comprehensive control environment that includes policies, processes, and control activities that leverage various aspects of the overall Amazon control environment. This control environment is in place for the secure delivery of AWS service offerings. The collective control environment encompasses the people, processes, and technology necessary to establish and maintain an environment that supports the operating effectiveness of the AWS control framework. AWS has integrated applicable cloud-specific controls identified by leading cloud computing industry bodies into the AWS control framework, and AWS continues to monitor these industry groups for ideas on which leading practices can be implemented to better assist you with managing your control environment.

The control environment at Amazon begins at the highest level of the company. Executive and senior leadership play important roles in establishing the company’s tone and core values. Every employee is provided with the company’s Code of Business Conduct and Ethics and completes periodic training. Compliance audits are performed so that employees understand and follow the established policies.

The AWS organizational structure provides a framework for planning, executing and controlling business operations. The organizational structure assigns roles and responsibilities to provide for adequate staffing, the efficiency of operations, and the segregation of duties. Management has also established authority and appropriate lines of reporting for key personnel. Included as part of the company’s hiring verification processes are education, previous employment, and, in some cases, background checks as permitted by law and regulation for employees commensurate with the employee’s position and level of access to AWS facilities. The company follows a structured onboarding process to familiarize new employees with Amazon tools, processes, systems, policies, and procedures.

Third-Party Information Security Policy (Section 500.11)

You have the option to enroll in an Enterprise Agreement with AWS. Using Enterprise Agreements, you can tailor agreements so that they best suit your needs. For more information, contact your sales representative.

Multi-Factor Authentication (Section 500.12)

AWS Multi-Factor Authentication (MFA) is a simple best practice that adds an extra layer of protection on top of your user name and password. With MFA enabled, when users signs in to an AWS website, they will be prompted for their user name and password (the first factor—what they know), as well as for an authentication code from their AWS MFA device (the second factor—what they have). Taken together, these multiple factors provide increased security for your AWS account settings and resources. You can enable MFA for your AWS account and for individual IAM users you have created under your account. MFA can be also be used to control access to AWS service APIs. After you have obtained a supported hardware or virtual MFA device, AWS does not charge any additional fees for using MFA.

You can also protect cross-account access using MFA.

Limitation on Data Retention (Section 500.13)

AWS provides you with the ability to delete their data. However, you retain control and ownership of your data, so it is your responsibility to manage data retention to your own requirements. See AWS Cloud Security Whitepaper for more details.

Training and Monitoring (Section 500.14)

AWS publishes independent auditor reports and certifications to provide you with information about the policies, processes, and controls established and operated by AWS. We can provide the relevant certifications and reports to you. You can execute continuous monitoring of logical controls on your own systems.

For example, Amazon CloudWatch is a web service that provides monitoring for AWS Cloud resources, starting with Amazon EC2. It provides you with visibility into resource utilization, operational performance, and overall demand patterns including metrics such as CPU utilization, disk reads and writes, and network traffic. You can set up CloudWatch alarms to notify you if certain thresholds are crossed or to take other automated actions such as adding or removing EC2 instances if Auto Scaling is enabled.

Encryption of Nonpublic Information (Section 500.15)

You can use your own encryption mechanisms for nearly all AWS services, including Amazon S3, Amazon EBS, Amazon SimpleDB, and Amazon EC2. Amazon VPC sessions are also encrypted. Optionally, you can enable server-side encryption on S3. You can also use third-party encryption technologies. Learn more about AWS KMS and feel free to bring your own keys.

AWS produces, controls, and distributes symmetric cryptographic keys using NIST-approved key management technology and processes in the AWS information system. AWS developed a secure key and credential manager to create, protect, and distribute symmetric keys. The key manager also secures and distributes AWS credentials that are needed on hosts, RSA public/private keys, and X.509 Certifications. AWS cryptographic processes are reviewed by independent third-party auditors for our continued compliance with SOC, PCI DSS, ISO 27001, and FedRAMP.

Incident Response Plan (Section 500.16)

AWS Support is a one-on-one, fast-response support channel that is staffed 24 x 7 x 365 with experienced technical support engineers. The service helps you, regardless of your size or technical ability, to use AWS products and features successfully. AWS provides different tiers of support, which give you the flexibility to choose the support tier that best meets your needs. All AWS Support tiers offer an unlimited number of support cases with pay-by-the-month pricing and no long-term contracts. See Enterprise Support for more information.

Internally, the Amazon Incident Management team employs industry-standard diagnostic procedures to drive resolution during business-impacting events. Staff operators provide 24 x 7 x 365 coverage to detect incidents and manage the impact and resolution. The AWS incident response program, plans, and procedures have been developed in alignment with the ISO 27001 standard. The AWS SOC 1 Type 2 report provides details about the specific control activities that AWS executes.

Contact your sales representative to have our AWS team members help you get started. Don’t have a sales representative yet? Contact us.

– Jodi


32% of All US Adults Watch Pirated Content

$
0
0

Post Syndicated from Ernesto original https://torrentfreak.com/32-of-all-us-adults-watch-pirated-content-170119/

piratekayDespite the availability of many legal services, piracy remains rampant througout the United States.
This is one of the main conclusions of research conducted by anti-piracy firm Irdeto, which works with prominent clients including Twentieth Century Fox and Starz.

Through YouGov, the company conducted a representative survey of over 1,000 respondents which found that 32 percent of all US adults admit to streaming or downloading pirated video content.

These self-confessed pirates are interested in a wide variety of video content. TV-shows and movies that still play in theaters are on the top of the list for many, with 24 percent each, but older movies, live sports and Netflix originals are mentioned as well.

The data further show that the majority of US adults (69%) know that piracy is illegal. Interestingly, this also means that a large chunk of the population believes that they’re doing nothing wrong.

While the major copyright holders often stress that piracy results in massive revenue losses, the pirates themselves are not particularly bothered by this. In fact, 39 percent say that claimed losses don’t impact their download habits.

According to Lawrence Low, Irdeto’s Vice President of Business Development and Sales, piracy does more than just financial damage. It also limits the resources content creators have to make new content, which may ultimately lead to less choice.

“Piracy deters content creators from investing in new content, impacting the creative process and providing consumers with less choice,” Low says.

“It is becoming increasingly important for operators and movie studios to educate consumers on the tactics employed by pirates and to further promote innovative offerings that allow consumers to legally acquire content,” he adds.

This insight is not new of course. Over the past few years, various copyright groups have put a spotlight on legal services, even targeting pirates directly with educational copyright alerts.

However, for now that doesn’t seem to have had much of an effect. Piracy remains rampant, especially among younger people. Previously a similar survey revealed that among millennials, more than two-thirds admit to having downloaded or streamed pirated content.

Source: TF, for the latest info on copyright, file-sharing, torrent sites and ANONYMOUS VPN services.

Introducing the AWS IoT Button Enterprise Program

$
0
0

Post Syndicated from Tara Walker original https://aws.amazon.com/blogs/aws/introducing-the-aws-iot-button-enterprise-program/

The AWS IoT Button first made its appearance on the IoT scene in October of 2015 at AWS re:Invent with the introduction of the AWS IoT service.  That year all re:Invent attendees received the AWS IoT Button providing them the opportunity to get hands-on with AWS IoT.  Since that time AWS IoT button has been made broadly available to anyone interested in the clickable IoT device.

During this past AWS re:Invent 2016 conference, the AWS IoT button was launched into the enterprise with the AWS IoT Button Enterprise Program.  This program is intended to help businesses to offer new services or improve existing products at the click of a physical button.  With the AWS IoT Button Enterprise Program, enterprises can use a programmable AWS IoT Button to increase customer engagement, expand applications and offer new innovations to customers by simplifying the user experience.  By harnessing the power of IoT, businesses can respond to customer demand for their products and services in real-time while providing a direct line of communication for customers, all via a simple device.


AWS IoT Button Enterprise Program

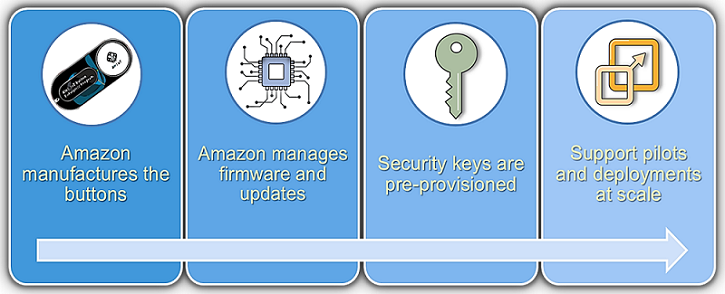
Let’s discuss how the new AWS IoT Button Enterprise Program works.  Businesses start by placing a bulk order of the AWS IoT buttons and provide a custom label for the branding of the buttons.  Amazon manufactures the buttons and pre-provisions the IoT button devices by giving each a certificate and unique private key to grant access to AWS IoT and ensure secure communication with the AWS cloud.  This allows for easier configuration and helps customers more easily get started with the programming of the IoT button device.

Businesses would design and build their IoT solution with the button devices and creation of device companion applications.  The AWS IoT Button Enterprise Program provides businesses some complimentary assistance directly from AWS to ensure a successful deployment.  The deployed devices then would only need to be configured with Wi-Fi at user locations in order to function.


For enterprises, there are several use cases that would benefit from the implementation of an IoT button solution. Here are some ideas:

  • Reordering services or custom products such as pizza or medical supplies
  • Requesting a callback from a customer service agent
  • Retail operations such as a call for assistance button in stores or restaurants
  • Inventory systems for capturing products amounts for inventory
  • Healthcare applications such as alert or notification systems for the disabled or elderly
  • Interface with Smart Home systems to turn devices on and off such as turning off outside lights or opening the garage door
  • Guest check-in/check-out systems


AWS IoT Button

At the heart of the AWS IoT Button Enterprise Program is the AWS IoT Button.  The AWS IoT button is a 2.4GHz Wi-Fi with WPA2-PSK enabled device that has three click types: Single click, Double click, and Long press.  Note that a Long press click type is sent if the button is pressed for 1.5 seconds or longer.  The IoT button has a small LED light with color patterns for the status of the IoT button.  A blinking white light signifies that the IoT button is connecting to Wi-Fi and getting an IP address, while a blinking blue light signifies that the button is in wireless access point (AP) mode.  The data payload that is sent from the device when pressed contains the device serial number, the battery voltage, and the click type.

Currently, there are 3 ways to get started building your AWS IoT button solution.  The first option is to use the AWS IoT Button companion mobile app.  The mobile app will create the required AWS IoT resources, including the creation of the TLS 1.2 certificates, and create an AWS IoT rule tied to AWS Lambda.  Additionally, it will enable the IoT button device via AWS IoT to be an event source that invokes a new AWS Lambda function of your choosing from the Lambda blueprints.  You can download the aforementioned mobile apps for Android and iOS below.


The second option is to use the AWS Lambda Blueprint Wizard as an easy way to start using your AWS IoT Button. Like the mobile app, the wizard will create the required AWS IoT resources for you and add an event source to your button that invokes a new Lambda function.

The third option is to follow the step by step tutorial in the AWS IoT getting started guide and leverage the AWS IoT console to create these resources manually.

Once you have configured your IoT button successfully and created a simple one-click solution using one of the aforementioned getting started guides, you should be ready to start building your own custom IoT button solution.   Using a click of a button, your business will be able to build new services for customers, offer new features for existing services, and automate business processes to operate more efficiently.

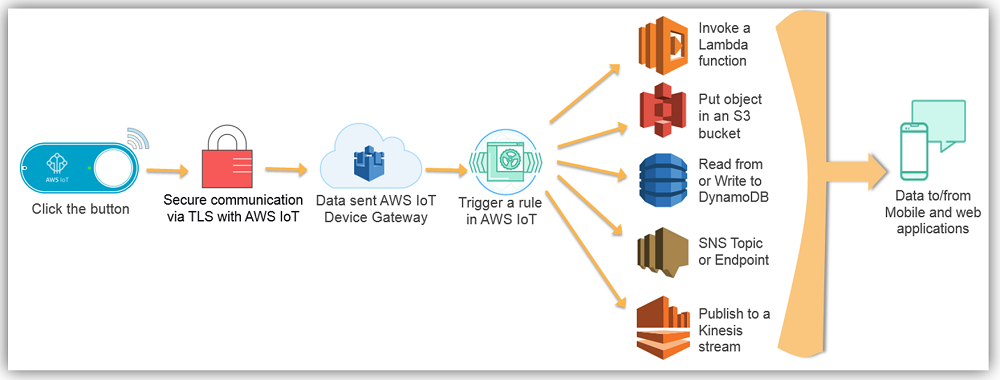
The basic technical flow of an AWS IoT button solution is as follows:

  • A button is clicked and secure connection is established with AWS IoT with TLS 1.2
  • The button data payload is sent to AWS IoT Device Gateway
  • The rules engine evaluates received messages (JSON) published into AWS IoT and performs actions or trigger AWS Services based defined business rules.
  • The triggered AWS Service executes or action is performed
  • The device state can be read, stored and set with Device Shadows
  • Mobile and Web Apps can receive and update data based upon action

Now that you have general knowledge about the AWS IoT button, we should jump into a technical walk-through of building an AWS IoT button solution.


AWS IoT Button Solution Walkthrough

We will dive more deeply into building an AWS IoT Button solution with a quick example of a use case for providing one-click customer service options for a business.

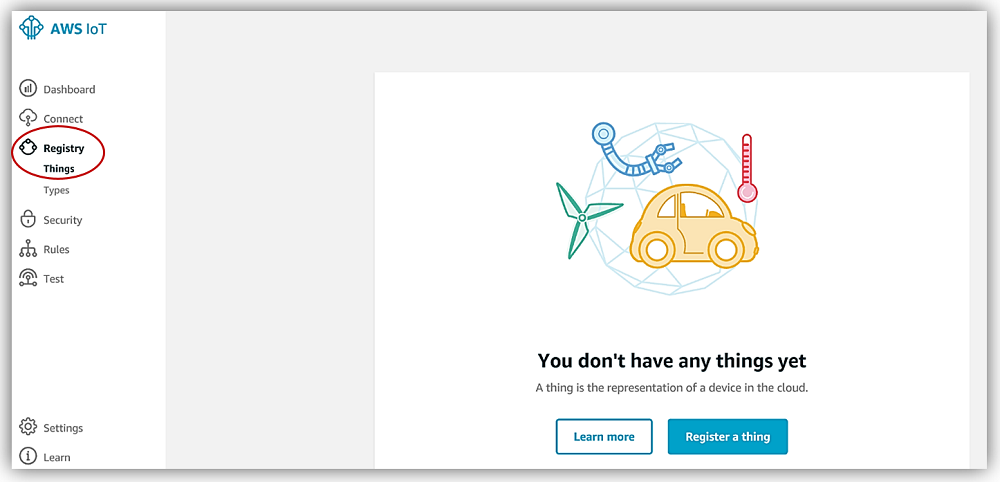
To get started, I will go to the AWS IoT console, register my IoT button as a Thing and create a Thing type.  In the console, I select the Registry and then Things options in console menu.

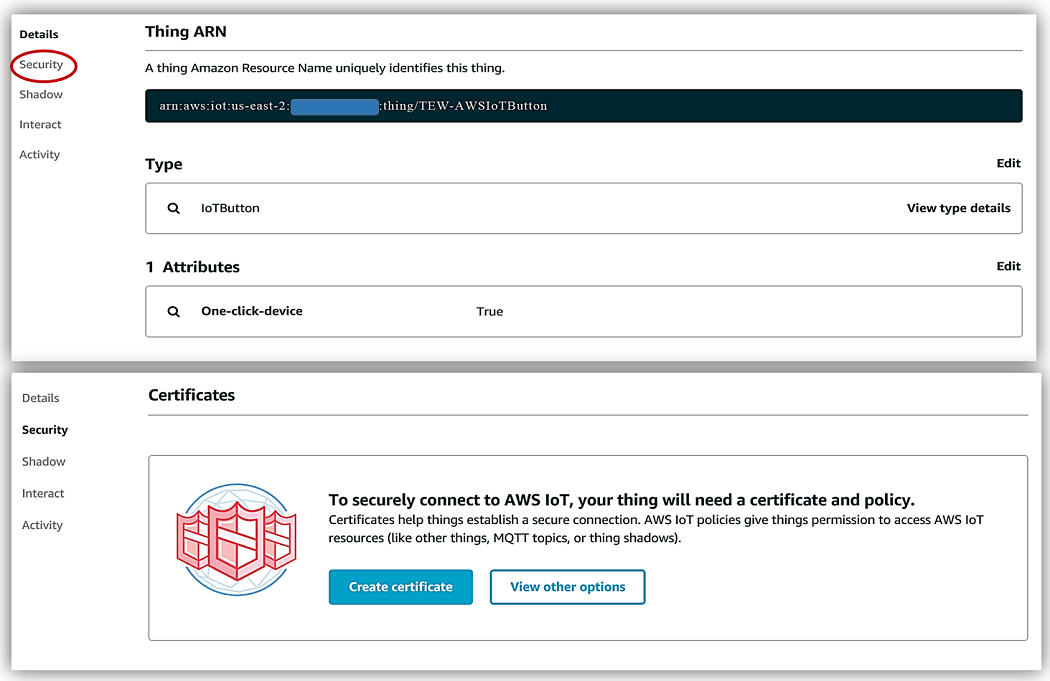
The name of my IoT thing in this example will be TEW-AWSIoTButton.  If you desire to categorize the IoT things, you can create a Thing type and assign a type to similar IoT ‘things’.  I will categorize my IoT thing, TEW-AWSIoTButton, as an IoTButton thing type with a One-click-device attribute key and select Create thing button.

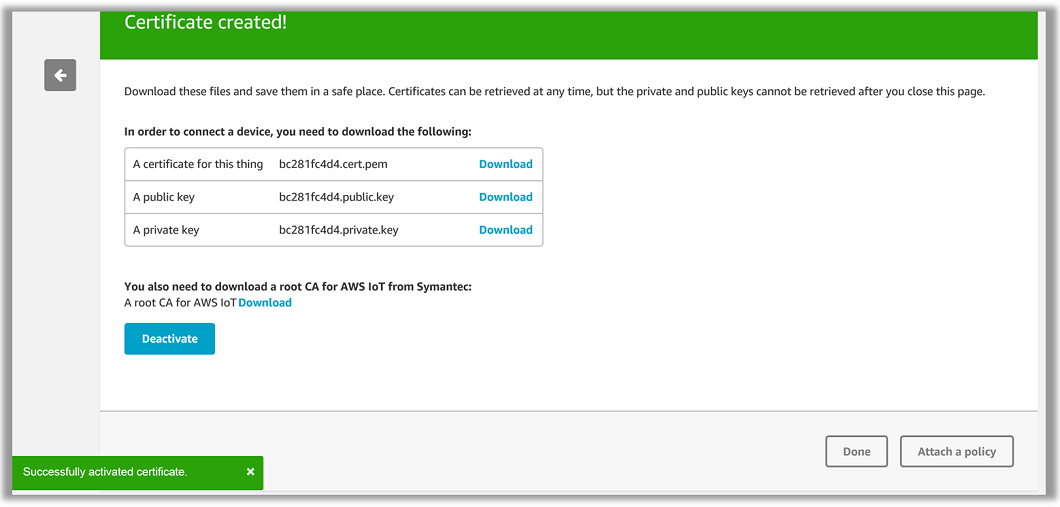
After my AWS IoT button device, TEW-AWSIoTButton, is registered in the Thing Registry, the next step is to acquire the required X.509 certificate and keys.  I will have AWS IoT generate the certificate for this device, but the service allows for to use your own certificates.  Authenticating the connection with the X.509 certificates helps to protect the data exchange between your device and AWS IoT service.

When the certificates are generated with AWS IoT, it is important that you download and save all of the files created since the public and private keys will not be available after you leave the download page. Additionally, do not forget to download the root CA for AWS IoT from the link provided on the page with your generated certificates.

The newly created certificate will be inactive, therefore, it is vital that you activate the certificate prior to use.  AWS IoT uses the TLS protocol to authenticate the certificates using the TLS protocol’s client authentication mode.  The certificates enable asymmetric keys to be used with devices, and AWS IoT service will request and validate the certificate’s status and the AWS account against a registry of certificates.  The service will challenge for proof of ownership of the private key corresponding to the public key contained in the certificate.  The final step in securing the AWS IoT connection to my IoT button is to create and/or attach an IAM policy for authorization.

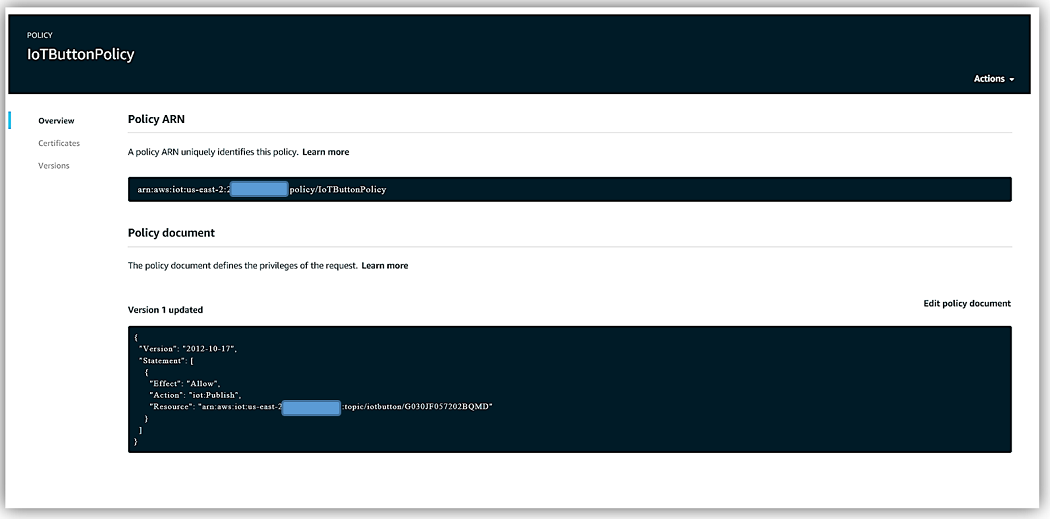
I will choose the Attach a policy button and then select Create a Policy option in order to build a specific policy for my IoT button.  In Name field of the new IoT policy, I will enter IoTButtonPolicy for the name of this new policy. Since the AWS IoT Button device only supports button presses, our AWS IoT button policy will only need to add publish permissions.  For this reason, this policy will only allow the iot:Publish action.


For the Resource ARN of the IoT policy, the AWS IoT buttons typically follow the format pattern of: arn: aws: iot: TheRegion: AWSAccountNumber: topic/ iotbutton /ButtonSerialNumber.  This means that the Resource ARN for this IoT button policy will be:

I should note that if you are creating an IAM policy for an IoT device that is not an AWS IoT button, the Resource ARN format pattern would be as follows: arn: aws: iot: TheRegion: AWSAccountNumber: topic/ YourTopic/ OptionalSubTopic/

The created policy for our AWS IoT Button, IoTButtonPolicy, looks as follows:

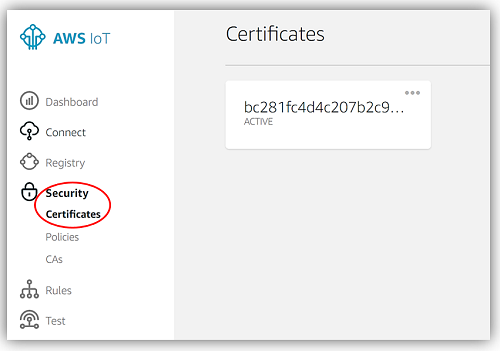
The next step is to return to the AWS IoT console dashboard, select Security and then Certificates menu options.  I will choose the certificate created in the aforementioned steps.

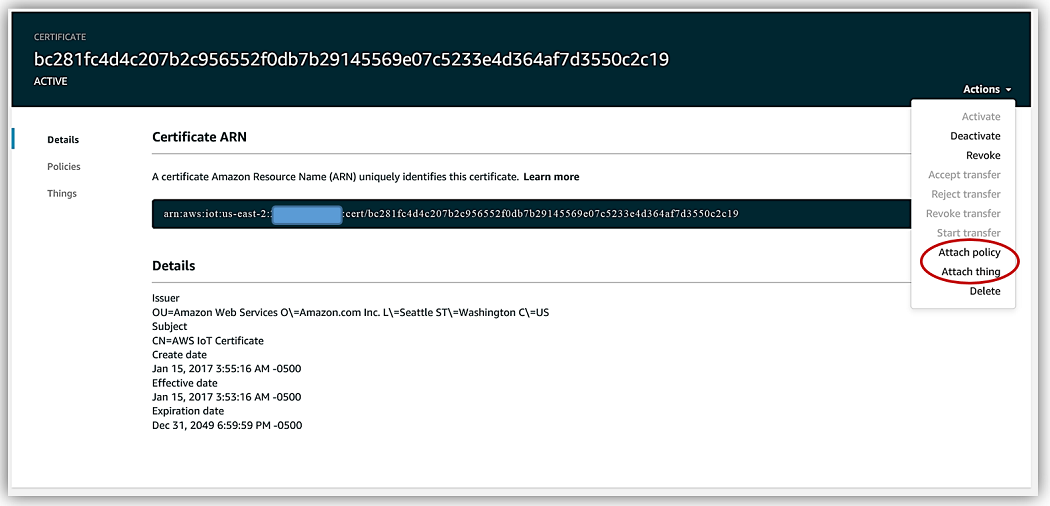
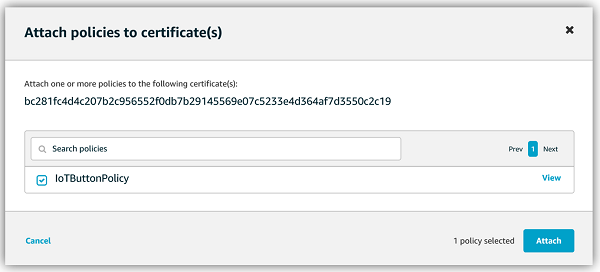
Then on the selected certificate page, I will select the Actions dropdown on the far right top corner.  In order to add the IoTButtonPolicy IAM policy to the certificate, I will click the Attach policy option.


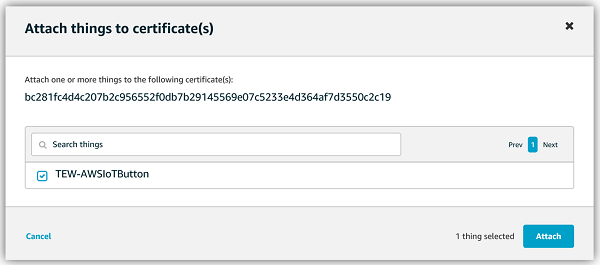
I will repeat all of the steps mentioned above but this time I will add the TEW-AWSIoTButton thing by selecting the Attach thing option.

All that is left is to add the certificate and private key to the physical AWS IoT button and connect the AWS IoT Button to Wi-Fi in order to have the IoT button be fully functional.

Important to note: For businesses that have signed up to participate in the AWS IoT Button Enterprise Program, all of these aforementioned steps; Button logo branding, AWS IoT thing creation, obtaining certificate & key creation, and adding certificates to buttons, are completed for them by Amazon and AWS.  Again, this is to help make it easier for enterprises to hit the ground running in the development of their desired AWS IoT button solution.

Now, going back to the AWS IoT button used in our example, I will connect the button to Wi-Fi by holding the button until the LED blinks blue; this means that the device has gone into wireless access point (AP) mode.

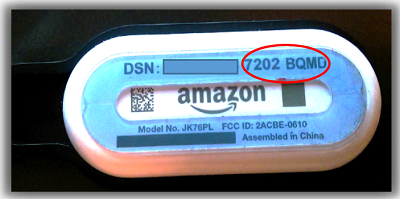
In order to provide internet connectivity to the IoT button and start configuring the device’s connection to AWS IoT, I will connect to the button’s Wi-Fi network which should start with Button ConfigureMe. The first time the connection is made to the button’s Wi-Fi, a password will be required.  Enter the last 8 characters of the device serial number shown on the back of the physical AWS IoT button device.

The AWS IoT button is now configured and ready to build a system around it. The next step will be to add the actions that will be performed when the IoT button is pressed.  This brings us to the AWS IoT Rules engine, which is used to analyze the IoT device data payload coming from the MQTT topic stream and/or Device Shadow, and trigger AWS Services actions.  We will set up rules to perform varying actions when different types of button presses are detected.

Our AWS IoT button solution will be a simple one, we will set up two AWS IoT rules to respond to the IoT button being clicked and the button’s payload being sent to AWS IoT.  In our scenario, a single button click will represent that a request is being sent by a customer to a fictional organization’s customer service agent.  A double click, however, will represent that a text will be sent containing a customer’s fictional current account status.

The first AWS IoT rule created will receive the IoT button payload and connect directly to Amazon SNS to send an email only if the rule condition is fulfilled that the button click type is SINGLE. The second AWS IoT rule created will invoke a Lambda function that will send a text message containing customer account status only if the rule condition is fulfilled that the button click type is DOUBLE.

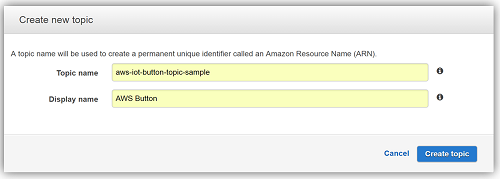
In order to create the AWS IoT rule that will send an email to subscribers of an SNS topic for requesting a customer service agent’s help, we will go to Amazon SNS and create a SNS topic.

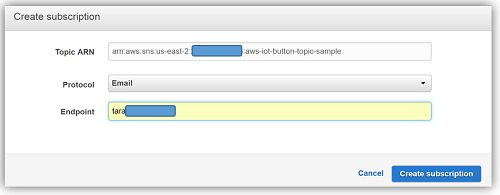
I will create an email subscription to the topic with the fictional subscribed customer service email, which in this case is just my email address.  Of course, this could be several customer service representatives that are subscribed to the topic in order to receive emails for customer assistance requests.

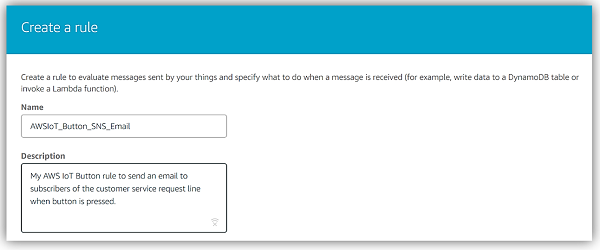
Now returning to the AWS IoT console, I will select the Rules menu and choose the Create rule option. I first provide a name and description for the rule.

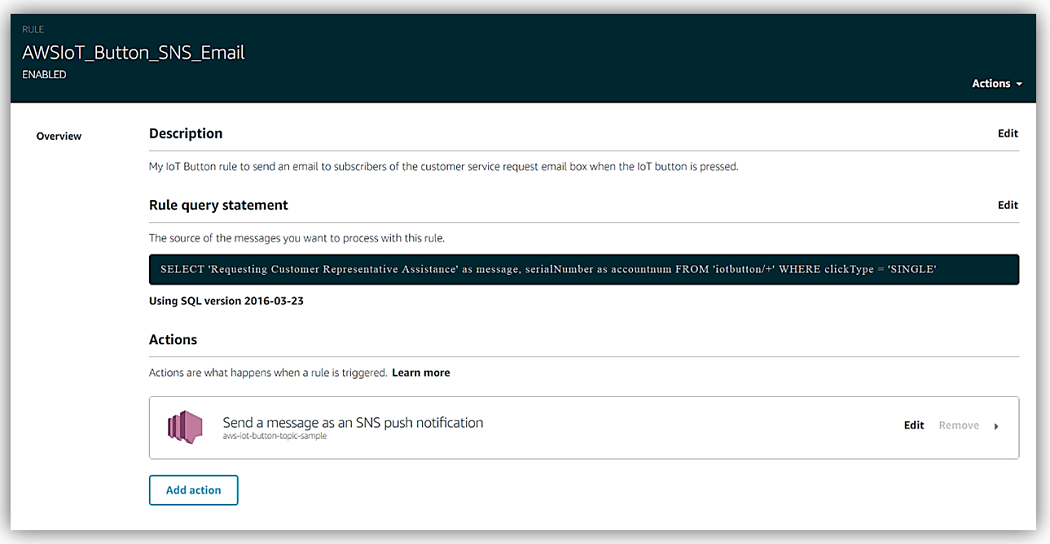
Next, I select the SQL version to be used for the AWS IoT rules engine.  I select the latest SQL version, however, if I did not choose to set a version, the default version of 2015-10-08 will be used. The rules engine uses a SQL-like syntax with statements containing the SELECT, FROM, and WHERE clauses.  I want to return a literal string for the message, which is not apart of the IoT button data payload.  I also want to return the button serial number as the accountnum, which are not apart of the payload.  Since the latest version, 2016-03-23, supports literal objects, I will be able to send a custom payload to Amazon SNS.

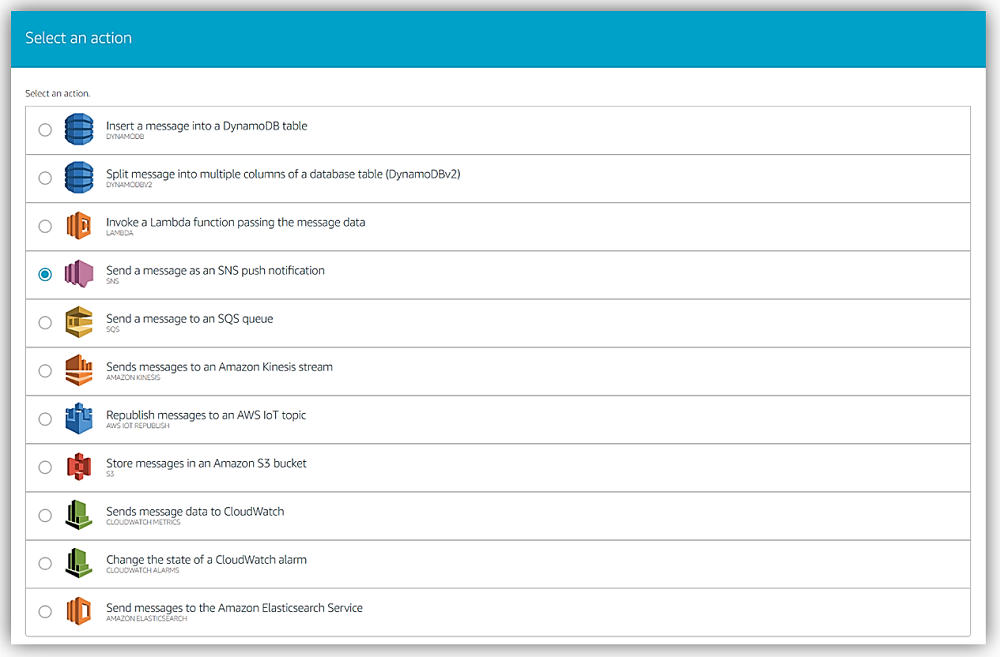
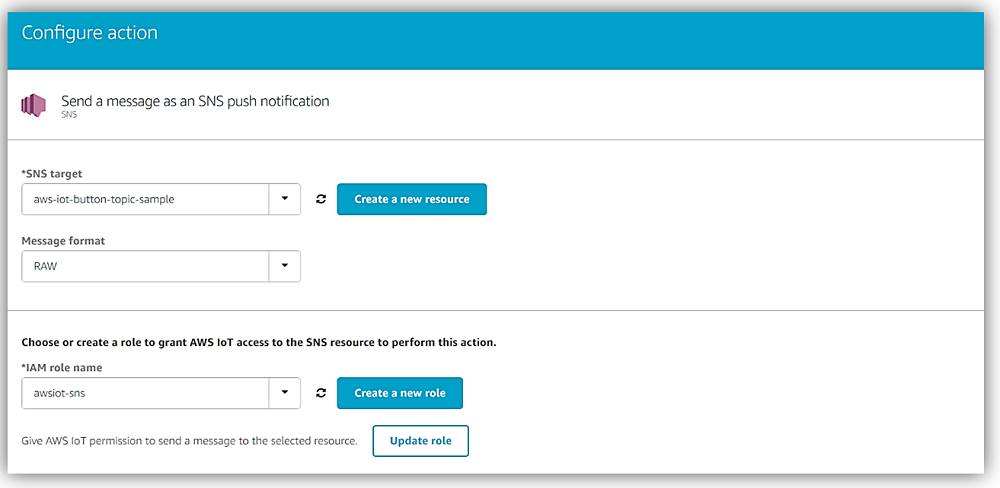
I have created the rule, all that is left is to add a rule action to perform when the rule is analyzed.  As I mentioned above, an email should be sent to customer service representatives when this rule is triggered by a single IoT button press.  Therefore, my rule action will be the Send a message as an SNS push notification to the SNS topic that I created to send an email to our fictional customer service reps aka me. Remember that the use of an IAM role is required to provide access to SNS resources; if you are using the console you have the option to create a new role or update an existing role to provide the correct permissions.  Also, since I am doing a custom message and pushing to SNS, I select the Message format type to be RAW.

Our rule has been created, now all that is left is for us to test that an email is successfully sent when the AWS IoT button is pressed once, and therefore the data payload has a click type of SINGLE.

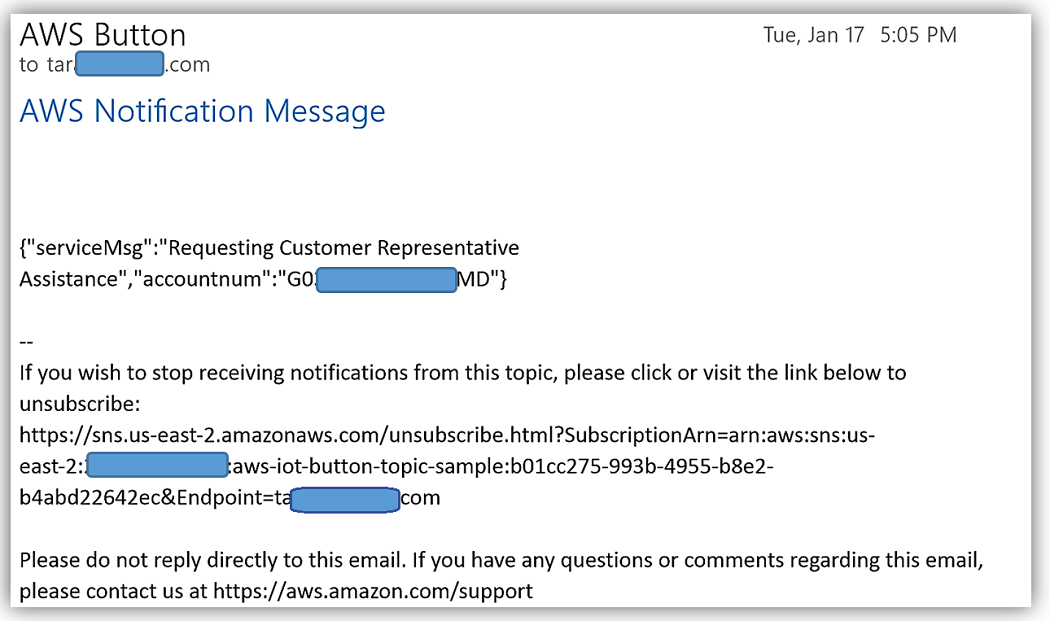
A single press of our AWS IoT Button and the custom message is published to the SNS Topic, and the email shown below was sent to the subscribed customer service agents email addresses; in this example, to my email address.


In order to create the AWS IoT rule that will send a text via Lambda and a SNS topic for the scenario in which customers request account status to be sent when the IoT Button is pressed twice.  We will start by creating an AWS IoT rule with an AWS Lambda action.  To create this IoT rule, we first need to create a Lambda function and the SNS Topic with a SNS text based subscription.

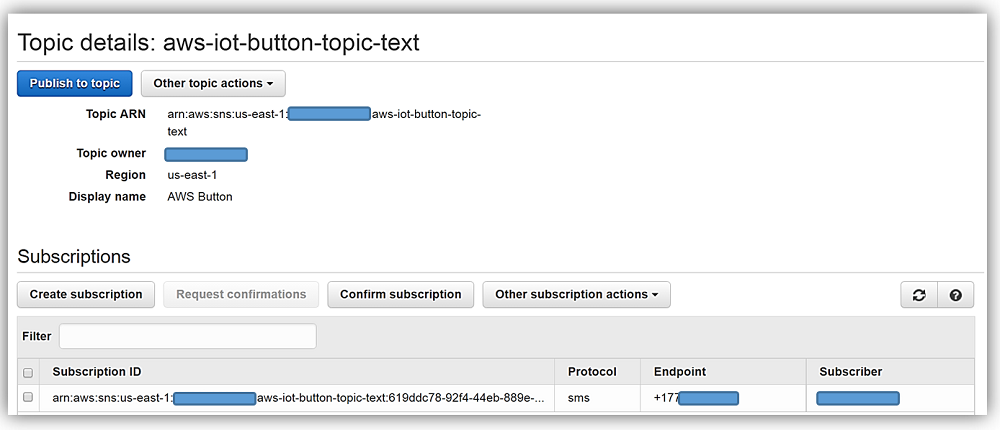
First, I will go to the Amazon SNS console and create a SNS Topic. After the topic is created, I will create a SNS text subscription for our SNS topic and add a number that will receive the text messages. I will then copy the SNS Topic ARN for use in my Lambda function. Please note, that I am creating the SNS Topic in a different region than previously created SNS topic to use a region with support for sending SMS via SNS. In the Lambda function, I will need to ensure the correct region for the SNS Topic is used by including the region as a parameter of the constructor of the SNS object. The created SNS topic, aws-iot-button-topic-text is shown below.


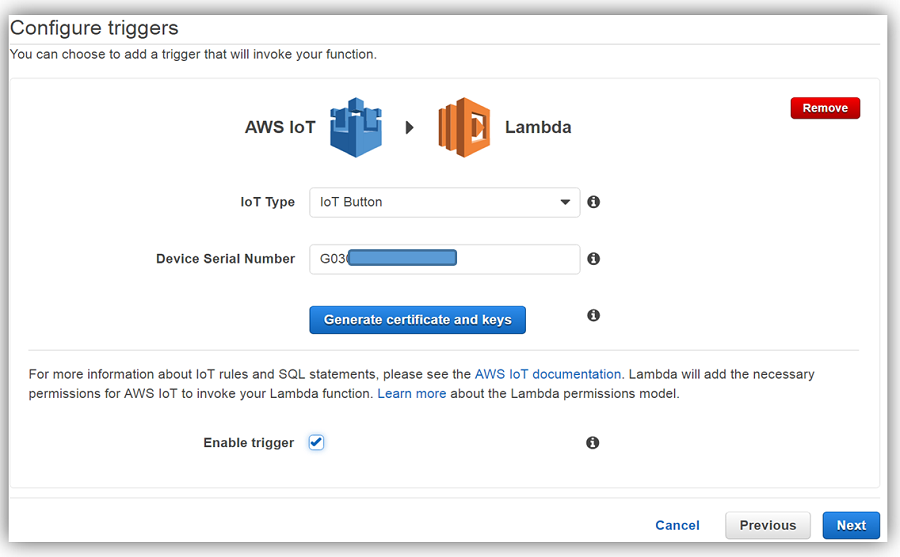
We now will go to the AWS Lambda console and create a Lambda function with an AWS IoT trigger, an IoT Type as IoT Button, and the requested Device Serial Number will be the serial number on the back of our AWS IoT Button. There is no need to generate the certificate and keys in this step because the AWS IoT button is already configured with certificates and keys for secure communication with AWS IoT.

The next is to create the Lambda function,  IoTNotifyByText, with the following code that will receive the IoT button data payload and create a message to publish to Amazon SNS.

'use strict';

console.log('Loading function');
var AWS = require("aws-sdk");
var sns = new AWS.SNS({region: 'us-east-1'});

exports.handler = (event, context, callback) => {
    // Load the message as JSON object
    var iotPayload = JSON.stringify(event, null, 2);

    // Create a text message from IoT Payload
    var snsMessage = "Attention: Customer Info for Account #: " + event.accountnum + " Account Status: In Good Standing " +
    "Balance is: 1234.56"

    // Log payload and SNS message string to the console and for CloudWatch Logs
    console.log("Received AWS IoT payload:", iotPayload);
    console.log("Message to send: " + snsMessage);

    // Create params for SNS publish using SNS Topic created for AWS IoT button
    // Populate the parameters for the publish operation using required JSON format
    // - Message : message text
    // - TopicArn : the ARN of the Amazon SNS topic
    var params = {
        Message: snsMessage,
        TopicArn: "arn:aws:sns:us-east-1:xxxxxxxxxxxx:aws-iot-button-topic-text"
     };

     sns.publish(params, context.done);
};

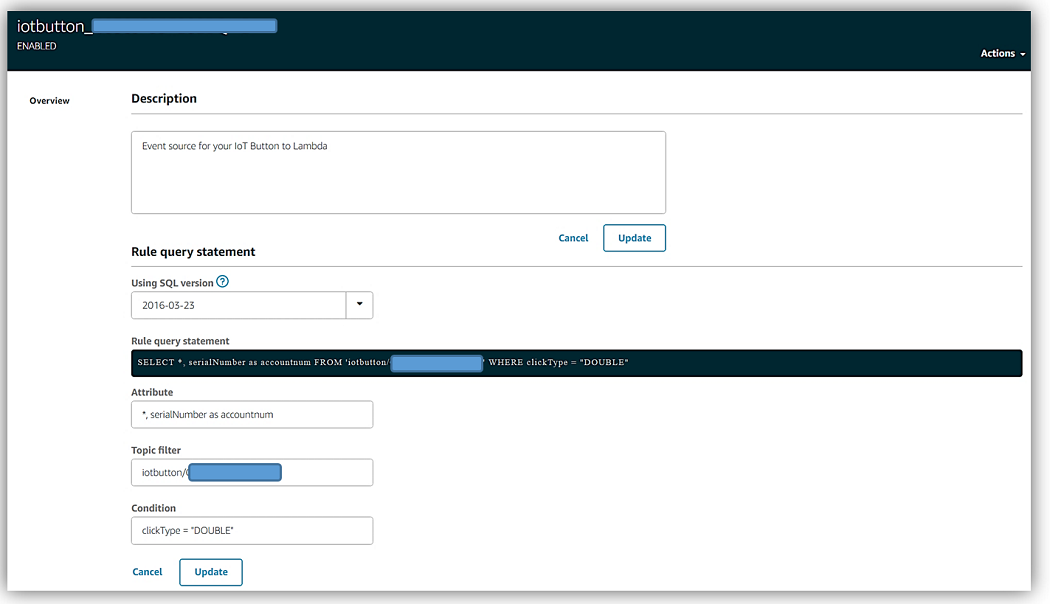
All that is left is for us to do is to alter the AWS IoT rule automatically created when we created a Lambda function with an AWS IoT trigger. Therefore, we will go to the AWS IoT console and select Rules menu option. We will find and select the IoT button rule created by Lambda which usually has a name with a suffix that is equal to the IoT button device serial number.


Once the rule is selected, we will choose the Edit option beside the Rule query statement section.

We change the Select statement to return the serial number as the accountnum and click Update button to save changes to the AWS IoT rule.

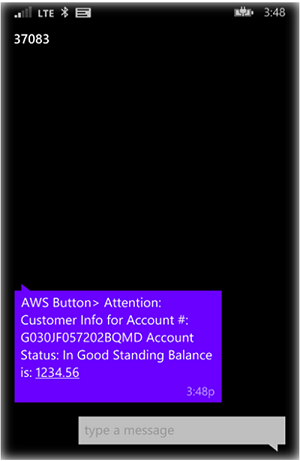
Time to Test. I click the IoT button twice and wait for the green LED light to appear, confirming a successful connection was made and a message was published to AWS IoT. After a few seconds, a text message is received on my phone with the fictitious customer account information.


This was a simple example of how a business could leverage the AWS IoT Button in order to build business solutions for their customers.  With the new AWS IoT Button Enterprise Program which helps businesses in obtaining the quantities of AWS IoT buttons needed, as well as, providing AWS IoT service pre-provisioning and deployment support; Businesses can now easily get started in building their own customized IoT solution.

Available Now

The original 1st generation of the AWS IoT button is currently available on Amazon.com, and the 2nd generation AWS IoT button will be generally available in February.  The main difference in the IoT buttons are the amount of battery life and/or clicks available for the button.  Please note that right now if you purchase the original AWS IoT button, you will receive $20 in AWS credits when you register.

Businesses can sign up today for the AWS IoT Button Enterprise Program currently in Limited Preview. This program is designed to enable businesses to expand their existing applications or build new IoT capabilities with the cloud and a click of an IoT button device.  You can read more about the AWS IoT button and learn more about building solutions with a programmable IoT button on the AWS IoT Button product page.  You can also dive deeper into the AWS IoT service by visiting the AWS IoT developer guide, the AWS IoT Device SDK documentation, and/or the AWS Internet of Things Blog.


Tara

The Raspberry Pi Foundation’s Digital Making Curriculum

$
0
0

Post Syndicated from Carrie Anne Philbin original https://www.raspberrypi.org/blog/digital-making-curriculum/

At Raspberry Pi, we’re determined in our ambition to put the power of digital making into the hands of people all over the world: one way we pursue this is by developing high-quality learning resources to support a growing community of educators. We spend a lot of time thinking hard about what you can learn by tinkering and making with a Raspberry Pi, and other devices and platforms, in order to become skilled in computer programming, electronics, and physical computing.

Now, we’ve taken an exciting step in this journey by defining our own digital making curriculum that will help people everywhere learn new skills.

A PDF version of the curriculum is also available to download.

Who is it for?

We have a large and diverse community of people who are interested in digital making. Some might use the curriculum to help guide and inform their own learning, or perhaps their children’s learning. People who run digital making clubs at schools, community centres, and Raspberry Jams may draw on it for extra guidance on activities that will engage their learners. Some teachers may wish to use the curriculum as inspiration for what to teach their students.

Raspberry Pi produces an extensive and varied range of online learning resources and delivers a huge teacher training program. In creating this curriculum, we have produced our own guide that we can use to help plan our resources and make sure we cover the broad spectrum of learners’ needs.

Progression

Learning anything involves progression. You start with certain skills and knowledge and then, with guidance, practice, and understanding, you gradually progress towards broader and deeper knowledge and competence. Our digital making curriculum is structured around this progression, and in representing it, we wanted to avoid the age-related and stage-related labels that are often associated with a learner’s progress and the preconceptions these labels bring. We came up with our own, using characters to represent different levels of competence, starting with Creator and moving onto Builder and Developer before becoming a Maker.

Progress through our curriculum and become a digital maker

Strands

We want to help people to make things so that they can become the inventors, creators, and makers of tomorrow. Digital making, STEAM, project-based learning, and tinkering are at the core of our teaching philosophy which can be summed up simply as ‘we learn best by doing’.

We’ve created five strands which we think encapsulate key concepts and skills in digital making: Design, Programming, Physical Computing, Manufacture, and Community and Sharing.

Computational thinking

One of the Raspberry Pi Foundation’s aims is to help people to learn about computer science and how to make things with computers. We believe that learning how to create with digital technology will help people shape an increasingly digital world, and prepare them for the work of the future.

Computational thinking is at the heart of the learning that we advocate. It’s the thought process that underpins computing and digital making: formulating a problem and expressing its solution in such a way that a computer can effectively carry it out. Computational thinking covers a broad range of knowledge and skills including, but not limited to:

  • Logical reasoning
  • Algorithmic thinking
  • Pattern recognition
  • Abstraction
  • Decomposition
  • Debugging
  • Problem solving

By progressing through our curriculum, learners will develop computational thinking skills and put them into practice.

What’s not on our curriculum?

If there’s one thing we learned from our extensive work in formulating this curriculum, it’s that no two educators or experts can agree on the best approach to progression and learning in the field of digital making. Our curriculum is intended to represent the skills and thought processes essential to making things with technology. We’ve tried to keep the headline outcomes as broad as possible, and then provide further examples as a guide to what could be included.

Our digital making curriculum is not intended to be a replacement for computer science-related curricula around the world, such as the ‘Computing Programme of Study’ in England or the ‘Digital Technologies’ curriculum in Australia. We hope that following our learning pathways will support the study of formal curricular and exam specifications in a fun and tangible way. As we continue to expand our catalogue of free learning resources, we expect our curriculum will grow and improve, and your input into that process will be vital.

Get involved

We’re proud to be part of a movement that aims to empower people to shape their world through digital technologies. We value the support of our community of makers, educators, volunteers, and enthusiasts. With this in mind, we’re interested to hear your thoughts on our digital making curriculum. Add your feedback to this form, or talk to us at one of the events that Raspberry Pi will attend in 2017.

The post The Raspberry Pi Foundation’s Digital Making Curriculum appeared first on Raspberry Pi.

China Bans Unauthorized VPN Services in Internet Crackdown

$
0
0

Post Syndicated from Andy original https://torrentfreak.com/china-ban-unauthorized-vpn-services-in-internet-crackdown-170123/

blocked-censorWhile the Internet is considered by many to be the greatest invention of modern time, to others it presents a disruptive influence that needs to be controlled.

Among developed nations nowhere is this more obvious than in China, where the government seeks to limit what citizens can experience online. Using technology such as filters and an army of personnel, people are routinely barred from visiting certain websites and engaging in activity deemed as undermining the state.

Of course, a cat-and-mouse game is continuously underway, with citizens regularly trying to punch through the country’s so-called ‘Great Firewall’ using various techniques, services, and encryption technologies. Now, however, even that is under threat.

In an announcement yesterday from China’s Ministry of Industry and Information Technology, the government explained that due to Internet technologies and services expanding in a “disorderly” fashion, regulation is needed to restore order.

“In recent years, as advances in information technology networks, cloud computing, big data and other applications have flourished, China’s Internet network access services market is facing many development opportunities. However, signs of disorderly development show the urgent need for regulation norms,” MIIT said.

In order to “standardize” the market and “strengthen network information security management,” the government says it is embarking on a “nationwide Internet network access services clean-up.” It will begin immediately and continue until March 31, 2018, with several aims.

All Internet services such as data centers, ISPs, CDNs and much-valued censorship-busting VPNs, will need to have pre-approval from the government to operate. Operating such a service without a corresponding telecommunications business license will constitute an offense.

“Internet data centers, ISP and CDN enterprises shall not privately build communication transmission facilities, and shall not use the network infrastructure and IP addresses, bandwidth and other network access resources…without the corresponding telecommunications business license,” the notice reads.

It will also be an offense to possess a business license but then operate outside its scope, such as by exceeding its regional boundaries or by operating other Internet services not permitted by the license. Internet entities are also forbidden to sub-lease to other unlicensed entities.

In the notice, VPNs and similar technologies have a section all to themselves and are framed as “cross-border issues.”

“Without the approval of the telecommunications administrations, entities can not create their own or leased line (including a Virtual Private Network) and other channels to carry out cross-border business activities,” it reads.

The notice, published yesterday, renders most VPN providers in China illegal, SCMP reports.

Only time will tell what effect the ban will have in the real world, but in the short-term there is bound to be some disruption as entities seek to license their services or scurry away underground.

As always, however, the Internet will perceive censorship as damage, and it’s inevitable that the most determined of netizens will find a way to access content outside China (such as Google, Facebook, YouTube and Twitter), no matter how strict the rules.

Source: TF, for the latest info on copyright, file-sharing, torrent sites and ANONYMOUS VPN services.

Hello World – a new magazine for educators

$
0
0

Post Syndicated from Philip Colligan original https://www.raspberrypi.org/blog/hello-world-new-magazine-for-educators/

Today, the Raspberry Pi Foundation is launching a new, free resource for educators.

Hello World – a new magazine for educators

Hello World is a magazine about computing and digital making written by educators, for educators. With three issues each year, it contains 100 pages filled with news, features, teaching resources, reviews, research and much more. It is designed to be cross-curricular and useful to all kinds of educators, from classroom teachers to librarians.

Hello World is a magazine about computing and digital making written by educators, for educators. With three issues each year, it contains 100 pages filled with news, features, teaching resources, reviews, research and much more.

It is designed to be cross-curricular and useful to all kinds of educators, from classroom teachers to librarians.  While it includes lots of great examples of how educators are using Raspberry Pi computers in education, it is device- and platform-neutral.

Community building

As with everything we do at the Raspberry Pi Foundation, Hello World is about community building. Our goal is to provide a resource that will help educators connect, share great practice, and learn from each other.

Hello World is a collaboration between the Raspberry Pi Foundation and Computing at School, the grass-roots organisation of computing teachers that’s part of the British Computing Society. The magazine builds on the fantastic legacy of Switched On, which it replaces as the official magazine for the Computing at School community.

We’re thrilled that many of the contributors to Switched On have agreed to continue writing for Hello World. They’re joined by educators and researchers from across the globe, as well as the team behind the amazing MagPi, the official Raspberry Pi magazine, who are producing Hello World.

print (“Hello, World!”)

Hello World is available free, forever, for everyone online as a downloadable pdf.  The content is written to be internationally relevant, and includes features on the most interesting developments and best practices from around the world.

The very first issue of Hello World, the magazine about computing and digital making for educators

Thanks to the very generous support of our sponsors BT, we are also offering the magazine in a beautiful print version, delivered for free to the homes of serving educators in the UK.

Papert’s legacy 

This first issue is dedicated to Seymour Papert, in many ways the godfather of computing education. Papert was the creator of the Logo programming language and the author of some of the most important research on the role of computers in education. It will come at no surprise that his legacy has a big influence on our work at the Raspberry Pi Foundation, not least because one of our co-founders, Jack Lang, did a summer internship with Papert.

Seymour Papert

Seymour Papert with one of his computer games at the MIT Media Lab
Credit: Steve Liss/The Life Images Collection/Getty Images

Inside you’ll find articles exploring Papert’s influence on how we think about learning, on the rise of the maker movement, and on the software that is used to teach computing today from Scratch to Greenfoot.

Get involved

We will publish three issues of Hello World a year, timed to coincide with the start of the school terms here in the UK. We’d love to hear your feedback on this first issue, and please let us know what you’d like to see covered in future issues too.

The magazine is by educators, for educators. So if you have experience, insights or practical examples that you can share, get in touch: contact@helloworld.cc.

The post Hello World – a new magazine for educators appeared first on Raspberry Pi.

Researchers Issue Security Warning Over Android VPN Apps

$
0
0

Post Syndicated from Andy original https://torrentfreak.com/researchers-issue-security-warning-over-android-vpn-apps-170125/

warningThere was a time when the Internet was a fairly straightforward place to navigate, with basic software, basic websites and few major security issues. Over the years, however, things have drastically changed.

Many people now spend their entire lives connected to the web in some way, particularly via mobile devices and apps such as Facebook and the countless thousands of others now freely available online.

For some users, the idea of encrypting their traffic has become attractive, from both a security and anti-censorship standpoint. On the one hand people like the idea of private communications and on the other, encryption can enable people to bypass website blocks, wherever they may occur and for whatever reason.

As a result, millions are now turning to premium VPN packages from reputable companies. Others, however, prefer to use the all-in-one options available on Google’s Play store, but according to a new study, that could be a risky strategy.

A study by researchers at CSIRO’s Data 61, University of New South Wales, and UC Berkley, has found that hundreds of VPN apps available from Google Play presented significant security issues including malware, spyware, adware and data leaks.

Very often, users look at the number of downloads combined with the ‘star rating’ of apps to work out whether they’re getting a good product. However, the researchers found that among the 283 apps tested, even the highest ranked and most-downloaded apps can carry nasty surprises.

“While 37% of the analyzed VPN apps have more than 500K installs and 25% of them receive at least a 4-star rating, over 38% of them contain some malware presence according to VirusTotal,” the researchers write.

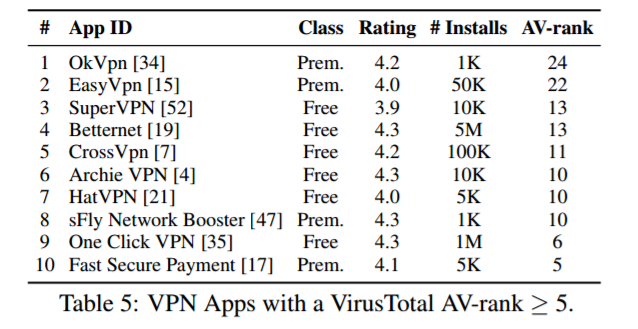
The five types of malware detected can be broken down as follows: Adware (43%), Trojan (29%), Malvertising (17%), Riskware (6%) and Spyware (5%). The researchers ordered the most problematic apps by VirusTotal AV-Rank, which represents the number of anti-virus tools that identified any malware activity.

The worst offenders, according to the reportvpn-worst

The researchers found that only a marginal number of VPN users raised any security or privacy concerns in the review sections for each app, despite many of them having serious problems. The high number of downloads seem to suggest that users have confidence in them, despite their issues.

“According to the number of installs of these apps, millions of users appear to trust VPN apps despite their potential maliciousness. In fact, the high presence of malware activity in VPN apps that our analysis has revealed is worrisome given the ability that these apps already have to inspect and analyze all user’s traffic with the VPN permission,” the paper reads.

The growing awareness of VPNs and their association with privacy and security has been a hot topic in recent years, but the researchers found that many of the apps available on Google Play offer neither. Instead, they featured tracking of users by third parties while demanding access to sensitive Android permissions.

“Even though 67% of the identified VPN Android apps offer services to enhance online privacy and security, 75% of them use third-party tracking libraries and 82% request permissions to access sensitive resources including user accounts and text messages,” the researchers note.

Even from this low point, things manage to get worse. Many VPN users associate the product they’re using with encryption and the privacy it brings, but for almost one-fifth of apps tested by the researchers, the concept is alien.

“18% of the VPN apps implement tunneling protocols without encryption despite promising online anonymity and security to their users,” they write, adding that 16% of tested apps routed traffic through other users of the same app rather than utilizing dedicated online servers.

“This forwarding model raises a number of trust, security, and privacy concerns for participating users,” the researchers add, noting that only Hola admits to the practice on its website.

And when it comes to the handling of IPv6 traffic, the majority of the apps featured in the study fell short in a dramatic way. Around 84% of the VPN apps tested had IPv6 leaks while 66% had DNS leaks, something the researchers put down to misconfigurations or developer-induced errors.

“Both the lack of strong encryption and traffic leakages can ease online tracking activities performed by inpath middleboxes (e.g., commercial WiFi [Access Points] harvesting user’s data) and by surveillance agencies,” they warn.

While the study (pdf) is detailed, it does not attempt to rank any of the applications tested, other than showing a table of some of the worst offenders. From the perspective of the consumer looking to install a good VPN app, that’s possibly not as helpful as they might like.

Instead, those looking for a VPN will have to carry out their own research online before taking the plunge. Sticking with well-known companies that are transparent about their practices is a great start. And, if an app requests access to sensitive data during the install process for no good reason, get rid of it. Finally, if it’s a free app with a free service included, it’s a fair assumption that strings may be attached.

Source: TF, for the latest info on copyright, file-sharing, torrent sites and ANONYMOUS VPN services.

AWS Web Application Firewall (WAF) for Application Load Balancers

$
0
0

Post Syndicated from Jeff Barr original https://aws.amazon.com/blogs/aws/aws-web-application-firewall-waf-for-application-load-balancers/

I’m still catching up on a couple of launches that we made late last year!

Today’s post covers two services that I’ve written about in the past — AWS Web Application Firewall (WAF) and AWS Application Load Balancer:

AWS Web Application Firewall (WAF) – Helps to protect your web applications from common application-layer exploits that can affect availability or consume excessive resources. As you can see in my post (New – AWS WAF), WAF allows you to use access control lists (ACLs), rules, and conditions that define acceptable or unacceptable requests or IP addresses. You can selectively allow or deny access to specific parts of your web application and you can also guard against various SQL injection attacks. We launched WAF with support for Amazon CloudFront.

AWS Application Load Balancer (ALB) – This load balancing option for the Elastic Load Balancing service runs at the application layer. It allows you to define routing rules that are based on content that can span multiple containers or EC2 instances. Application Load Balancers support HTTP/2 and WebSocket, and give you additional visibility into the health of the target containers and instances (to learn more, read New – AWS Application Load Balancer).

Better Together
Late last year (I told you I am still catching up), we announced that WAF can now help to protect applications that are running behind an Application Load Balancer. You can set this up pretty quickly and you can protect both internal and external applications and web services.

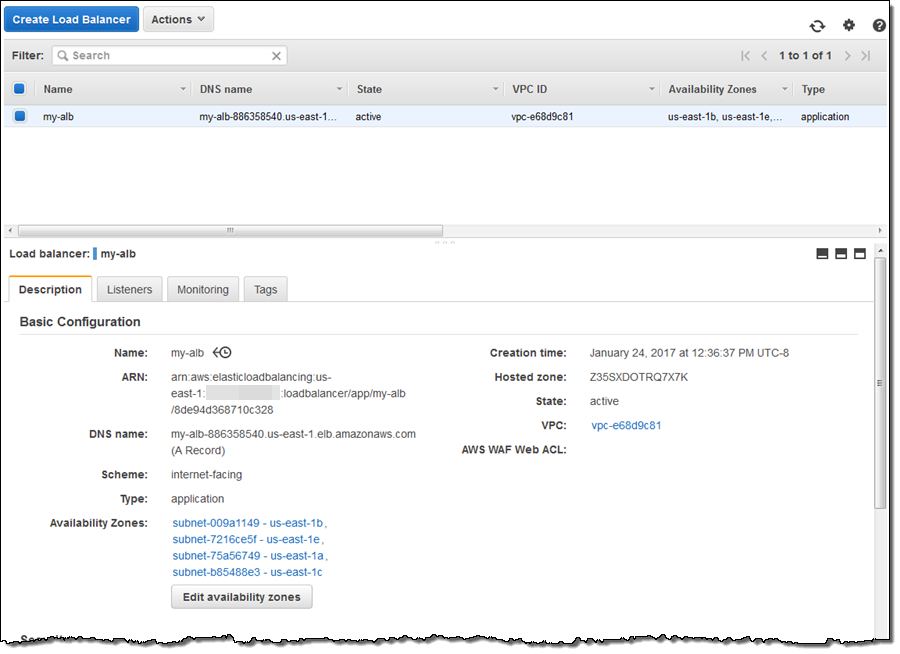
I already have three EC2 instances behind an ALB:

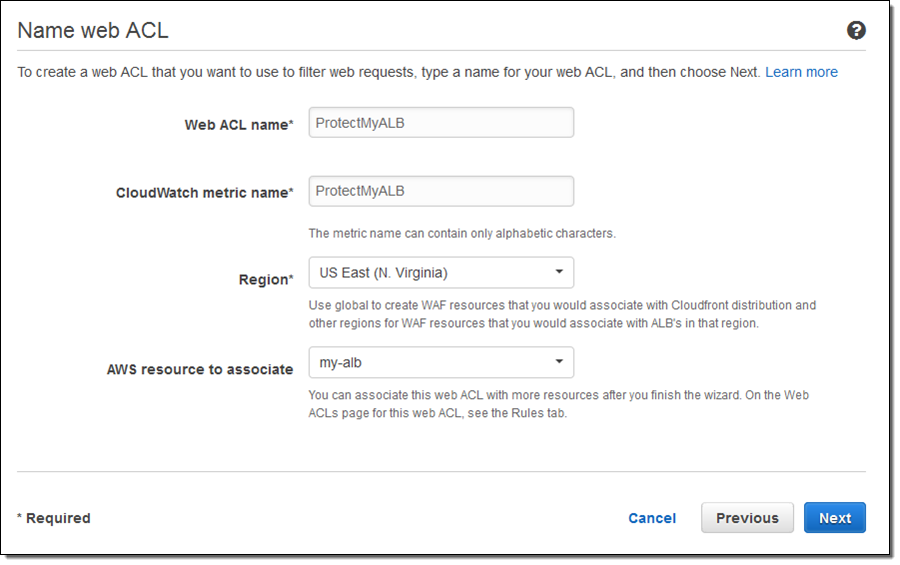
I simple create a Web ACL in the same region and associate it with the ALB. I begin by naming the Web ACL. I also instruct WAF to publish to a designated CloudWatch metric:

Then I add any desired conditions to my Web ACL:

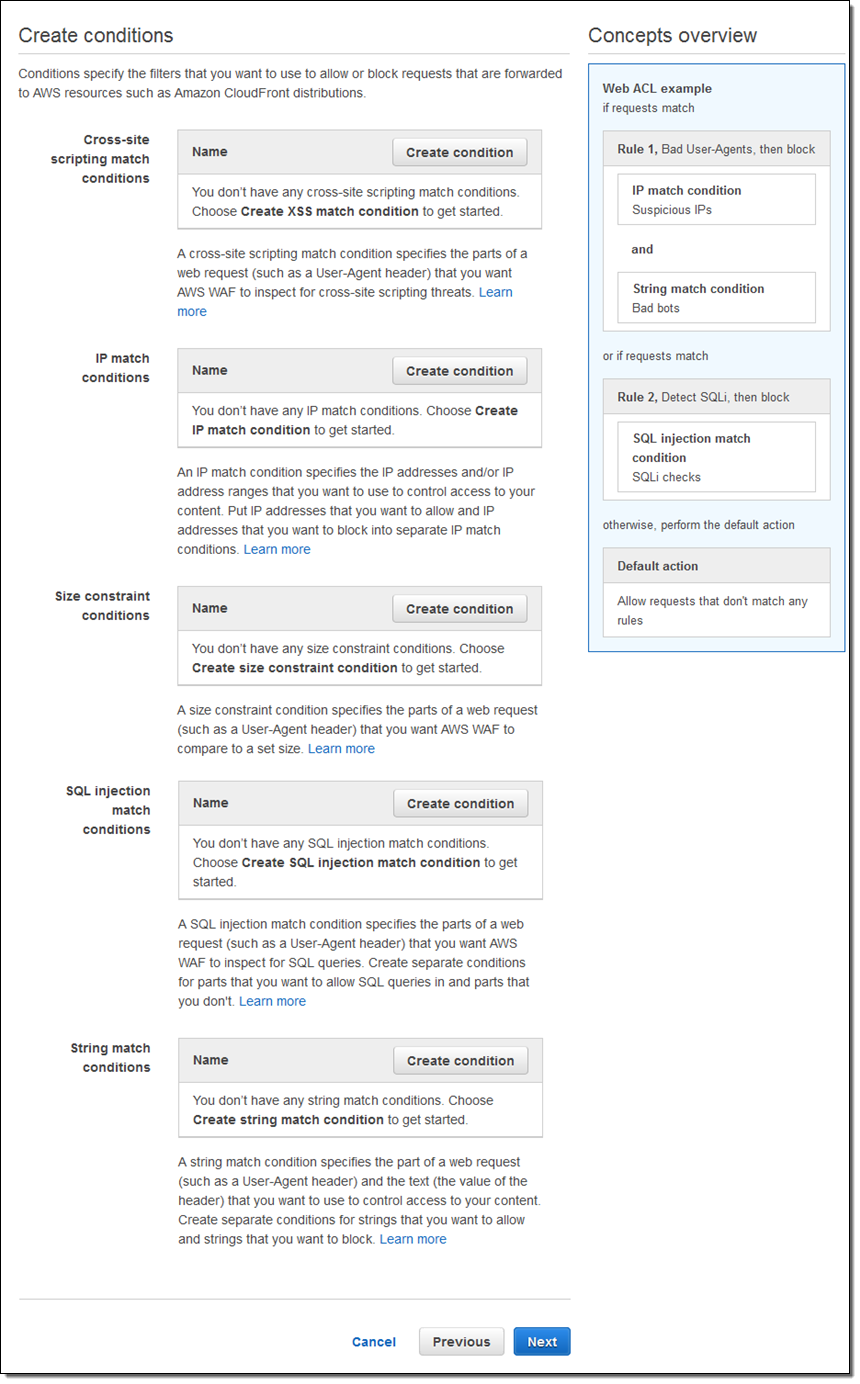
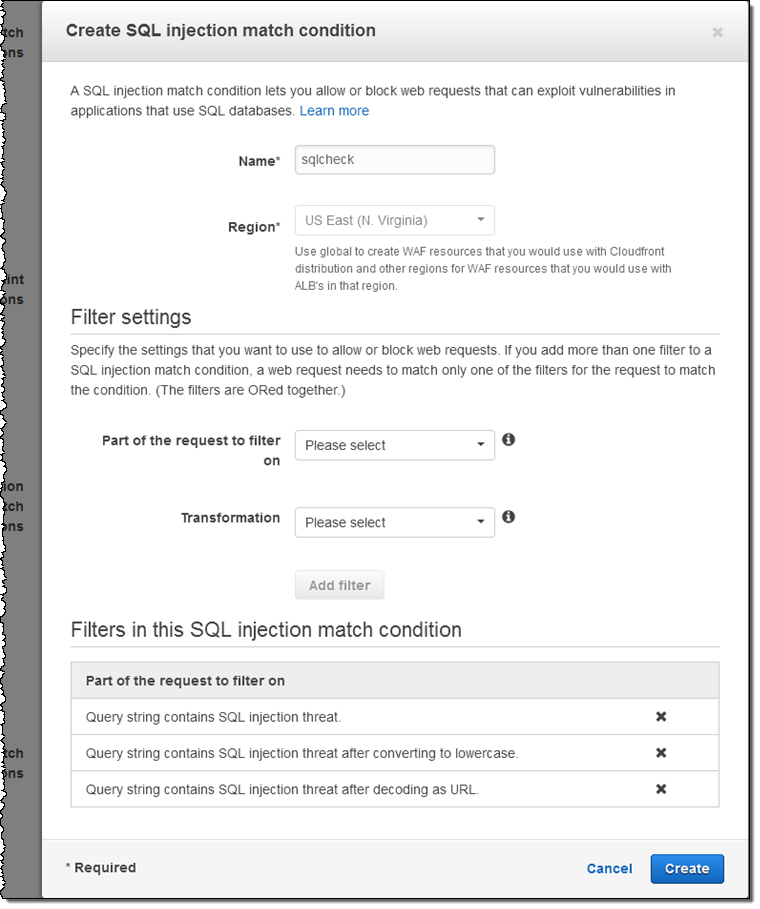
For example, I can easily set up several SQL injection filters for the query string:

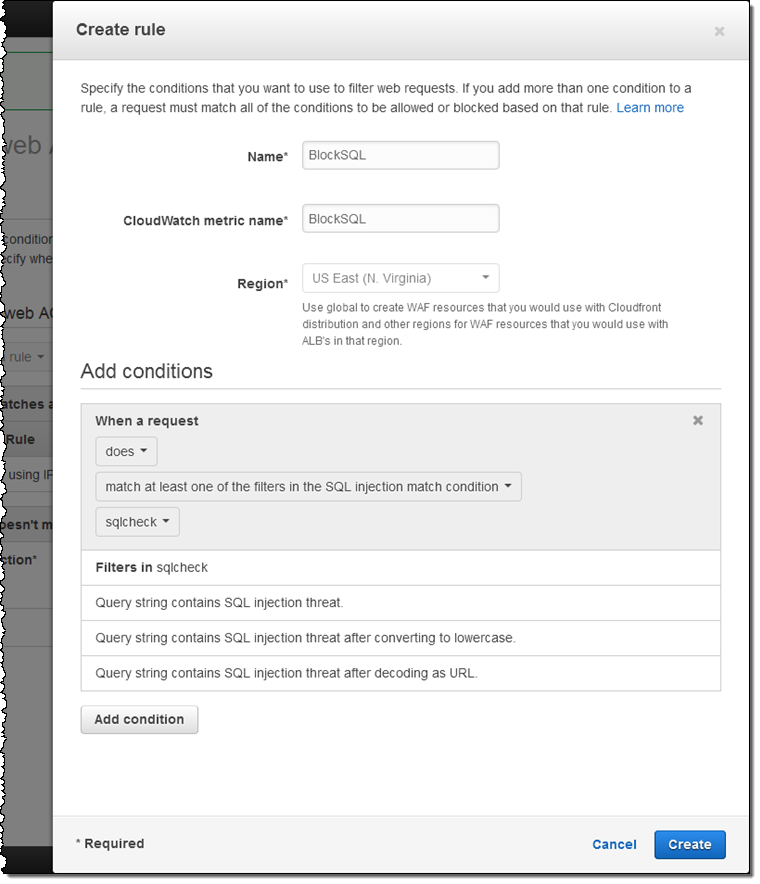
After I create the filter I use it to create a rule:

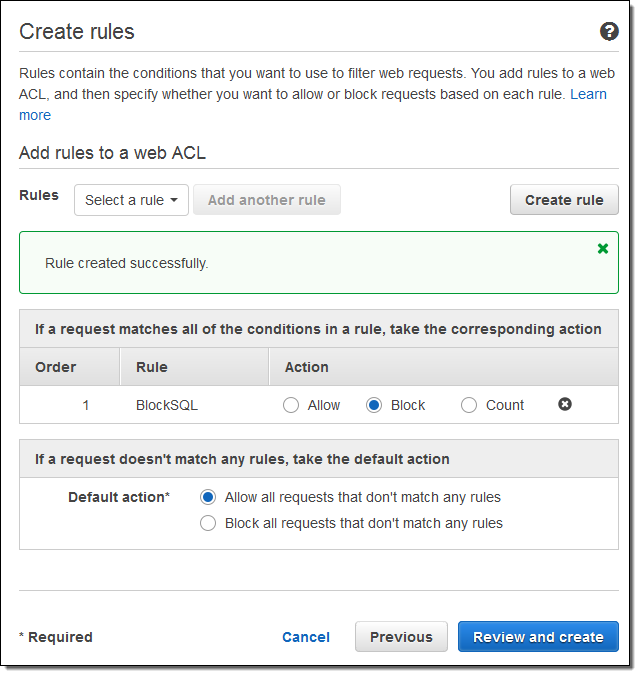
And then I use the rule to block requests that match the condition:

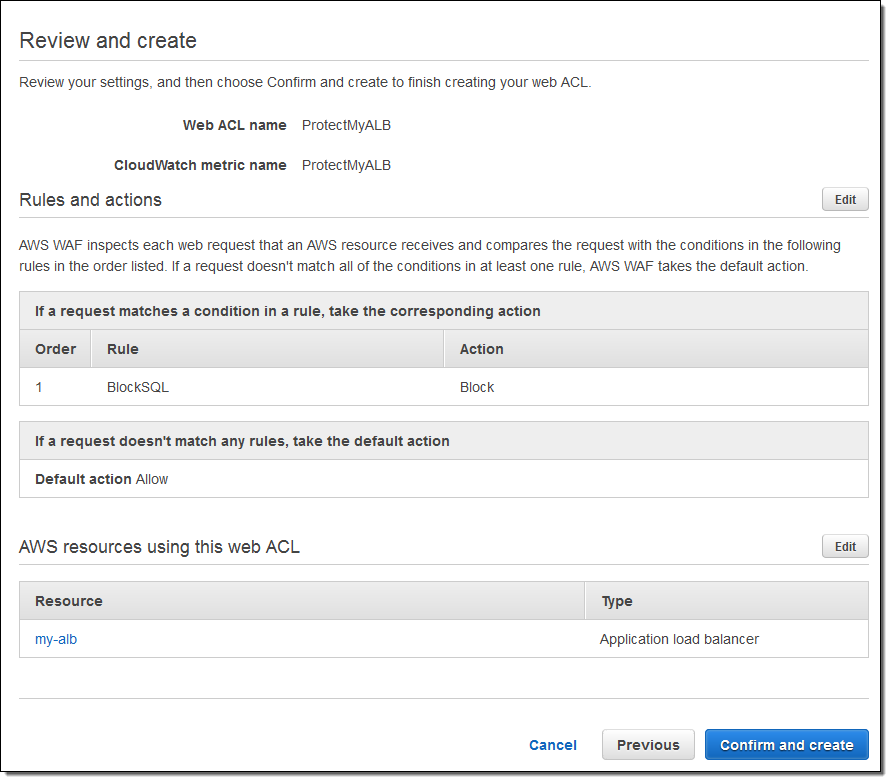
To pull it all together I review my settings and then create the Web ACL:

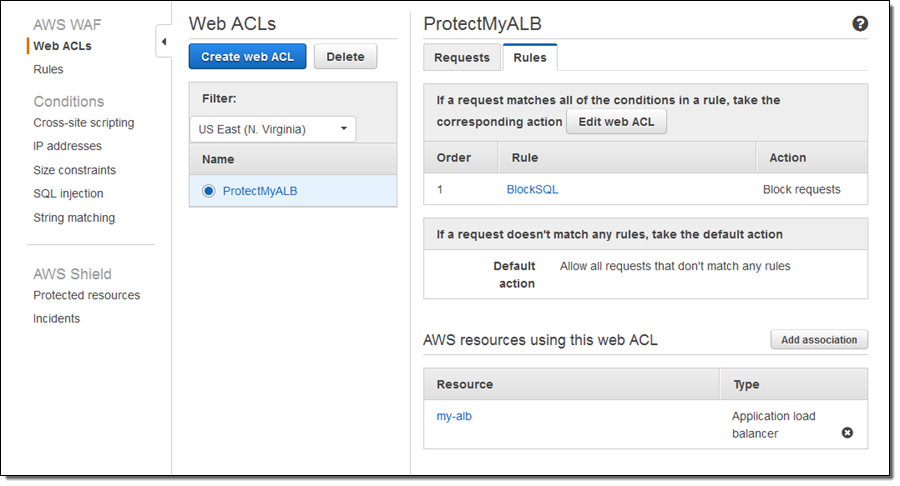
Seconds after I click on Confirm and create, the new rule is active and WAF is protecting the application behind my ALB:

And that’s all it takes to use WAF to protect the EC2 instances and containers that are running behind an Application Load Balancer!

Learn More
To learn more about how to use WAF and ALB together, plan to attend the Secure Your Web Applications Using AWS WAF and Application Load Balancer webinar at 10 AM PT on January 26th.

You may also find the Secure Your Web Application With AWS WAF and Amazon CloudFront presentation from re:Invent to be of interest.

Jeff;


Run Mixed Workloads with Amazon Redshift Workload Management

$
0
0

Post Syndicated from Suresh Akena original https://aws.amazon.com/blogs/big-data/run-mixed-workloads-with-amazon-redshift-workload-management/

Mixed workloads run batch and interactive workloads (short-running and long-running queries or reports) concurrently to support business needs or demand. Typically, managing and configuring mixed workloads requires a thorough understanding of access patterns, how the system resources are being used and performance requirements.

It’s common for mixed workloads to have some processes that require higher priority than others. Sometimes, this means a certain job must complete within a given SLA. Other times, this means you only want to prevent a non-critical reporting workload from consuming too many cluster resources at any one time.

Without workload management (WLM), each query is prioritized equally, which can cause a person, team, or workload to consume excessive cluster resources for a process which isn’t as valuable as other more business-critical jobs.

This post provides guidelines on common WLM patterns and shows how you can use WLM query insights to optimize configuration in production workloads.

Workload concepts

You can use WLM to define the separation of business concerns and to prioritize the different types of concurrently running queries in the system:

  • Interactive: Software that accepts input from humans as it runs. Interactive software includes most popular programs, such as BI tools or reporting applications.
    • Short-running, read-only user queries such as Tableau dashboard query with low latency requirements.
    • Long-running, read-only user queries such as a complex structured report that aggregates the last 10 years of sales data.
  • Batch: Execution of a job series in a server program without manual intervention (non-interactive). The execution of a series of programs, on a set or “batch” of inputs, rather than a single input, would instead be a custom job.
    • Batch queries includes bulk INSERT, UPDATE, and DELETE transactions, for example, ETL or ELT programs.

Amazon Redshift Workload Management

Amazon Redshift is a fully managed, petabyte scale, columnar, massively parallel data warehouse that offers scalability, security and high performance. Amazon Redshift provides an industry standard JDBC/ODBC driver interface, which allows customers to connect their existing business intelligence tools and re-use existing analytics queries.

Amazon Redshift is a good fit for any type of analytical data model, for example, star and snowflake schemas, or simple de-normalized tables.

Managing workloads

Amazon Redshift Workload Management allows you to manage workloads of various sizes and complexity for specific environments. Parameter groups contain WLM configuration, which determines how many query queues are available for processing and how queries are routed to those queues. The default parameter group settings are not configurable. Create a custom parameter group to modify the settings in that group, and then associate it with your cluster. The following settings can be configured:

  • How many queries can run concurrently in each queue
  • How much memory is allocated among the queues
  • How queries are routed to queues, based on criteria such as the user who is running the query or a query label
  • Query timeout settings for a queue

When the user runs a query, WLM assigns the query to the first matching queue and executes rules based on the WLM configuration. For more information about WLM query queues, concurrency, user groups, query groups, timeout configuration, and queue hopping capability, see Defining Query Queues. For more information about the configuration properties that can be changed dynamically, see WLM Dynamic and Static Configuration Properties.

For example, the WLM configuration in the following screenshot has three queues to support ETL, BI, and other users. ETL jobs are assigned to the long-running queue and BI queries to the short-running queue. Other user queries are executed in the default queue.

Redshift_Workload_1

Guidelines on WLM optimal cluster configuration

1. Separate the business concerns and run queries independently from each other

Create independent queues to support different business processes, such as dashboard queries and ETL. For example, creating a separate queue for one-time queries would be a good solution so that they don’t block more important ETL jobs.

Additionally, because faster queries typically use a smaller amount of memory, you can set a low percentage for WLM memory percent to use for that one-time user queue or query group.

2. Rotate the concurrency and memory allocations based on the access patterns (if applicable)

In traditional data management, ETL jobs pull the data from the source systems in a specific batch window, transform, and then load the data into the target data warehouse. In this approach, you can allocate more concurrency and memory to the BI_USER group and very limited resources to ETL_USER during business hours. After hours, you can dynamically allocate or switch the resources to ETL_USER without rebooting the cluster so that heavy, resource-intensive jobs complete very quickly.

Note: The example AWS CLI command is shown on several lines for demonstration purposes. Actual commands should not have line breaks and must be submitted as a single line. The following JSON configuration requires escaped quotes.

Redshift_Workload_2

To change WLM settings dynamically, AWS recommends a scheduled Lambda function or scheduled data pipeline (ShellCmd).

3. Use queue hopping to optimize or support mixed workload (ETL and BI workload) continuously

WLM queue hopping allows read-only queries (BI_USER queries) to move from one queue to another queue without cancelling them completely. For example, as shown in the following screenshot, you can create two queues—one with a 60-second timeout for interactive queries and another with no timeout for batch queries—and add the same user group, BI_USER, to each queue. WLM automatically re-routes any only BI_USER timed-out queries in the interactive queue to the batch queue and restarts them.

Redshift_Workload_3

In this example, the ETL workload does not block the BI workload queries and the BI workload is eventually classified as batch, so that long-running, read-only queries do not block the execution of quick-running queries from the same user group.

4. Increase the slot count temporarily for resource-intensive ETL or batch queries

Amazon Redshift writes intermediate results to the disk to help prevent out-of-memory errors, but the disk I/O can degrade the performance. The following query shows if any active queries are currently running on disk:

SELECT query, label, is_diskbased FROM svv_query_state
WHERE is_diskbased = 't';

Query results:

query | label        | is_diskbased
-------+--------------+--------------
1025   | hash tbl=142 |      t

Typically, hashes, aggregates, and sort operators are likely to write data to disk if the system doesn’t have enough memory allocated for query processing. To fix this issue, allocate more memory to the query by temporarily increasing the number of query slots that it uses. For example, a queue with a concurrency level of 4 has 4 slots. When the slot count is set to 4, a single query uses the entire available memory of that queue. Note that assigning several slots to one query consumes the concurrency and blocks other queries from being able to run.

In the following example, I set the slot count to 4 before running the query and then reset the slot count back to 1 after the query finishes.

set wlm_query_slot_count to 4;
select
	p_brand,
	p_type,
	p_size,
	count(distinct ps_suppkey) as supplier_cnt
from
	partsupp,
	part
where
	p_partkey = ps_partkey
	and p_brand <> 'Brand#21'
	and p_type not like 'LARGE POLISHED%'
	and p_size in (26, 40, 28, 23, 17, 41, 2, 20)
	and ps_suppkey not in (
		select
			s_suppk
                                  from
			supplier
		where
			s_comment like '%Customer%Complaints%'
	)
group by
	p_brand,
	p_type,
	p_size
order by
	supplier_cnt desc,
	p_brand,
	p_type,
	p_size;

set wlm_query_slot_count to 1; -- after query completion, resetting slot count back to 1

Note:  The above TPC data set query is used for illustration purposes only.

Example insights from WLM queries

The following example queries can help answer questions you might have about your workloads:

  • What is the current query queue configuration? What is the number of query slots and the time out defined for each queue?
  • How many queries are executed, queued and executing per query queue?
  • What is my workload look like for each query queue per hour? Do I need to change my configuration based on the load?
  • How is my existing WLM configuration working? What query queues should be optimized to meet the business demand?

WLM configures query queues according to internally-defined WLM service classes. The terms queue and service class are often used interchangeably in the system tables.

Amazon Redshift creates several internal queues according to these service classes along with the queues defined in the WLM configuration. Each service class has a unique ID. Service classes 1-4 are reserved for system use and the superuser queue uses service class 5. User-defined queues use service class 6 and greater.

Query: Existing WLM configuration

Run the following query to check the existing WLM configuration. Four queues are configured and every queue is assigned to a number. In the query, queue number is mapped to service_class (Queue #1 => ETL_USER=>Service class 6) with the evictable flag set to false (no query timeout defined).

select service_class, num_query_tasks, evictable, eviction_threshold, name
from stv_wlm_service_class_config
where service_class > 5;
Redshift_Workload_4

The query above provides information about the current WLM configuration. This query can be automated using Lambda and send notifications to the operations team whenever there is a change to WLM.

Query: Queue state

Run the following query to monitor the state of the queues, the memory allocation for each queue and the number of queries executed in each queue. The query provides information about the custom queues and the superuser queue.

select config.service_class, config.name
, trim (class.condition) as description
, config.num_query_tasks as slots
, config.max_execution_time as max_time
, state.num_queued_queries queued
, state.num_executing_queries executing
, state.num_executed_queries executed
from
STV_WLM_CLASSIFICATION_CONFIG class,
STV_WLM_SERVICE_CLASS_CONFIG config,
STV_WLM_SERVICE_CLASS_STATE state
where
class.action_service_class = config.service_class
and class.action_service_class = state.service_class
and config.service_class > 5
order by config.service_class;

Redshift_Workload_5

Service class 9 is not being used in the above results. This would allow you to configure minimum possible resources (concurrency and memory) for default queue. Service class 6, etl_group, has executed more queries so you may configure or re-assign more memory and concurrency for this group.

Query: After the last cluster restart

The following query shows the number of queries that are either executing or have completed executing by service class after the last cluster restart.

select service_class, num_executing_queries,  num_executed_queries
from stv_wlm_service_class_state
where service_class >5
order by service_class;

Redshift_Workload_6
Service class 9 is not being used in the above results. Service class 6, etl_group, has executed more queries than any other service class. You may want configure more memory and concurrency for this group to speed up query processing.

Query: Hourly workload for each WLM query queue

The following query returns the hourly workload for each WLM query queue. Use this query to fine-tune WLM queues that contain too many or too few slots, resulting in WLM queuing or unutilized cluster memory. You can copy this query (wlm_apex_hourly.sql) from the amazon-redshift-utils GitHub repo.

WITH
        -- Replace STL_SCAN in generate_dt_series with another table which has > 604800 rows if STL_SCAN does not
        generate_dt_series AS (select sysdate - (n * interval '1 second') as dt from (select row_number() over () as n from stl_scan limit 604800)),
        apex AS (SELECT iq.dt, iq.service_class, iq.num_query_tasks, count(iq.slot_count) as service_class_queries, sum(iq.slot_count) as service_class_slots
                FROM
                (select gds.dt, wq.service_class, wscc.num_query_tasks, wq.slot_count
                FROM stl_wlm_query wq
                JOIN stv_wlm_service_class_config wscc ON (wscc.service_class = wq.service_class AND wscc.service_class > 4)
                JOIN generate_dt_series gds ON (wq.service_class_start_time <= gds.dt AND wq.service_class_end_time > gds.dt)
                WHERE wq.userid > 1 AND wq.service_class > 4) iq
        GROUP BY iq.dt, iq.service_class, iq.num_query_tasks),
        maxes as (SELECT apex.service_class, trunc(apex.dt) as d, date_part(h,apex.dt) as dt_h, max(service_class_slots) max_service_class_slots
                        from apex group by apex.service_class, apex.dt, date_part(h,apex.dt))
SELECT apex.service_class, apex.num_query_tasks as max_wlm_concurrency, maxes.d as day, maxes.dt_h || ':00 - ' || maxes.dt_h || ':59' as hour, MAX(apex.service_class_slots) as max_service_class_slots
FROM apex
JOIN maxes ON (apex.service_class = maxes.service_class AND apex.service_class_slots = maxes.max_service_class_slots)
GROUP BY  apex.service_class, apex.num_query_tasks, maxes.d, maxes.dt_h
ORDER BY apex.service_class, maxes.d, maxes.dt_h;

For the purposes of this post, the results are broken down by service class.

Redshift_Workload_7

In the above results, service class#6 seems to be utilized consistently up to 8 slots in 24 hrs. Looking at these numbers, no change is required for this service class at this point.

Redshift_Workload_8

Service class#7 can be optimized based on the above results. Two observations to note:

  • 6am- 3pm or 6pm- 6am (next day): The maximum number of slots used is 3. There is an opportunity to rotate concurrency and memory allocation based on these access patterns. For more information about how to rotate resources dynamically, see the guidelines section earlier in the post.
  • 3pm-6pm: Peak is observed during this period. You can leave the existing configuration during this time.

Summary

Amazon Redshift is a powerful, fully managed data warehouse that can offer significantly increased performance and lower cost in the cloud. Using the WLM feature, you can ensure that different users and processes running on the cluster receive the appropriate amount of resource to maximize performance and throughput.

If you have questions or suggestions, please leave a comment below.


About the Author

Suresh_90Suresh Akena is a Senior Big data/IT Transformation architect for AWS Professional Services. He works with the enterprise customers to provide leadership on large scale data strategies including migration to AWS platform, big data and analytics projects and help them to optimize and improve time to market for data driven applications when using AWS. In his spare time, he likes to play with his 8 and 3 year old daughters and watch movies.


Related


Top 10 Performance Tuning Techniques for Amazon Redshift

o_redshift_update_1


How to Automate Container Instance Draining in Amazon ECS

$
0
0

Post Syndicated from Chris Barclay original https://aws.amazon.com/blogs/compute/how-to-automate-container-instance-draining-in-amazon-ecs/

My colleague Madhuri Peri sent a nice guest post that describes how to use container instance draining to remove tasks from an instance before scaling down a cluster with Auto Scaling Groups.
—–

There are times when you might need to remove an instance from an Amazon ECS cluster; for example, to perform system updates, update the Docker daemon, or scale down the cluster size. Container instance draining enables you to remove a container instance from a cluster without impacting tasks in your cluster. It works by preventing new tasks from being scheduled for placement on the container instance while it is in the DRAINING state, replacing service tasks on other container instances in the cluster if the resources are available, and enabling you to wait until tasks have successfully moved before terminating the instance.

You can change a container instance’s state to DRAINING manually, but in this post, I demonstrate how to use container instance draining with Auto Scaling groups and AWS Lambda to automate the process.

Amazon ECS overview

Amazon ECS is a container management service that makes it easy to run, stop, and manage Docker containers on a cluster, or logical grouping of EC2 instances. When you run tasks using ECS, you place them on a cluster. Amazon ECS downloads your container images from a registry that you specify, and runs those images on the container instances within your cluster.

Using the container instance draining state

Auto Scaling groups support lifecycle hooks that can be invoked to allow custom processes to finish before instances launch or terminate. For this example, the lifecycle hook invokes a Lambda function that performs two tasks:

  1. Sets the ECS container instance state to DRAINING.
  2. Checks if there are any tasks left on the container instance. If there are running tasks still in process of draining, it posts a message to SNS so that the Lambda function is called again.

Lambda repeats step 2 until there are no tasks running on the container instance OR the heartbeat timeout on the lifecycle hook is reached (set to TTL 15 minutes in the sample CloudFormation template), whichever occurs first. Afterward, control is returned to the Auto Scaling lifecycle hook, and the instance terminates. This process is shown in the following diagram:

Try it out!

Use the CloudFormation template to set up the resources described in this post. To use the CloudFormation template you will need to upload the Lambda deployment package to an S3 bucket in your account. This template creates the following resources:

  • The VPC and associated network elements (subnets, security groups, route table, etc.)
  • An ECS cluster, ECS service, and sample ECS task definition
  • An Auto Scaling group with two EC2 instances and a termination lifecycle hook
  • A Lambda function
  • An SNS topic
  • IAM roles for Lambda to execute

Create the CloudFormation stack and then see how this works by triggering an instance termination event.

In the Amazon EC2 console, choose Auto Scaling Groups and select the name of the Auto Scaling group created by CloudFormation (from the resources section of the CloudFormation template).

Select Actions, Edit and update the service to reduce the desired number of instances by “1”. This initiates one of the instances’ termination process.

Select the Auto Scaling group Instances tab; one instance state value should show the lifecycle state “Terminating:Wait”.

This is when the lifecycle hook gets activated and posts a message to SNS. The Lambda function is then executed in response to the SNS message trigger.

The Lambda function changes the ECS container instance state to DRAINING. The ECS service scheduler then stop the tasks on the instance and starts tasks on an available instance.

You can go to the ECS console to confirm that the container instance state is DRAINING.

After the tasks have drained, the Auto Scaling group activity history confirms that the EC2 instance is terminated.

How it works

Take a moment to see the inner workings of the Lambda function. The function first checks to see if the event received has a LifecycleTransition value matching autoscaling:EC2_INSTANCE_TERMINATING.

# If the event received is instance terminating...
if 'LifecycleTransition' in message.keys():
print("message autoscaling {}".format(message['LifecycleTransition']))
if message['LifecycleTransition'].find('autoscaling:EC2_INSTANCE_TERMINATING') > -1:

If there is a match, it proceeds to call the function “checkContainerInstanceTaskStatus”. This function gets the container instance ID of the EC2 instance ID received, and sets the container instance state to ‘DRAINING’.

# Get lifecycle hook name
lifecycleHookName = message['LifecycleHookName']
print("Setting lifecycle hook name {} ".format(lifecycleHookName))

# Check if there are any tasks running on the instance
tasksRunning = checkContainerInstanceTaskStatus(Ec2InstanceId)

It then checks to see if there are tasks running on the instance. If there are tasks, it publishes a message to the SNS topic to trigger the Lambda function again and then exits.

# Use Task ARNs to get describe tasks
descTaskResp = ecsClient.describe_tasks(cluster=clusterName, tasks=listTaskResp['taskArns'])
for key in descTaskResp['tasks']:
print("Task status {}".format(key['lastStatus']))
print("Container instance ARN {}".format(key['containerInstanceArn']))
print("Task ARN {}".format(key['taskArn']))

# Check if any tasks are running
if len(descTaskResp['tasks']) > 0:
print("Tasks are still running..")
return 1
else:
print("NO tasks are on this instance {}..".format(Ec2InstanceId))
return 0

When the Lambda function sees that no more tasks are running on the container instance, it proceeds to complete the lifecycle hook and terminate the EC2 instance.

#Complete lifecycle hook.
try:
response = asgClient.complete_lifecycle_action(
LifecycleHookName=lifecycleHookName,
AutoScalingGroupName=asgGroupName,
LifecycleActionResult='CONTINUE',
InstanceId=Ec2InstanceId)
print("Response = {}".format(response))
print("Completedlifecycle hook action")
except Exception, e:
print(str(e))

Conclusion

Container instance draining simplifies cluster scale-down and operational activities such as new AMI rollouts. For example, with the integration described in this post, you could use CloudFormation and CodePipeline to create a rolling deployment that launches new instances and terminates instances in batches.

To learn more about container instance draining, see the Amazon ECS Developer Guide.

If you have questions or suggestions, please comment below.

Is ‘aqenbpuu’ a bad password?

$
0
0

Post Syndicated from Robert Graham original http://blog.erratasec.com/2017/01/is-aqenbpuu-bad-password.html

Press secretary Sean Spicer has twice tweeted a random string, leading people to suspect he’s accidentally tweeted his Twitter password. One of these was ‘aqenbpuu’, which some have described as a “shitty password“. Is is actually bad?

No. It’s adequate. Not the best, perhaps, but not “shitty”.

It depends upon your threat model. The common threats are password reuse and phishing, where the strength doesn’t matter. When the strength does matter is when Twitter gets hacked and the password hashes stolen.

Twitter uses the bcrypt password hashing technique, which is designed to be slow. A typical desktop with a GPU can only crack bcrypt passwords at a rate of around 321 hashes-per-second. Doing the math (26 to the power of 8, divided by 321, divided by one day) it will take 20 years for this desktop to crack the password.

That’s not a good password. A botnet with thousands of desktops, or a somebody willing to invest thousands of dollars on a supercomputer or cluster like Amazon’s, can crack that password in a few days.

But, it’s not a bad password, either. A hack of a Twitter account like this would be a minor event. It’s not worth somebody spending that much resources hacking. Security is a tradeoff — you protect a ton of gold with Ft. Knox like protections, but you wouldn’t invest the same amount protecting a ton of wood. The same is true with passwords — as long as you don’t reuse your passwords, or fall victim to phishing, eight lower case characters is adequate.

This is especially true if using two-factor authentication, in which case, such a password is more than adequate.

I point this out because the Trump administration is bad, and Sean Spicer is a liar. Our criticism needs to be limited to things we can support, such as the DC metro ridership numbers (which Spicer has still not corrected). Every time we weakly criticize the administration on things we cannot support, like “shitty passwords”, we lessen our credibility. We look more like people who will hate the administration no matter what they do, rather than people who are standing up for principles like “honesty”.


The numbers above aren’t approximations. I actually generated a bcrypt hash and attempted to crack it in order to benchmark how long this would take. I’ll describe the process here.

First of all, I installed the “PHP command-line”. While older versions of PHP used MD5 for hashing, the newer versions use Bcrypt.

# apt-get install php5-cli

I then created a PHP program that will hash the password:

I actually use it three ways. The first way is to hash a small password “ax”, one short enough that the password cracker will actually succeed in hashing. The second is to hash the password with PHP defaults, which is what I assume Twitter is using. The third is to increase the difficulty level, in case Twitter has increased the default difficulty level at all in order to protect weak passwords.

I then ran the PHP script, producing these hashes:
$ php spicer.php
$2y$10$1BfTonhKWDN23cGWKpX3YuBSj5Us3eeLzeUsfylemU0PK4JFr4moa
$2y$10$DKe2N/shCIU.jSfSr5iWi.jH0AxduXdlMjWDRvNxIgDU3Cyjizgzu
$2y$15$HKcSh42d8amewd2QLvRWn.wttbz/B8Sm656Xh6ZWQ4a0u6LZaxyH6

I ran the first one through the password cracking known as “Hashcat”. Within seconds, I get the correct password “ax”. Thus, I know Hashcat is correctly cracking the password. I actually had a little doubt, because the documentation doesn’t make it clear that the Bcrypt algorithm the program supports is the same as the one produced by PHP5.

I run the second one, and get the following speed statistics:

As you can seem, I’m brute-forcing an eight character password that’s all lower case (-a 3 ?l?l?l?l?l?l?l?l). Checking the speed as it runs, it seems pretty consistently slightly above 300 hashes/second. It’s not perfect — it keeps warning that it’s slow. This is because the GPU acceleration works best if trying many password hashes at a time.

I tried the same sort of setup using John-the-Ripper in incremental mode. Whereas Hashcat uses the GPU, John uses the CPU. I have a 6-core Broadwell CPU, so I ran John-the-Ripper with 12 threads.

Curiously, it’s slightly faster, at 347 hashes-per-second on the CPU rather than 321 on the GPU.

Using the stronger work factor (the third hash I produced above), I get about 10 hashes/second on John, and 10 on Hashcat as well. It takes over a second to even generate the hash, meaning it’s probably too aggressive for a web server like Twitter to have to do that much work every time somebody logs in, so I suspect they aren’t that aggressive.

Would a massive IoT botnet help? Well, I tried out John on the Raspbery PI 3. With the same settings cracking the password (at default difficulty), I got the following:

In other words, the RPi is 35 times slower than my desktop computer at this task.

The RPi v3 has four cores and about twice the clock speed of IoT devices. So the typical IoT device would be 250 times slower than a desktop computer. This gives a good approximation of the difference in power.


So there’s this comment:

Yes, you can. So I did, described below.

Okay, so first you need to use the “Node Package Manager” to install bcrypt. The name isn’t “bcrypt”, which refers to a module that I can’t get installed on any platform. Instead, you want “bcrypt-nodejs”.

# npm install bcrypt-nodejs
bcrypt-nodejs@0.0.3 node_modules\bcrypt-nodejs

On all my platforms (Windows, Ubuntu, Raspbian) this is already installed. So now you just create a script spicer.js:

var bcrypt = require(“bcrypt-nodejs”);
console.log(bcrypt.hashSync(“aqenbpuu”);

This produces the following hash, which has the same work factor as the one generated by the PHP script above:

$2a$10$Ulbm//hEqMoco8FLRI6k8uVIrGqipeNbyU53xF2aYx3LuQ.xUEmz6

Hashcat and John then are the same speed cracking this one as the other one. The first characters $2a$ define the hash type (bcrypt). Apparently, there’s a slightly difference between that and $2y$, but that doesn’t change the analysis.


The first comment below questions the speed I get, because running Hashcat in benchmark mode, it gets much higher numbers for bcrypt.

This is actually normal, due to different iteration counts.

A bcrypt hash includes an iteration count (or more precisely, the logarithm of an iteration count). It repeats the hash that number of times. That’s what the $10$ means in the hash:

$2y$10$………

The Hashcat benchmark uses the number 5 (actually, 2^5, or 32 times) as it’s count. But the default iteration count produced by PHP and NodeJS is 10 (2^10, or 1024 times). Thus, you’d expect these hashes to run at a speed 32 times slower.

And indeed, that’s what I get. Running the benchmark on my machine, I get the following output:

Hashtype: bcrypt, Blowfish(OpenBSD)
Speed.Dev.#1…..:    10052 H/s (82.28ms)

Doing the math, dividing 1052 hashes/sec by 321 hashes/sec, I get 31.3. This is close enough to 32, the expected answer, giving the variabilities of thermal throttling, background activity on the machine, and so on.

Googling, this appears to be a common complaint. It’s be nice if it said something like ‘bcrypt[speed=5]’  or something to make this clear.


Spicer tweeted another password, “n9y25ah7”. Instead of all lower-case, this is lower-case plus digits, or 36 to the power of 8 combinations, so it’s about 13 times harder (36/26)^8, which is roughly in the same range.
BTW, there are two notes I want to make.

The first is that a good practical exercise first tries to falsify the theory. In this case, I deliberately tested whether Hashcat and John were actually cracking the right password. They were. They both successfully cracked the two character password “ax”. I also tested GPU vs. CPU. Everyone knows that GPUs are faster for password cracking, but also everyone knows that Bcrypt is designed to be hard to run on GPUs.

The second note is that everything here is already discussed in my study guide on command-lines [*]. I mention that you can run PHP on the command-line, and that you can use Hashcat and John to crack passwords. My guide isn’t complete enough to be an explanation for everything, but it’s a good discussion of where you need to end up.

The third note is that I’m not a master of any of these tools. I know enough about these tools to Google the answers, not to pull them off the top of my head. Mastery is impossible, don’t even try it. For example, bcrypt is one of many hashing algorithms, and has all by itself a lot of complexity, such as the difference between $2a$ and $2y$, or the the logarithmic iteration count. I ignored the issue of salting bcrypt altogether. So what I’m saying is that the level of proficiency you want is to be able to google the steps in solving a problem like this, not actually knowing all this off the top of your head.

Raspberry Pi at Scouts Wintercamp

$
0
0

Post Syndicated from Ben Nuttall original https://www.raspberrypi.org/blog/raspberry-pi-at-scouts-wintercamp/

As well as working with classroom teachers and supporting learning in schools, Raspberry Pi brings computing and digital making to educators and learners in all sorts of other settings. I recently attended Wintercamp, a camp for Scouts at Gilwell Park. With some help from Brian and Richard from Vodafone, I ran a Raspberry Pi activity space introducing Scouts to digital making with Raspberry Pi, using the Sense HAT, the Camera Module, and GPIO, based on some of our own learning resources.

Ben Nuttall on Twitter

Today I’m running @Raspberry_Pi activities for @UKScouting at @gpwintercamp with @VodafoneUK!

Note the plastic sheeting on the floor! Kids were dropping into our sessions all day with muddy boots, having taken part in all sorts of fun activities, indoors and out.

Ben Nuttall on Twitter

@gpwintercamp

In the UK, the Scouts have Digital Citizen and Digital Maker badges, and we’re currently working with the Scout Association to help deliver content for the Digital Maker badge, as supported by the Vodafone Foundation.

The activities we ran were just a gentle introduction to creative tech and experimenting with sensors, but they went down really well, and many of the participants felt happy to move beyond the worksheets and try out their own ideas. We set challenges, and got them to think about how they could incorporate technology like this into their Scouting activities.

Having been through the Scouting movement myself, it’s amazing to be involved in working to show young people how technology can be applied to projects related to their other hobbies and interests. I loved introducing the Scouts to the idea that programming and making can be tools to help solve problems that are relevant to them and to others in their communities, as well as enabling them to do some good in the world, and to be creative.

Scouts coding

Ben Nuttall on Twitter

Can you breathe on the Sense HAT to make the humidity read 90?” “That’s cool. It makes you light-headed…

While conducting a survey of Raspberry Jam organisers recently, I discovered that a high proportion of those who run Jams are also involved in other youth organisations. Many were Scout leaders. Other active Pi community folk happen to be involved in Scouting too, like Brian and Richard, who helped out at the weekend, and who are Scout and Cub leaders. I’m interested to speak to anyone in the Pi community who has an affiliation with the Scouts to share ideas on how they think digital making can be incorporated in Scouting activities. Please do get in touch!

Ben Nuttall on Twitter

Not a great picture but the Scouts made a Fleur de Lys on the Sense HAT at @gpwintercamp


The timing is perfect for young people in this age group to get involved with digital making, as we’ve just launched our first Pioneers challenge. There’s plenty of scope there for outdoor tech projects.

Thanks to UK Scouting and the Wintercamp team for a great weekend. Smiles all round!

The post Raspberry Pi at Scouts Wintercamp appeared first on Raspberry Pi.

How to Detect and Automatically Remediate Unintended Permissions in Amazon S3 Object ACLs with CloudWatch Events

$
0
0

Post Syndicated from Mustafa Torun original https://aws.amazon.com/blogs/security/how-to-detect-and-automatically-remediate-unintended-permissions-in-amazon-s3-object-acls-with-cloudwatch-events/

Amazon S3 Access Control Lists (ACLs) enable you to specify permissions that grant access to S3 buckets and objects. When S3 receives a request for an object, it verifies whether the requester has the necessary access permissions in the associated ACL. For example, you could set up an ACL for an object so that only the users in your account can access it, or you could make an object public so that it can be accessed by anyone.

If the number of objects and users in your AWS account is large, ensuring that you have attached correctly configured ACLs to your objects can be a challenge. For example, what if a user were to call the PutObjectAcl API call on an object that is supposed to be private and make it public? Or, what if a user were to call the PutObject with the optional Acl parameter set to public-read, therefore uploading a confidential file as publicly readable? In this blog post, I show a solution that uses Amazon CloudWatch Events to detect PutObject and PutObjectAcl API calls in near real time and helps ensure that the objects remain private by making automatic PutObjectAcl calls, when necessary.

Note that this process is a reactive approach, a complement to the proactive approach in which you would use the AWS Identity and Access Management (IAM) policy conditions to force your users to put objects with private access (see Specifying Conditions in a Policy for more information). The reactive approach I present in this post is for “just in case” situations in which the change on the ACL is accidental and must be fixed.

Solution overview

The following diagram illustrates this post’s solution:

  1. An IAM or root user in your account makes a PutObjectAcl or PutObject call.
  2. S3 sends the corresponding API call event to both AWS CloudTrail and CloudWatch Events in near real time.
  3. A CloudWatch Events rule delivers the event to an AWS Lambda function.
  4. If the object is in a bucket in which all the objects need to be private and the object is not private anymore, the Lambda function makes a PutObjectAcl call to S3 to make the object private.

Solution diagram

To detect the PutObjectAcl call and modify the ACL on the object, I:

  1. Turn on object-level logging in CloudTrail for the buckets I want to monitor.
  2. Create an IAM execution role to be used when the Lambda function is being executed so that Lambda can make API calls to S3 on my behalf.
  3. Create a Lambda function that receives the PutObjectAcl API call event, checks whether the call is for a monitored bucket, and, if so, ensures the object is private.
  4. Create a CloudWatch Events rule that matches the PutObjectAcl API call event and invokes the Lambda function created in the previous step.

The remainder of this blog post details the steps of this solution’s deployment and the testing of its setup.

Deploying the solution

In this section, I follow the four solution steps outlined in the previous section to use CloudWatch Events to detect and fix unintended access permissions in S3 object ACLs automatically. I start with turning on object-level logging in CloudTrail for the buckets of interest.

I use the AWS CLI in this section. (To learn more about setting up the AWS CLI, see Getting Set Up with the AWS Command Line Interface.) Before you start, make sure your installed AWS CLI is up to date (specifically, you must use version 1.11.28 or newer). You can check the version of your CLI as follows.

$ aws --version

I run the following AWS CLI command to create an S3 bucket named everything-must-be-private. Remember to replace the placeholder bucket names with your own bucket names, in this instance and throughout the post (bucket names are global in S3).

$ aws s3api create-bucket \
--bucket everything-must-be-private

As the bucket name suggests, I want all the files in this bucket to be private. In the rest of this section, I detail above four steps for deploying the solution.

Step 1: Turn on object-level logging in CloudTrail for the S3 bucket

In this step, I create a CloudTrail trail and turn on object-level logging for the bucket, everything-must-be-private. My goal is to achieve the following setup, which are also illustrated in the following diagram:

  1. A requester makes an API call against this bucket.
  2. I let a CloudTrail trail named my-object-level-s3-trail receive the corresponding events.
  3. I log the events to a bucket named bucket-for-my-object-level-s3-trail and deliver them to CloudWatch Events.

Diagram2-012417-MT

First, I create a file named bucket_policy.json and populate it with the following policy. Remember to replace the placeholder account ID with your own account ID, in this instance and throughout the post.

{
    "Version": "2012-10-17",
    "Statement": [{
        "Effect": "Allow",
        "Principal": {
            "Service": "cloudtrail.amazonaws.com"
        },
        "Action": "s3:GetBucketAcl",
        "Resource": "arn:aws:s3:::bucket-for-my-object-level-s3-trail"
    }, {
        "Effect": "Allow",
        "Principal": {
            "Service": "cloudtrail.amazonaws.com"
        },
        "Action": "s3:PutObject",
        "Resource": "arn:aws:s3:::bucket-for-my-object-level-s3-trail/AWSLogs/123456789012/*",
        "Condition": {
            "StringEquals": {
                "s3:x-amz-acl": "bucket-owner-full-control"
            }
        }
    }]
}

Then, I run the following commands to create the bucket for logging with the preceding policy so that CloudTrail can deliver log files to the bucket.

$ aws s3api create-bucket \
--bucket bucket-for-my-object-level-s3-trail

$ aws s3api put-bucket-policy \
--bucket bucket-for-my-object-level-s3-trail \
--policy file://bucket_policy.json

Next, I create a trail and start logging on the trail.

$ aws cloudtrail create-trail \
--name my-object-level-s3-trail \
--s3-bucket-name bucket-for-my-object-level-s3-trail

$ aws cloudtrail start-logging \
--name my-object-level-s3-trail

I then create a file named my_event_selectors.json and populate it with the following content.

[{
        "IncludeManagementEvents": false,
        "DataResources": [{
            "Values": [
                 "arn:aws:s3:::everything-must-be-private/"
            ],
            "Type": "AWS::S3::Object"
        }],
        "ReadWriteType": "All"
}]

By default, S3 object-level operations are not logged in CloudTrail. Only bucket-level operations are logged. As a result, I finish my trail setup by creating the event selector shown previously to have the object-level operations logged in those two buckets. Note that I explicitly set IncludeManagementEvents to false because I want only object-level operations to be logged.

$ aws cloudtrail put-event-selectors \
--trail-name my-object-level-s3-trail \
--event-selectors file://my_event_selectors.json

Step 2: Create the IAM execution role for the Lambda function

In this step, I create an IAM execution role for my Lambda function. The role allows Lambda to perform S3 actions on my behalf while the function is being executed. The role also allows CreateLogGroup, CreateLogStream, and PutLogEvents CloudWatch Logs APIs so that the Lambda function can write logs for debugging.

I start with putting the following trust policy document in a file named trust_policy.json.

{
        "Version": "2012-10-17",
        "Statement": [{
            "Effect": "Allow",
            "Principal": {
                "Service": "lambda.amazonaws.com"
            },
            "Action": "sts:AssumeRole"
        }]
}

Next, I run the following command to create the IAM execution role.

$ aws iam create-role \
--role-name AllowLogsAndS3ACL \
--assume-role-policy-document file://trust_policy.json

I continue by putting the following access policy document in a file named access_policy.json.

{
        "Version": "2012-10-17",
        "Statement": [{
            "Effect": "Allow",
            "Action": [
                "s3:GetObjectAcl",
                "s3:PutObjectAcl"
            ],
            "Resource": "arn:aws:s3:::everything-must-be-private/*"
        }, {
            "Effect": "Allow",
            "Action": [
                "logs:CreateLogGroup",
                "logs:CreateLogStream",
                "logs:PutLogEvents"
            ],
            "Resource": "arn:aws:logs:*:*:*"
        }]
}

Finally, I run the following command to define the access policy for the IAM execution role I have just created.

$ aws iam put-role-policy \
--role-name AllowLogsAndS3ACL \
--policy-name AllowLogsAndS3ACL \
--policy-document file://access_policy.json

Step 3: Create a Lambda function that processes the PutObjectAcl API call event

In this step, I create the Lambda function that processes the event. It also decides whether the ACL on the object needs to be changed, and, if so, makes a PutObjectAcl call to make it private. I start with adding the following code to a file named lambda_function.py.

from __future__ import print_function

import json
import boto3

print('Loading function')

s3 = boto3.client('s3')

bucket_of_interest = "everything-must-be-private"

# For a PutObjectAcl API Event, gets the bucket and key name from the event
# If the object is not private, then it makes the object private by making a
# PutObjectAcl call.
def lambda_handler(event, context):
    # Get bucket name from the event
    bucket = event['detail']['requestParameters']['bucketName']
    if (bucket != bucket_of_interest):
        print("Doing nothing for bucket = " + bucket)
        return

    # Get key name from the event
    key = event['detail']['requestParameters']['key']

    # If object is not private then make it private
    if not (is_private(bucket, key)):
        print("Object with key=" + key + " in bucket=" + bucket + " is not private!")
        make_private(bucket, key)
    else:
        print("Object with key=" + key + " in bucket=" + bucket + " is already private.")

# Checks an object with given bucket and key is private
def is_private(bucket, key):
    # Get the object ACL from S3
    acl = s3.get_object_acl(Bucket=bucket, Key=key)

    # Private object should have only one grant which is the owner of the object
    if (len(acl['Grants']) > 1):
        return False

    # If canonical owner and grantee ids do no match, then conclude that the object
    # is not private
    owner_id = acl['Owner']['ID']
    grantee_id = acl['Grants'][0]['Grantee']['ID']
    if (owner_id != grantee_id):
        return False
    return True

# Makes an object with given bucket and key private by calling the PutObjectAcl API.
def make_private(bucket, key):
    s3.put_object_acl(Bucket=bucket, Key=key, ACL="private")
    print("Object with key=" + key + " in bucket=" + bucket + " is marked as private.")

Next, I zip the lambda_function.py file into an archive named CheckAndCorrectObjectACL.zip and run the following command to create the Lambda function.

$ aws lambda create-function \
--function-name CheckAndCorrectObjectACL \
--zip-file fileb://CheckAndCorrectObjectACL.zip \
--role arn:aws:iam::123456789012:role/AllowLogsAndS3ACL \
--handler lambda_function.lambda_handler \
--runtime python2.7

Finally, I run the following command to allow CloudWatch Events to invoke my Lambda function for me.

$ aws lambda add-permission \
--function-name CheckAndCorrectObjectACL \
--statement-id AllowCloudWatchEventsToInvoke \
--action 'lambda:InvokeFunction' \
--principal events.amazonaws.com \
--source-arn arn:aws:events:us-east-1:123456789012:rule/S3ObjectACLAutoRemediate

Step 4: Create the CloudWatch Events rule

Now, I create the CloudWatch Events rule that is triggered when an event is received from S3. I start with defining the event pattern for my rule. I create a file named event_pattern.json and populate it with the following code.

{
	"detail-type": [
		"AWS API Call via CloudTrail"
	],
	"detail": {
		"eventSource": [
			"s3.amazonaws.com"
		],
		"eventName": [
			"PutObjectAcl",
			"PutObject"
		],
		"requestParameters": {
			"bucketName": [
				"everything-must-be-private"
			]
		}
	}
}

With this event pattern, I am configuring my rule so that it is triggered only when a PutObjectAcl or a PutObject API call event from S3 via CloudTrail is delivered for the objects in the bucket I choose. I finish my setup by running the following commands to create the CloudWatch Events rule and adding to it as a target the Lambda function I created in the previous step.

$ aws events put-rule \
--name S3ObjectACLAutoRemediate \
--event-pattern file://event_pattern.json

$ aws events put-targets \
--rule S3ObjectACLAutoRemediate \
--targets Id=1,Arn=arn:aws:lambda:us-east-1:123456789012:function:CheckAndCorrectObjectACL

Test the setup

From now on, whenever a user in my account makes a PutObjectAcl call against the bucket everything-must-be-private, S3 will deliver the corresponding event to CloudWatch Events via CloudTrail. The event must match the CloudWatch Events rule in order to be delivered to the Lambda function. Finally, the function checks if the object ACL is expected. If not, the function makes the object private.

For testing the setup, I create an empty file named MyCreditInfo in the bucket everything-must-be-private, and I check its ACL.

$ aws s3api put-object \
--bucket everything-must-be-private \
--key MyCreditInfo

$ aws s3api get-object-acl \
--bucket everything-must-be-private \
--key MyCreditInfo

In the response to my command, I see only one grantee, which is the owner (me). This means the object is private. Now, I add public read access to this object (which is supposed to stay private).

$ aws s3api put-object-acl \
--bucket everything-must-be-private \
--key MyCreditInfo \
--acl public-read

If I act quickly and describe the ACL on the object again by calling the GetObjectAcl API, I see another grantee that allows everybody to read this object.

{
	"Grantee": {
		"Type": "Group",
		"URI": "http://acs.amazonaws.com/groups/global/AllUsers"
	},
	"Permission": "READ"
}

When I describe the ACL again, I see that the grantee for public read access has been removed. Therefore, the file is private again, as it should be. You can also test the PutObject API call by putting another object in this bucket with public read access.

$ aws s3api put-object \
--bucket everything-must-be-private \
--key MyDNASequence \
--acl public-read

Conclusion

In this post, I showed how you can detect unintended public access permissions in the ACL of an S3 object and how to revoke them automatically with the help of CloudWatch Events. Keep in mind that object-level S3 API call events and Lambda functions are only a small set of the events and targets that are available in CloudWatch Events. To learn more, see Using CloudWatch Events.

If you have comments about this blog post, submit them in the “Comments” section below. If you have questions about this post or how to implement the solution described, please start a new thread on the CloudWatch forum.

– Mustafa

Resize Images on the Fly with Amazon S3, AWS Lambda, and Amazon API Gateway

$
0
0

Post Syndicated from Bryan Liston original https://aws.amazon.com/blogs/compute/resize-images-on-the-fly-with-amazon-s3-aws-lambda-and-amazon-api-gateway/


John Pignata, Solutions Architect

With the explosion of device types used to access the Internet with different capabilities, screen sizes, and resolutions, developers must often provide images in an array of sizes to ensure a great user experience. This can become complex to manage and drive up costs.

Images stored using Amazon S3 are often processed into multiple sizes to fit within the design constraints of a website or mobile application. It’s a common approach to use S3 event notifications and AWS Lambda for eager processing of images when a new object is created in a bucket.

In this post, I explore a different approach and outline a method of lazily generating images, in which a resized asset is only created if a user requests that specific size.

Resizing on the fly

Instead of processing and resizing images into all necessary sizes upon upload, the approach of processing images on the fly has several upsides:

  • Increased agility
  • Reduced storage costs
  • Resilience to failure

Increased agility

When you redesign your website or application, you can add new dimensions on the fly, rather than working to reprocess the entire archive of images that you have stored.

Running a batch process to resize all original images into new, resized dimensions can be time-consuming, costly, and error-prone. With the on-the-fly approach, a developer can instead specify a new set of dimensions and lazily generate new assets as customers use the new website or application.

Reduced storage costs

With eager image processing, the resized images must be stored indefinitely as the operation only happens one time. The approach of resizing on-demand means that developers do not need to store images that are not accessed by users.

As a user request initiates resizing, this also unlocks options for optimizing storage costs for resized image assets, such as S3 lifecycle rules to expire older images that can be tuned to an application’s specific access patterns. If a user attempts to access a resized image that has been removed by a lifecycle rule, the API resizes it on demand to fulfill the request.

Resilience to failure

A key best practice outlined in the Architecting for the Cloud: Best Practices whitepaper is

“Design for failure and nothing will fail.” When building distributed services, developers should be pessimistic and assume that failures will occur.

If image processing is designed to occur only one time upon object creation, an intermittent failure in that process―or any data loss to the processed images―could cause continual failures to future users. When resizing images on-demand, each request initiates processing if a resized image is not found, meaning that future requests could recover from a previous failure automatically.

Architecture overview

diagram

Here’s the process:

  1. A user requests a resized asset from an S3 bucket through its static website hosting endpoint. The bucket has a routing rule configured to redirect to the resize API any request for an object that cannot be found.
  2. Because the resized asset does not exist in the bucket, the request is temporarily redirected to the resize API method.
  3. The user’s browser follows the redirect and requests the resize operation via API Gateway.
  4. The API Gateway method is configured to trigger a Lambda function to serve the request.
  5. The Lambda function downloads the original image from the S3 bucket, resizes it, and uploads the resized image back into the bucket as the originally requested key.
  6. When the Lambda function completes, API Gateway permanently redirects the user to the file stored in S3.
  7. The user’s browser requests the now-available resized image from the S3 bucket. Subsequent requests from this and other users will be served directly from S3 and bypass the resize operation. If the resized image is deleted in the future, the above process repeats and the resized image is re-created and replaced into the S3 bucket.

Set up resources

A working example with code is open source and available in the serverless-image-resizing GitHub repo. You can create the required resources by following the README directions, which use an AWS Serverless Application Model (AWS SAM) template, or manually following the directions below.

To create and configure the S3 bucket

  1. In the S3 console, create a new S3 bucket.
  2. Choose Permissions, Add Bucket Policy. Add a bucket policy to allow anonymous access.
  3. Choose Static Website Hosting, Enable website hosting and, for Index Document, enter index.html.
  4. Choose Save.
  5. Note the name of the bucket that you’ve created and the hostname in the Endpoint field.

To create the Lambda function

  1. In the Lambda console, choose Create a Lambda function, Blank Function.
  2. To select an integration, choose the dotted square and choose API Gateway.
  3. To allow all users to invoke the API method, for Security, choose Open and then Next.
  4. For Name, enter resize. For Code entry type, choose Upload a .ZIP file.
  5. Choose Function package and upload the .ZIP file of the contents of the Lambda function.
  6. To configure your function, for Environment variables, add two variables:
    • For Key, enter BUCKET; for Value,enter the bucket name that you created above.
    • For Key, enter URL; for Value, enter the endpoint field that you noted above, prefixed with http://.
  7. To define the execution role permissions for the function, for Role, choose Create a custom role. Choose View Policy Document, Edit, Ok.
  8. Replace YOUR_BUCKET_NAME_HERE with the name of the bucket that you’ve created and copy the following code into the policy document. Note that any leading spaces in your policy may cause a validation error.
{
  "Version": "2012-10-17",
  "Statement": [
    {
      "Effect": "Allow",
      "Action": [
        "logs:CreateLogGroup",
        "logs:CreateLogStream",
        "logs:PutLogEvents"
      ],
      "Resource": "arn:aws:logs:*:*:*"
    },
    {
      "Effect": "Allow",
      "Action": "s3:PutObject",
      "Resource": "arn:aws:s3:::__YOUR_BUCKET_NAME_HERE__/*"
    }
  ]
}
  1. For Memory, choose 1536. For Timeout, enter 10 sec. Choose Next, Create function.
  2. Choose Triggers, and note the hostname in the URL of your function.

resizefly_2.png

To set up the S3 redirection rule

  1. In the S3 console, open the bucket that you created above.
  2. Expand Static Website Hosting, Edit Redirection Rules.
  3. Replace YOUR_API_HOSTNAME_HERE with the hostname that you noted above and copy the following into the redirection rules configuration:
<routingrules>
 <routingrule>
  <condition>
   <keyprefixequals>
    <httperrorcodereturnedequals>
     404
    </httperrorcodereturnedequals>
   </keyprefixequals>
  </condition>
  <redirect>
   <protocol>
    https
   </protocol>
   <hostname>
    __YOUR_API_HOSTNAME_HERE__
   </hostname>
   <replacekeyprefixwith>
    prod/resize?key=
   </replacekeyprefixwith>
   <httpredirectcode>
    307
   </httpredirectcode>
  </redirect>
 </routingrule>
</routingrules>

Test image resizing

Upload a test image into your bucket to for testing. The blue marble is a great sample image for testing because it is large and square. Once uploaded, try to retrieve resized versions of the image using your bucket’s static website hosting endpoint:

http://YOUR_BUCKET_WEBSITE_HOSTNAME_HERE/300×300/blue_marble.jpg

http://YOUR_BUCKET_WEBSITE_HOSTNAME_HERE/25×25/blue_marble.jpg

http://YOUR_BUCKET_WEBSITE_HOSTNAME_HERE/500×500/blue_marble.jpg

You should see a smaller version of the test photo. If not, choose Monitoring in your Lambda function and check CloudWatch Logs for troubleshooting. You can also refer to the serverless-image-resizing GitHub repo for a working example that you can deploy to your account.

Conclusion

The solution I’ve outlined is a simplified example of how to implement this functionality. For example, in a real-world implementation, there would likely be a list of permitted sizes to prevent a requestor from filling your bucket with randomly sized images. Further cost optimizations could be employed, such as using S3 lifecycle rules on a bucket dedicated to resized images to expire resized images after a given amount of time.

This approach allows you to lazily generate resized images while taking advantage of serverless architecture. This means you have no operating systems to manage, secure, or patch; no servers to right-size, monitor, or scale; no risk of over-spending by over-provisioning; and no risk of delivering a poor user experience due to poor performance by under-provisioning.

If you have any questions, feedback, or suggestions about this approach, please let us know in the comments!

Managing Secrets for Amazon ECS Applications Using Parameter Store and IAM Roles for Tasks

$
0
0

Post Syndicated from Chris Barclay original https://aws.amazon.com/blogs/compute/managing-secrets-for-amazon-ecs-applications-using-parameter-store-and-iam-roles-for-tasks/

Thanks to my colleague Stas Vonholsky  for a great blog on managing secrets with Amazon ECS applications.

—–

As containerized applications and microservice-oriented architectures become more popular, managing secrets, such as a password to access an application database, becomes more challenging and critical.

Some examples of the challenges include:

  • Support for various access patterns across container environments such as dev, test, and prod
  • Isolated access to secrets on a container/application level rather than at the host level
  • Multiple decoupled services with their own needs for access, both as services and as clients of other services

This post focuses on newly released features that support further improvements to secret management for containerized applications running on Amazon ECS. My colleague, Matthew McClean, also published an excellent post on the AWS Security Blog, How to Manage Secrets for Amazon EC2 Container Service–Based Applications by Using Amazon S3 and Docker, which discusses some of the limitations of passing and storing secrets with container parameter variables.

Most secret management tools provide the following functionality:

  • Highly secured storage system
  • Central management capabilities
  • Secure authorization and authentication mechanisms
  • Integration with key management and encryption providers
  • Secure introduction mechanisms for access
  • Auditing
  • Secret rotation and revocation

Amazon EC2 Systems Manager Parameter Store

Parameter Store is a feature of Amazon EC2 Systems Manager. It provides a centralized, encrypted store for sensitive information and has many advantages when combined with other capabilities of Systems Manager, such as Run Command and State Manager. The service is fully managed, highly available, and highly secured.

Because Parameter Store is accessible using the Systems Manager API, AWS CLI, and AWS SDKs, you can also use it as a generic secret management store. Secrets can be easily rotated and revoked. Parameter Store is integrated with AWS KMS so that specific parameters can be encrypted at rest with the default or custom KMS key. Importing KMS keys enables you to use your own keys to encrypt sensitive data.

Access to Parameter Store is enabled by IAM policies and supports resource level permissions for access. An IAM policy that grants permissions to specific parameters or a namespace can be used to limit access to these parameters. CloudTrail logs, if enabled for the service, record any attempt to access a parameter.

While Amazon S3 has many of the above features and can also be used to implement a central secret store, Parameter Store has the following added advantages:

  • Easy creation of namespaces to support different stages of the application lifecycle.
  • KMS integration that abstracts parameter encryption from the application while requiring the instance or container to have access to the KMS key and for the decryption to take place locally in memory.
  • Stored history about parameter changes.
  • A service that can be controlled separately from S3, which is likely used for many other applications.
  • A configuration data store, reducing overhead from implementing multiple systems.
  • No usage costs.

Note: At the time of publication, Systems Manager doesn’t support VPC private endpoint functionality. To enforce stricter access to a Parameter Store endpoint from a private VPC, use a NAT gateway with a set Elastic IP address together with IAM policy conditions that restrict parameter access to a limited set of IP addresses.

IAM roles for tasks

With IAM roles for Amazon ECS tasks, you can specify an IAM role to be used by the containers in a task. Applications interacting with AWS services must sign their API requests with AWS credentials. This feature provides a strategy for managing credentials for your applications to use, similar to the way that Amazon EC2 instance profiles provide credentials to EC2 instances.

Instead of creating and distributing your AWS credentials to the containers or using the EC2 instance role, you can associate an IAM role with an ECS task definition or the RunTask API operation. For more information, see IAM Roles for Tasks.

You can use IAM roles for tasks to securely introduce and authenticate the application or container with the centralized Parameter Store. Access to the secret manager should include features such as:

  • Limited TTL for credentials used
  • Granular authorization policies
  • An ID to track the requests in the logs of the central secret manager
  • Integration support with the scheduler that could map between the container or task deployed and the relevant access privileges

IAM roles for tasks support this use case well, as the role credentials can be accessed only from within the container for which the role is defined. The role exposes temporary credentials and these are rotated automatically. Granular IAM policies are supported with optional conditions about source instances, source IP addresses, time of day, and other options.

The source IAM role can be identified in the CloudTrail logs based on a unique Amazon Resource Name and the access permissions can be revoked immediately at any time with the IAM API or console. As Parameter Store supports resource level permissions, a policy can be created to restrict access to specific keys and namespaces.

Dynamic environment association

In many cases, the container image does not change when moving between environments, which supports immutable deployments and ensures that the results are reproducible. What does change is the configuration: in this context, specifically the secrets. For example, a database and its password might be different in the staging and production environments. There’s still the question of how do you point the application to retrieve the correct secret? Should it retrieve prod.app1.secret, test.app1.secret or something else?

One option can be to pass the environment type as an environment variable to the container. The application then concatenates the environment type (prod, test, etc.) with the relative key path and retrieves the relevant secret. In most cases, this leads to a number of separate ECS task definitions.

When you describe the task definition in a CloudFormation template, you could base the entry in the IAM role that provides access to Parameter Store, KMS key, and environment property on a single CloudFormation parameter, such as “environment type.” This approach could support a single task definition type that is based on a generic CloudFormation template.

Walkthrough: Securely access Parameter Store resources with IAM roles for tasks

This walkthrough is configured for the North Virginia region (us-east-1). I recommend using the same region.

Step 1: Create the keys and parameters

First, create the following KMS keys with the default security policy to be used to encrypt various parameters:

  • prod-app1 –used to encrypt any secrets for app1.
  • license-key –used to encrypt license-related secrets.
aws kms create-key --description prod-app1 --region us-east-1
aws kms create-key --description license-code --region us-east-1

Note the KeyId property in the output of both commands. You use it throughout the walkthrough to identify the KMS keys.

The following commands create three parameters in Parameter Store:

  • prod.app1.db-pass (encrypted with the prod-app1 KMS key)
  • general.license-code (encrypted with the license-key KMS key)
  • prod.app2.user-name (stored as a standard string without encryption)
aws ssm put-parameter --name prod.app1.db-pass --value "AAAAAAAAAAA" --type SecureString --key-id "<key-id-for-prod-app1-key>" --region us-east-1
aws ssm put-parameter --name general.license-code --value "CCCCCCCCCCC" --type SecureString --key-id "<key-id-for-license-code-key>" --region us-east-1
aws ssm put-parameter --name prod.app2.user-name --value "BBBBBBBBBBB" --type String --region us-east-1

Step 2: Create the IAM role and policies

Now, create a role and an IAM policy to be associated later with the ECS task that you create later on.
The trust policy for the IAM role needs to allow the ecs-tasks entity to assume the role.

{
   "Version": "2012-10-17",
   "Statement": [
     {
       "Sid": "",
       "Effect": "Allow",
       "Principal": {
         "Service": "ecs-tasks.amazonaws.com"
       },
       "Action": "sts:AssumeRole"
     }
   ]
 }

Save the above policy as a file in the local directory with the name ecs-tasks-trust-policy.json.

aws iam create-role --role-name prod-app1 --assume-role-policy-document file://ecs-tasks-trust-policy.json

The following policy is attached to the role and later associated with the app1 container. Access is granted to the prod.app1.* namespace parameters, the encryption key required to decrypt the prod.app1.db-pass parameter and the license code parameter. The namespace resource permission structure is useful for building various hierarchies (based on environments, applications, etc.).

Make sure to replace <key-id-for-prod-app1-key> with the key ID for the relevant KMS key and <account-id> with your account ID in the following policy.

{
     "Version": "2012-10-17",
     "Statement": [
         {
             "Effect": "Allow",
             "Action": [
                 "ssm:DescribeParameters"
             ],
             "Resource": "*"
         },
         {
             "Sid": "Stmt1482841904000",
             "Effect": "Allow",
             "Action": [
                 "ssm:GetParameters"
             ],
             "Resource": [
                 "arn:aws:ssm:us-east-1:<account-id>:parameter/prod.app1.*",
                 "arn:aws:ssm:us-east-1:<account-id>:parameter/general.license-code"
             ]
         },
         {
             "Sid": "Stmt1482841948000",
             "Effect": "Allow",
             "Action": [
                 "kms:Decrypt"
             ],
             "Resource": [
                 "arn:aws:kms:us-east-1:<account-id>:key/<key-id-for-prod-app1-key>"
             ]
         }
     ]
 }

Save the above policy as a file in the local directory with the name app1-secret-access.json:

aws iam create-policy --policy-name prod-app1 --policy-document file://app1-secret-access.json

Replace <account-id> with your account ID in the following command:

aws iam attach-role-policy --role-name prod-app1 --policy-arn "arn:aws:iam::<account-id>:policy/prod-app1"

Step 3: Add the testing script to an S3 bucket

Create a file with the script below, name it access-test.sh and add it to an S3 bucket in your account. Make sure the object is publicly accessible and note down the object link, for example https://s3-eu-west-1.amazonaws.com/my-new-blog-bucket/access-test.sh

#!/bin/bash
#This is simple bash script that is used to test access to the EC2 Parameter store.
# Install the AWS CLI
apt-get -y install python2.7 curl
curl -O https://bootstrap.pypa.io/get-pip.py
python2.7 get-pip.py
pip install awscli
# Getting region
EC2_AVAIL_ZONE=`curl -s http://169.254.169.254/latest/meta-data/placement/availability-zone`
EC2_REGION="`echo \"$EC2_AVAIL_ZONE\" | sed -e 's:\([0-9][0-9]*\)[a-z]*\$:\\1:'`"
# Trying to retrieve parameters from the EC2 Parameter Store
APP1_WITH_ENCRYPTION=`aws ssm get-parameters --names prod.app1.db-pass --with-decryption --region $EC2_REGION --output text 2>&1`
APP1_WITHOUT_ENCRYPTION=`aws ssm get-parameters --names prod.app1.db-pass --no-with-decryption --region $EC2_REGION --output text 2>&1`
LICENSE_WITH_ENCRYPTION=`aws ssm get-parameters --names general.license-code --with-decryption --region $EC2_REGION --output text 2>&1`
LICENSE_WITHOUT_ENCRYPTION=`aws ssm get-parameters --names general.license-code --no-with-decryption --region $EC2_REGION --output text 2>&1`
APP2_WITHOUT_ENCRYPTION=`aws ssm get-parameters --names prod.app2.user-name --no-with-decryption --region $EC2_REGION --output text 2>&1`
# The nginx server is started after the script is invoked, preparing folder for HTML.
if [ ! -d /usr/share/nginx/html/ ]; then
mkdir -p /usr/share/nginx/html/;
fi
chmod 755 /usr/share/nginx/html/

# Creating an HTML file to be accessed at http://<public-instance-DNS-name>/ecs.html
cat > /usr/share/nginx/html/ecs.html <<EOF
<!DOCTYPE html>
<html>
<head>
<title>App1</title>
<style>
body {padding: 20px;margin: 0 auto;font-family: Tahoma, Verdana, Arial, sans-serif;}
code {white-space: pre-wrap;}
result {background: hsl(220, 80%, 90%);}
</style>
</head>
<body>
<h1>Hi there!</h1>
<p style="padding-bottom: 0.8cm;">Following are the results of different access attempts as expirienced by "App1".</p>

<p><b>Access to prod.app1.db-pass:</b><br/>
<pre><code>aws ssm get-parameters --names prod.app1.db-pass --with-decryption</code><br/>
<code><result>$APP1_WITH_ENCRYPTION</result></code><br/>
<code>aws ssm get-parameters --names prod.app1.db-pass --no-with-decryption</code><br/>
<code><result>$APP1_WITHOUT_ENCRYPTION</result></code></pre><br/>
</p>

<p><b>Access to general.license-code:</b><br/>
<pre><code>aws ssm get-parameters --names general.license-code --with-decryption</code><br/>
<code><result>$LICENSE_WITH_ENCRYPTION</result></code><br/>
<code>aws ssm get-parameters --names general.license-code --no-with-decryption</code><br/>
<code><result>$LICENSE_WITHOUT_ENCRYPTION</result></code></pre><br/>
</p>

<p><b>Access to prod.app2.user-name:</b><br/>
<pre><code>aws ssm get-parameters --names prod.app2.user-name --no-with-decryption</code><br/>
<code><result>$APP2_WITHOUT_ENCRYPTION</result></code><br/>
</p>

<p><em>Thanks for visiting</em></p>
</body>
</html>
EOF

Step 4: Create a test cluster

I recommend creating a new ECS test cluster with the latest ECS AMI and ECS agent on the instance. Use the following field values:

  • Cluster name: access-test
  • EC2 instance type: t2.micro
  • Number of instances: 1
  • Key pair: No EC2 key pair is required, unless you’d like to SSH to the instance and explore the running container.
  • VPC: Choose the default VPC. If unsure, you can find the VPC ID with the IP range 172.31.0.0/16 in the Amazon VPC console.
  • Subnets: Pick a subnet in the default VPC.
  • Security group: Create a new security group with CIDR block 0.0.0.0/0 and port 80 for inbound access.

Leave other fields with the default settings.

Create a simple task definition that relies on the public NGINX container and the role that you created for app1. Specify the properties such as the available container resources and port mappings. Note the command option is used to download and invoke a test script that installs the AWS CLI on the container, runs a number of get-parameter commands, and creates an HTML file with the results.

Replace <account-id> with your account ID, <your-S3-URI> with a link to the S3 object created in step 3 in the following commands:

aws ecs register-task-definition --family access-test --task-role-arn "arn:aws:iam::<account-id>:role/prod-app1" --container-definitions name="access-test",image="nginx",portMappings="[{containerPort=80,hostPort=80,protocol=tcp}]",readonlyRootFilesystem=false,cpu=512,memory=490,essential=true,entryPoint="sh,-c",command="\"/bin/sh -c \\\"apt-get update ; apt-get -y install curl ; curl -O <your-S3-URI> ; chmod +x access-test.sh ; ./access-test.sh ; nginx -g 'daemon off;'\\\"\"" --region us-east-1

aws ecs run-task --cluster access-test --task-definition access-test --count 1 --region us-east-1

Verifying access

After the task is in a running state, check the public DNS name of the instance and navigate to the following page:

http://<ec2-instance-public-DNS-name>/ecs.html

You should see the results of running different access tests from the container after a short duration.

If the test results don’t appear immediately, wait a few seconds and refresh the page.
Make sure that inbound traffic for port 80 is allowed on the security group attached to the instance.

The results you see in the static results HTML page should be the same as running the following commands from the container.

prod.app1.key1

aws ssm get-parameters --names prod.app1.db-pass --with-decryption --region us-east-1
aws ssm get-parameters --names prod.app1.db-pass --no-with-decryption --region us-east-1

Both commands should work, as the policy provides access to both the parameter and the required KMS key.

general.license-code

aws ssm get-parameters --names general.license-code --no-with-decryption --region us-east-1
aws ssm get-parameters --names general.license-code --with-decryption --region us-east-1

Only the first command with the “no-with-decryption” parameter should work. The policy allows access to the parameter in Parameter Store but there’s no access to the KMS key. The second command should fail with an access denied error.

prod.app2.user-name

aws ssm get-parameters --names prod.app2.user-name –no-with-decryption --region us-east-1

The command should fail with an access denied error, as there are no permissions associated with the namespace for prod.app2.

Finishing up

Remember to delete all resources (such as the KMS keys and EC2 instance), so that you don’t incur charges.

Conclusion

Central secret management is an important aspect of securing containerized environments. By using Parameter Store and task IAM roles, customers can create a central secret management store and a well-integrated access layer that allows applications to access only the keys they need, to restrict access on a container basis, and to further encrypt secrets with custom keys with KMS.

Whether the secret management layer is implemented with Parameter Store, Amazon S3, Amazon DynamoDB, or a solution such as Vault or KeyWhiz, it’s a vital part to the process of managing and accessing secrets.


Secure Amazon EMR with Encryption

$
0
0

Post Syndicated from Sai Sriparasa original https://aws.amazon.com/blogs/big-data/secure-amazon-emr-with-encryption/

In the last few years, there has been a rapid rise in enterprises adopting the Apache Hadoop ecosystem for critical workloads that process sensitive or highly confidential data. Due to the highly critical nature of the workloads, the enterprises implement certain organization/industry wide policies and certain regulatory or compliance policies. Such policy requirements are designed to protect sensitive data from unauthorized access.

A common requirement within such policies is about encrypting data at-rest and in-flight. Amazon EMR uses “security configurations” to make it easy to specify the encryption keys and certificates, ranging from AWS Key Management Service to supplying your own custom encryption materials provider.

You create a security configuration that specifies encryption settings and then use the configuration when you create a cluster. This makes it easy to build the security configuration one time and use it for any number of clusters.

o_Amazon_EMR_Encryption_1

In this post, I go through the process of setting up the encryption of data at multiple levels using security configurations with EMR. Before I dive deep into encryption, here are the different phases where data needs to be encrypted.

Data at rest

  • Data residing on Amazon S3—S3 client-side encryption with EMR
  • Data residing on disk—the Amazon EC2 instance store volumes (except boot volumes) and the attached Amazon EBS volumes of cluster instances are encrypted using Linux Unified Key System (LUKS)

Data in transit

  • Data in transit from EMR to S3, or vice versa—S3 client side encryption with EMR
  • Data in transit between nodes in a cluster—in-transit encryption via Secure Sockets Layer (SSL) for MapReduce and Simple Authentication and Security Layer (SASL) for Spark shuffle encryption
  • Data being spilled to disk or cached during a shuffle phase—Spark shuffle encryption or LUKS encryption

Encryption walkthrough

For this post, you create a security configuration that implements encryption in transit and at rest. To achieve this, you create the following resources:

  • KMS keys for LUKS encryption and S3 client-side encryption for data exiting EMR to S3
  • SSL certificates to be used for MapReduce shuffle encryption
  • The environment into which the EMR cluster is launched. For this post, you launch EMR in private subnets and set up an S3 VPC endpoint to get the data from S3.
  • An EMR security configuration

All of the scripts and code snippets used for this walkthrough are available on the aws-blog-emrencryption GitHub repo.

Generate KMS keys

For this walkthrough, you use AWS KMS, a managed service that makes it easy for you to create and control the encryption keys used to encrypt your data and disks.

You generate two KMS master keys, one for S3 client-side encryption to encrypt data going out of EMR and the other for LUKS encryption to encrypt the local disks. The Hadoop MapReduce framework uses HDFS. Spark uses the local file system on each slave instance for intermediate data throughout a workload, where data could be spilled to disk when it overflows memory.

To generate the keys, use the kms.json AWS CloudFormation script.  As part of this script, provide an alias name, or display name, for the keys. An alias must be in the “alias/aliasname” format, and can only contain alphanumeric characters, an underscore, or a dash.

o_Amazon_EMR_Encryption_2

After you finish generating the keys, the ARNs are available as part of the outputs.

o_Amazon_EMR_Encryption_3

Generate SSL certificates

The SSL certificates allow the encryption of the MapReduce shuffle using HTTPS while the data is in transit between nodes.

o_Amazon_EMR_Encryption_4

For this walkthrough, use OpenSSL to generate a self-signed X.509 certificate with a 2048-bit RSA private key that allows access to the issuer’s EMR cluster instances. This prompts you to provide subject information to generate the certificates.

Use the cert-create.sh script to generate SSL certificates that are compressed into a zip file. Upload the zipped certificates to S3 and keep a note of the S3 prefix. You use this S3 prefix when you build your security configuration.

Important

This example is a proof-of-concept demonstration only. Using self-signed certificates is not recommended and presents a potential security risk. For production systems, use a trusted certification authority (CA) to issue certificates.

To implement certificates from custom providers, use the TLSArtifacts provider interface.

Build the environment

For this walkthrough, launch an EMR cluster into a private subnet. If you already have a VPC and would like to launch this cluster into a public subnet, skip this section and jump to the Create a Security Configuration section.

To launch the cluster into a private subnet, the environment must include the following resources:

  • VPC
  • Private subnet
  • Public subnet
  • Bastion
  • Managed NAT gateway
  • S3 VPC endpoint

As the EMR cluster is launched into a private subnet, you need a bastion or a jump server to SSH onto the cluster. After the cluster is running, you need access to the Internet to request the data keys from KMS. Private subnets do not have access to the Internet directly, so route this traffic via the managed NAT gateway. Use an S3 VPC endpoint to provide a highly reliable and a secure connection to S3.

o_Amazon_EMR_Encryption_5

In the CloudFormation console, create a new stack for this environment and use the environment.json CloudFormation template to deploy it.

As part of the parameters, pick an instance family for the bastion and an EC2 key pair to be used to SSH onto the bastion. Provide an appropriate stack name and add the appropriate tags. For example, the following screenshot is the review step for a stack that I created.

o_Amazon_EMR_Encryption_6

After creating the environment stack, look at the Output tab and make a note of the VPC ID, bastion, and private subnet IDs, as you will use them when you launch the EMR cluster resources.

o_Amazon_EMR_Encryption_7

Create a security configuration

The final step before launching the secure EMR cluster is to create a security configuration. For this walkthrough, create a security configuration with S3 client-side encryption using EMR, and LUKS encryption for local volumes using the KMS keys created earlier. You also use the SSL certificates generated and uploaded to S3 earlier for encrypting the MapReduce shuffle.

o_Amazon_EMR_Encryption_8

Launch an EMR cluster

Now, you can launch an EMR cluster in the private subnet. First, verify that the service role being used for EMR has access to the AmazonElasticMapReduceRole managed service policy. The default service role is EMR_DefaultRole. For more information, see Configuring User Permissions Using IAM Roles.

From the Build an environment section, you have the VPC ID and the subnet ID for the private subnet into which the EMR cluster should be launched. Select those values for the Network and EC2 Subnet fields. In the next step, provide a name and tags for the cluster.

o_Amazon_EMR_Encryption_9

The last step is to select the private key, assign the security configuration that was created in the Create a security configuration section, and choose Create Cluster.

o_Amazon_EMR_Encryption_10

Now that you have the environment and the cluster up and running, you can get onto the master node to run scripts. You need the IP address, which you can retrieve from the EMR console page. Choose Hardware, Master Instance group and note the private IP address of the master node.

o_Amazon_EMR_Encryption_11

As the master node is in a private subnet, SSH onto the bastion instance first and then jump from the bastion instance to the master node. For information about how to SSH onto the bastion and then to the Hadoop master, open the ssh-commands.txt file. For more information about how to get onto the bastion, see the Securely Connect to Linux Instances Running in a Private Amazon VPC post.

After you are on the master node, bring your own Hive or Spark scripts. For testing purposes, the GitHub /code directory includes the test.py PySpark and test.q Hive scripts.

Summary

As part of this post, I’ve identified the different phases where data needs to be encrypted and walked through how data in each phase can be encrypted. Then, I described a step-by-step process to achieve all the encryption prerequisites, such as building the KMS keys, building SSL certificates, and launching the EMR cluster with a strong security configuration. As part of this walkthrough, you also secured the data by launching your cluster in a private subnet within a VPC, and used a bastion instance for access to the EMR cluster.

If you have questions or suggestions, please comment below.


About the Author

sai_90Sai Sriparasa is a Big Data Consultant for AWS Professional Services. He works with our customers to provide strategic & tactical big data solutions with an emphasis on automation, operations & security on AWS. In his spare time, he follows sports and current affairs.


Related

Implementing Authorization and Auditing using Apache Ranger on Amazon EMR

EMRRanger_1


Month in Review: January 2017

$
0
0

Post Syndicated from Derek Young original https://aws.amazon.com/blogs/big-data/month-in-review-january-2017/

Another month of big data solutions on the Big Data Blog!

Take a look at our summaries below and learn, comment, and share. Thank you for reading!

NEW POSTS

Decreasing Game Churn: How Upopa used ironSource Atom and Amazon ML to Engage Users
Ever wondered what it takes to keep a user from leaving your game or application after all the hard work you put in? Wouldn’t it be great to get a chance to interact with the users before they’re about to leave? In this post, learn how ironSource worked with gaming studio Upopa to build an efficient, cheap, and accurate way to battle churn and make data-driven decisions using ironSource Atom’s data pipeline and Amazon ML.

Create a Healthcare Data Hub with AWS and Mirth Connect
Healthcare providers record patient information across different software platforms. Each of these platforms can have varying implementations of complex healthcare data standards. Also, each system needs to communicate with a central repository called a health information exchange (HIE) to build a central, complete clinical record for each patient. In this post, learn how to consume different data types as messages, transform the information within the messages, and then use AWS services to take action depending on the message type.

Call for Papers! DEEM: 1st Workshop on Data Management for End-to-End Machine Learning
Amazon and Matroid will hold the first workshop on Data Management for End-to-End Machine Learning (DEEM) on May 14th, 2017 in conjunction with the premier systems conference SIGMOD/PODS 2017 in Raleigh, North Carolina. DEEM brings together researchers and practitioners at the intersection of applied machine learning, data management, and systems research to discuss data management issues in ML application scenarios. The workshop is soliciting research papers that describe preliminary and ongoing research results.

Converging Data Silos to Amazon Redshift Using AWS DMS
In this post, learn to use AWS Database Migration Service (AWS DMS) and other AWS services to easily converge multiple heterogonous data sources to Amazon Redshift. You can then use Amazon QuickSight, to visualize the converged dataset to gain additional business insights.

Run Mixed Workloads with Amazon Redshift Workload Management
It’s common for mixed workloads to have some processes that require higher priority than others. Sometimes, this means a certain job must complete within a given SLA. Other times, this means you only want to prevent a non-critical reporting workload from consuming too many cluster resources at any one time. Without workload management (WLM), each query is prioritized equally, which can cause a person, team, or workload to consume excessive cluster resources for a process which isn’t as valuable as other more business-critical jobs. This post provides guidelines on common WLM patterns and shows how you can use WLM query insights to optimize configuration in production workloads.

Secure Amazon EMR with Encryption
In this post, learn how to set up encryption of data at multiple levels using security configurations with EMR. You’ll walk through the step-by-step process to achieve all the encryption prerequisites, such as building the KMS keys, building SSL certificates, and launching the EMR cluster with a strong security configuration.

FROM THE ARCHIVE

Powering Amazon Redshift Analytics with Apache Spark and Amazon Machine Learning
In this post, learn to generate a predictive model for flight delays that can be used to help pick the flight least likely to add to your travel stress. To accomplish this, you’ll use Apache Spark running on Amazon EMR for extracting, transforming, and loading (ETL) the data, Amazon Redshift for analysis, and Amazon Machine Learning for creating predictive models.


Want to learn more about Big Data or Streaming Data? Check out our Big Data and Streaming data educational pages.

Leave a comment below to let us know what big data topics you’d like to see next on the AWS Big Data Blog.

Fake cases for your Raspberry Pi – make sure you don’t end up with one!

$
0
0

Post Syndicated from Liz Upton original https://www.raspberrypi.org/blog/fake-cases-raspberry-pi-make-sure-dont-end-one/

If you’re a Pi fan, you’ll recognise our official case, designed by Kinneir Dufort. We’re rather proud of it, and if sales are anything to go by, you seem to like it a lot as well.

Raspberry Pi case design sketches

Unfortunately, some scammers in China have also spotted that Pi owners like the case a lot, so they’ve been cloning it and trying to sell it in third-party stores.

We managed to get our hands on a sample through a proxy pretending to be a Pi shop, and we have some pictures so you can see what the differences are and ensure that you have the genuine article. The fake cases are not as well-made as the real thing, and they also deprive us of some much-needed charitable income. As you probably know, the Raspberry Pi Foundation is a charity. All the money we make from selling computers, cases, cameras, and other products goes straight into our charitable fund to train teachers, provide free learning resources, teach kids, help build the foundations of digital making in schools, and much more.

Let’s do a bit of spot-the-difference.

Fake case. Notice the poor fit, the extra light pipes (the Chinese cloner decided not to make different cases for Pi2 and Pi3), and the sunken ovals above them.

Real case. Only one set of light pipes (this case is for a Pi3), no ovals, and the whole thing fits together much more neatly. There’s no lip in the middle piece under the lid.

There are some other telltale signs: have a close look at the area around the logo on the white lid.

This one’s the fake. At about the 7 o’clock position, the plastic around the logo is uneven and ripply – the effect’s even more pronounced in real life. 

This is what a real case looks like. The logo is much more crisp and cleanly embossed, and there are no telltale lumps and bumps around it.

The underside’s a bit off as well:

The cloners are using a cheaper, translucent non-slip foot on the fake case, and the feet don’t fit well in the lugs which house them. Again, you can see that the general fit is quite bad.

Real case. Near-transparent non-slip feet, centred in their housing, and with no shreds of escaping glue. There’s no rectangular tooling marks on the bottom. The SD card slot is a different shape.

Please let us know if you find any of these fake cases in the wild. And be extra-vigilant if you’re buying somewhere like eBay to make sure that you’re purchasing the real thing. We also make a black and grey version of the case, although the pink and white is much more popular. We haven’t seen these cloned yet, but if you spot one we’d like to know about it, as we can then discuss them with the resellers. It’s more than possible that retailers won’t realise they’re buying fakes, but it damages our reputation when something shonky comes on the market and it looks like we’ve made it. It damages the Raspberry Pi Foundation’s pockets too, which means we can’t do the important work in education we were set up to do.

The post Fake cases for your Raspberry Pi – make sure you don’t end up with one! appeared first on Raspberry Pi.

Popular Kodi Addon ‘Exodus’ Turned Users into a DDoS ‘Botnet’

$
0
0

Post Syndicated from Ernesto original https://torrentfreak.com/popular-kodi-addon-exodus-turned-users-into-a-ddos-botnet-170203/

exodus-moviesMillions of people use Kodi as their main source of entertainment, often with help from add-ons that allow them to access pirated movies and TV-shows.

One of the most popular addons is Exodus. The software is maintained by “Lambda,” who’s one of the most prolific developers in the community.

Exodus is widely praised as one of the most useful addons to access streaming video, including pirated movies and TV-shows. This prominent position also brings along quite a few adversaries, which recently led to an unusual situation.

Due to the controversial nature of his work, Lambda has always preferred to remain anonymous. However, he was recently confronted with some people who copied his work and/or threatened to expose his real identity. But instead of backing down, he launched an attack.

Roughly a week ago several lines of code were added to the Exodus plugin, which contacted external sites. While this is nothing new for Kodi addons, in this case the lines in question were targeting resources of Lambda’s adversaries.

Soon after people started to notice, complaints started rolling in accusing Exodus of creating a DDoS “botnet.” The Ares Blog mentioned the issue and a lively discussion started in the TV Addons forum, where the developer himself joined in defending his actions.

The offending code
exodusddos

Lambda says that he added the code as a countermeasure against people who he believes are trying to do harm or get him in legal trouble. The users themselves are not harmed by the code since they are simply trying to access another web source, he adds.

“Like I said they try to find my identity and give me legal trouble. I have no choice but to protect myself. If this won’t help me to defend myself I will retire from all these and focus on my legal addons,” the developer notes.

While some people sympathized with the move, Lambda eventually decided to make the “protection” feature optional. Still, that didn’t satisfy everyone and soon after the developer decided to throw in the towel and retire.

“I just couldn’t deal with all this stress anymore, I made bad decisions that I shouldn’t take and I am sorry about that,” Lambda explains in a formal apology.

“I think this is the time for me to leave, this whole thing is changing me as a person, so it’s time for me to take care of myself and leave this scene once and for all,” he adds.

TorrentFreak reached out to TV Addons repository which offers the Exodus addon, and they told us that the malicious code is no longer present. They are very unhappy with the incident and say they did their best to resolve the matter as swiftly as possible.

“The actions taken were inexcusable,” TV Addons’ Eleazar informed us. When they found out about the code, the developer’s repository was locked and they stress that “this situation is not being taken lightly.”

TV Addons has previously published a malicious code policy and says it takes an active stance against this type of abuse. As such, the team has taken it upon themselves to continue the development of Exodus, with Lambda’s approval.

“Moving forward, his addons will be maintained by another member of our team. TV ADDONS stands for the end user first, integrity is of our utmost concern,” Eleazar notes.

As for Lambda himself, he plans to continue his work on other projects.

“I want to thank everybody who stood by me all these years. It’s time for me to move on and I hope the team to take over my beloved addon. Take care everybody,” he concludes.

Source: TF, for the latest info on copyright, file-sharing, torrent sites and ANONYMOUS VPN services.

Migrate External Table Definitions from a Hive Metastore to Amazon Athena

$
0
0

Post Syndicated from Neil Mukerje original https://aws.amazon.com/blogs/big-data/migrate-external-table-definitions-from-a-hive-metastore-to-amazon-athena/

For customers who use Hive external tables on Amazon EMR, or any flavor of Hadoop, a key challenge is how to effectively migrate an existing Hive metastore to Amazon Athena, an interactive query service that directly analyzes data stored in Amazon S3. With Athena, there are no clusters to manage and tune, and no infrastructure to set up or manage. Customers pay only for the queries they run.

In this post, I discuss an approach to migrate an existing Hive metastore to Athena, as well as how to use the Athena JDBC driver to run scripts. I demonstrate two scripts.

  1. The first script exports external tables from a Hive metastore on EMR, or other Hadoop flavors, as a Hive script. This script handles both Hive metastores local to the cluster or metastores stored in an external database.
  1. The second script executes the Hive script in Athena over JDBC to import the external tables into the Athena catalog.

Both scripts are available in the aws-blog-athena-importing-hive-metastores GitHub repo.

Prerequisites

You must have the following resources available:

  • A working Python 2.7+ environment. (required for the first script)
  • A working Java 1.8 runtime environment
  • Groovy, if not already installed
  • The Java classpath set to point to the Athena JDBC driver JAR file location

In EMR, you can use the following commands to complete the prerequisites (Python comes already installed):

# set Java to 1.8
EMR $> export JAVA_HOME=/usr/lib/jvm/java-1.8.0

# Download Groovy and set Groovy binary in PATH
EMR $> wget https://dl.bintray.com/groovy/maven/apache-groovy-binary-2.4.7.zip
EMR $> unzip apache-groovy-binary-2.4.7.zip
EMR $> export PATH=$PATH:`pwd`/groovy-2.4.7/bin/:

# Download latest Athena JDBC driver and set it in JAVA CLASSPATH
EMR $> aws s3 cp s3://athena-downloads/drivers/AthenaJDBC41-1.0.0.jar .
EMR $> export CLASSPATH=`pwd`/AthenaJDBC41-1.0.0.jar:;

Exporting external tables from a Hive metastore

The Python script exportdatabase.py exports external tables only from the Hive metastore, and saves them to a local file as a Hive script.

EMR $> python exportdatabase.py <<Hive database name>> 

Here’s the sample output:

EMR $> python exportdatabase.py default

Found 10 tables in database...

Database metadata exported to default_export.hql.

Athena does not support every data type and SerDe supported by Hive. Edit or replace contents in the generated Hive script as needed to ensure compatibility. For more information about supported datatypes and SerDes, see the Amazon Athena documentation.

Importing the external tables into Athena

The Groovy script executescript.gvy connects to Athena and executes the Hive script generated earlier. Make sure that you update the access key ID and secret access key, and replace ‘s3_staging_dir’ with an Amazon S3 location. Also, make sure that the target database specified in the command exists in Athena.

EMR $> groovy executescript.gvy <<target database in Athena>> <<Hive script file>>

Here’s the sample output:

$ groovy executescript.gvy playdb default_export.hql

Found 2 statements in script...

1. Executing :DROP TABLE IF EXISTS `nyc_trips_pq`

result : OK

2. Executing :
CREATE EXTERNAL TABLE `nyc_trips_pq`(
  `vendor_name` string,
  `trip_pickup_datetime` string,
  `trip_dropoff_datetime` string,
  `passenger_count` int,
  `trip_distance` float,
  `payment_type` string,
  `are_amt` float,
  `surcharge` float,
  `mta_tax` float,
  `tip_amt` float,
  `tolls_amt` float,
  `total_amt` float)
PARTITIONED BY (
  `year` string,
  `month` string)
ROW FORMAT SERDE
  'org.apache.hadoop.hive.ql.io.parquet.serde.ParquetHiveSerDe'
STORED AS INPUTFORMAT
  'org.apache.hadoop.hive.ql.io.parquet.MapredParquetInputFormat'
OUTPUTFORMAT
  'org.apache.hadoop.hive.ql.io.parquet.MapredParquetOutputFormat'
  LOCATION
  's3://bucket/dataset2'
TBLPROPERTIES (
  'parquet.compress'='SNAPPY',
  'transient_lastDdlTime'='1478199332')

result : OK

The executescript.gvy script can be used to execute any Hive script in Athena. For example, you can use this script to add partitions to an existing Athena table that uses a custom partition format.

You can save the following SQL statements to a script, named addpartitions.hql:

ALTER TABLE default.elb_logs_raw_native_part ADD PARTITION (year='2015',month='01',day='01') location 's3://athena-examples/elb/raw/2015/01/01';
ALTER TABLE default.elb_logs_raw_native_part ADD PARTITION (year='2015',month='01',day='02') location 's3://athena-examples/elb/raw/2015/01/02';
ALTER TABLE default.elb_logs_raw_native_part ADD PARTITION (year='2015',month='01',day='03') location 's3://athena-examples/elb/raw/2015/01/03';
ALTER TABLE default.elb_logs_raw_native_part ADD PARTITION (year='2015',month='01',day='04') location 's3://athena-examples/elb/raw/2015/01/04';

Run the following command to execute addpartitions.hql:

EMR $> groovy executescript.gvy default addpartitions.hql

Found 4 statements in script...

1. Executing :ALTER TABLE default.elb_logs_raw_native_part ADD PARTITION (year='2015',month='01',day='01') location 's3://athena-examples/elb/raw/2015/01/01'

result : OK

2. Executing :
ALTER TABLE default.elb_logs_raw_native_part ADD PARTITION (year='2015',month='01',day='02') location 's3://athena-examples/elb/raw/2015/01/02'

result : OK

3. Executing :
ALTER TABLE default.elb_logs_raw_native_part ADD PARTITION (year='2015',month='01',day='03') location 's3://athena-examples/elb/raw/2015/01/03'

result : OK

4. Executing :
ALTER TABLE default.elb_logs_raw_native_part ADD PARTITION (year='2015',month='01',day='04') location 's3://athena-examples/elb/raw/2015/01/04'

result : OK

Two samples—sample_createtable.hql and sample_addpartitions.hql—are included in the aws-blog-athena-importing-hive-metastores GitHub repo so that you can test the executescript.gvy script. Run them using the following commands to create the table and add partitions to it in Athena:

$> groovy executescript.gvy default sample_createtable.hql
$> groovy executescript default sample_addpartitions.hql

Summary

In this post, I showed you how to migrate an existing Hive metastore to Athena as well as how to use the Athena JDBC driver to execute scripts. Here are some ways you can extend this script:

  • Automatically discover partitions and add partitions to migrated external tables in Athena.
  • Periodically keep a Hive metastore in sync with Athena by applying only changed DDL definitions.

I hope you find this post useful and that this helps accelerate your Athena migration efforts. Please do share any feedback or suggestions in the comments section below.


About the Author

Neil_Mukerje_100Neil Mukerje is a Solutions Architect with AWS. He guides customers on AWS architecture and best practices. In his spare time, he ponders on the cosmic significance of everything he does.


Related

Derive Insights from IoT in Minutes using AWS IoT, Amazon Kinesis Firehose, Amazon Athena, and Amazon QuickSight

o_IoT_Minutes_11

Viewing all 771 articles
Browse latest View live