Quantcast
Channel: resources – Noise
Viewing all 771 articles
Browse latest View live

How to Remediate Amazon Inspector Security Findings Automatically

$
0
0

Post Syndicated from Eric Fitzgerald original https://aws.amazon.com/blogs/security/how-to-remediate-amazon-inspector-security-findings-automatically/

The Amazon Inspector security assessment service can evaluate the operating environments and applications you have deployed on AWS for common and emerging security vulnerabilities automatically. As an AWS-built service, Amazon Inspector is designed to exchange data and interact with other core AWS services not only to identify potential security findings, but also to automate addressing those findings.

Previous related blog posts showed how you can deliver Amazon Inspector security findings automatically to third-party ticketing systems and automate the installation of the Amazon Inspector agent on new Amazon EC2 instances. In this post, I show how you can automatically remediate findings generated by Amazon Inspector. To get started, you must first run an assessment and publish any security findings to an Amazon Simple Notification Service (SNS) topic. Then, you create an AWS Lambda function that is triggered by those notifications. Finally, the Lambda function examines the findings, and then implements the appropriate remediation based on the type of issue.

Use case

In this post’s example, I find a common vulnerability and exposure (CVE) for a missing update and use Lambda to call the Amazon EC2 Systems Manager to update the instance. However, this is just one use case and the underlying logic can be used for multiple cases such as software and application patching, kernel version updates, security permissions and roles changes, and configuration changes.

The solution

Overview

The solution in this blog post does the following:

  1. Launches a new Amazon EC2 instance, deploying the EC2 Simple Systems Manager (SSM) agent and its role to the instance.
  2. Deploys the Amazon Inspector agent to the instance by using EC2 Systems Manager.
  3. Creates an SNS topic to which Amazon Inspector will publish messages.
  4. Configures an Amazon Inspector assessment template to post finding notifications to the SNS topic.
  5. Creates the Lambda function that is triggered by notifications to the SNS topic and uses EC2 Systems Manager from within the Lambda function to perform automatic remediation on the instance.

1.  Launch an EC2 instance with EC2 Systems Manager enabled

In my previous Security Blog post, I discussed the use of EC2 user data to deploy the EC2 SSM agent to a Linux instance. To enable the type of autoremediation we are talking about, it is necessary to have the EC2 Systems Manager installed on your instances. If you already have EC2 Systems Manager installed on your instances, you can move on to Step 2. Otherwise, let’s take a minute to review how the process works:

  1. Create an AWS Identity and Access Management (IAM) role so that the on-instance EC2 SSM agent can communicate with EC2 Systems Manager. You can learn more about the process of creating a role while launching an instance.
  2. While launching the instance with the EC2 launch wizard, associate the role you just created with the new instance and provide the appropriate script as user data for your operating system and architecture to install the EC2 Systems Manager agent as the instance is launched. See the process and scripts.

Screenshot of configuring instance details

Note: You must change the scripts slightly when copying them from the instructions to the EC2 user data. The word region in the curl command must be replaced with the AWS region code (for example, us-east-1).

2.  Deploy the Amazon Inspector agent to the instance by using EC2 Systems Manager

You can deploy the Amazon Inspector agent with EC2 Systems Manager, with EC2 instance user data, or by connecting to an EC2 instance via SSH and running the installation steps manually. Because you just installed the EC2 SSM agent, you will use that method.

To deploy the Amazon Inspector agent:

  1. Navigate to the EC2 console in the desired region. In the navigation pane, choose Command History under Commands near the bottom of the list.
  2. Choose Run a command.
  3. Choose the AWS-RunShellScript command document, and then choose Select instances to specify the instance that you created previously. Note: If you do not see the instance in that list, you probably did not successfully install the EC2 SSM agent. This means you have to start over with the previous section. Common mistakes include failing to associate a role with the instance, failing to associate the correct policy with the role, or providing an incorrect user data script.
  4. Paste the following script in the Commands.
    #!/bin/bash
    cd /tmp
    curl -O https://d1wk0tztpsntt1.cloudfront.net/linux/latest/install
    chmod a+x /tmp/install
    bash /tmp/install
  5. Choose Run to execute the script on the instance.

Screenshot of deploying the Amazon Inspector agent

3.  Create an SNS topic to which Amazon Inspector will publish messages

Amazon SNS uses topics, communication channels for sending messages and subscribing to notifications. You will create an SNS topic for this solution to which Amazon Inspector publishes messages whenever there is a security finding. Later, you will create a Lambda function that subscribes to this topic and receives a notification whenever a new security finding is generated.

To create an SNS topic:

  1. In the AWS Management Console, navigate to the SNS console.
  2. Choose Create topic. Type a topic name and a display name, and choose Create topic.
  3. From the list of displayed topics, choose the topic that you just created by selecting the check box to the left of the topic name, and then choose Edit topic policy from the Other topic actions drop-down list.
  4. In the Advanced view tab, find the Principal section of the policy document. In that section, replace the line that says “AWS”: “*” with the following text: “Service”: “inspector.amazonaws.com” (see the following screenshot).
  5. Choose Update policy to save the changes.
  6. Choose Edit topic policy On the Basic view tab, set the topic policy to allow Only me (topic owner) to subscribe to the topic, and choose Update policy to save the changes.

Screenshot of editing the topic policy

4.  Configure an Amazon Inspector assessment template to post finding notifications to the SNS topic

An assessment template is a configuration that tells Amazon Inspector how to construct a specific security evaluation. For example, an assessment template can tell Amazon Inspector which EC2 instances to target and which rules packages to evaluate. You can configure a template to tell Amazon Inspector to generate SNS notifications when findings are identified. In order to enable automatic remediation, you either create a new template or modify an existing template to set up SNS notifications to the SNS topic that you just created.

To enable automatic remediation:

  1. Sign in to the AWS Management Console and navigate to the Amazon Inspector console.
  2. Choose Assessment templates in the navigation pane.
  3. Choose one of your existing Amazon Inspector assessment templates. If you need to create a new Amazon Inspector template, type a name for the template and choose the Common Vulnerabilities and Exposures rules package. Then go back to the list and select the template.
  4. Expand the template so that you can see all the settings by choosing the right-pointing arrowhead in the row for that template.
  5. Choose the pencil icon next to the SNS topics.
  6. Add the SNS topic that you created in the previous section by choosing it from the Select a new topic to notify of events drop-down list (see the following screenshot).
  7. Choose Save to save your changes.

Screenshot of configuring the SNS topic

5.  Create the Lambda autoremediation function

Now, create a Lambda function that listens for Amazon Inspector to notify it of new security findings, and then tells the EC2 SSM agent to run the appropriate system update command (apt-get update or yum update) if the finding is for an unpatched CVE vulnerability.

Step 1: Create an IAM role for the Lambda function to send EC2 Systems Manager commands

A Lambda function needs specific permissions to interact with your AWS resources. You provide these permissions in the form of an IAM role, and the role has a policy attached that permits the Lambda function to receive SNS notifications and to send commands to the Amazon Inspector agent via EC2 Systems Manager.

To create the IAM role:

  1. Sign in to the AWS Management Console, and navigate to the IAM console.
  2. Choose Roles in the navigation pane, and then choose Create new role.
  3. Type a name for the role. You should (but are not required to) use a descriptive name such as Amazon Inspector-agent-autodeploy-lambda. Regardless of the name you choose, remember the name because you will need it in the next section.
  4. Choose the AWS Lambda role type.
  5. Attach the policies AWSLambdaBasicExecutionRole and AmazonSSMFullAccess.
  6. Choose Create the role.

Step 2: Create the Lambda function that will update the host by sending the appropriate commands through EC2 Systems Manager

Now, create the Lambda function. You can download the source code for this function from the .zip file link in the following procedure. Some things to note about the function are:

  • The function listens for notifications on the configured SNS topic, but only acts on notifications that are from Amazon Inspector that report a finding and are reporting a CVE vulnerability.
  • The function checks to ensure that the EC2 SSM agent is installed, running, and healthy on the EC2 instance for which the finding was reported.
  • The function checks the operating system of the EC2 instance and determines if it is a supported Linux distribution (Ubuntu or Amazon Linux).
  • The function sends the distribution-appropriate package update command (apt-get update or yum update) to the EC2 instance via EC2 Systems Manager.
  • The function does not reboot the agent. You either have to add that functionality yourself or reboot the agent manually.

To create the Lambda function:

  1. Sign in to the AWS Management Console in the region that you intend to use, and navigate to the Lambda console.
  2. Choose Create a Lambda function.
  3. On the Select a blueprint page, choose the Hello World Python blueprint and choose Next.
  4. On the Configure triggers page, choose SNS as the trigger, and choose the SNS topic that you created in the last section. Choose the Enable trigger check box and choose Next.
  5. Type a name and description for the function. Choose Python 2.7 runtime.
  6. Download and save this .zip file.
  7. Unzip the .zip file, and copy the entire contents of lambda-auto-remediate.py to your clipboard.
  8. Choose Edit code inline under Code entry type in the Lambda function, and replace all the existing text with the text that you just copied from lambda-auto-remediate.py.
  9. Select Choose an existing role from the Role drop-down list, and then in the Existing role box, choose the IAM role that you created in Step 1 of this section.
  10. Choose Next and then Create function to complete the creation of the function.

You now have a working system that monitors Amazon Inspector for CVE findings and will patch affected Ubuntu or Amazon Linux instances automatically. You can view or modify the source code for the function in the Lambda console. Additionally, Lambda and EC2 Systems Manager will generate logs whenever the function causes an agent to patch itself.

Note: If you have multiple CVE findings for an instance, the remediation commands might be executed more than once, but the package managers for Linux handle this efficiently. You still have to reboot the instances yourself, but EC2 Systems Manager includes a feature to do that as well.

Summary

Using Amazon Inspector with Lambda allows you to automate certain security tasks. Because Lambda supports Python and JavaScript, development of such automation is similar to automating any other kind of administrative task via scripting. Even better, you can take actions on EC2 instances in response to Amazon Inspector findings by using Lambda to invoke EC2 Systems Manager. This enables you to take instance-specific actions based on issues that Amazon Inspector finds. Combining these capabilities allows you to build event-driven security automation to help better secure your AWS environment in near real time.

If you have comments about this blog post, submit them in the “Comments” section below. If you have questions about implementing the solution in this post, start a new thread on the Amazon Inspector forum.

– Eric


New! Attach an AWS IAM Role to an Existing Amazon EC2 Instance by Using the AWS CLI

$
0
0

Post Syndicated from Apurv Awasthi original https://aws.amazon.com/blogs/security/new-attach-an-aws-iam-role-to-an-existing-amazon-ec2-instance-by-using-the-aws-cli/

AWS Identity and Access Management (IAM) roles enable your applications running on Amazon EC2 to use temporary security credentials that AWS creates, distributes, and rotates automatically. Using temporary credentials is an IAM best practice because you do not need to maintain long-term keys on your instance. Using IAM roles for EC2 also eliminates the need to use long-term AWS access keys that you have to manage manually or programmatically. Starting today, you can enable your applications to use temporary security credentials provided by AWS by attaching an IAM role to an existing EC2 instance. You can also replace the IAM role attached to an existing EC2 instance.

In this blog post, I show how you can attach an IAM role to an existing EC2 instance by using the AWS CLI.

Overview of the solution

In this blog post’s solution, I:

  1. Create an IAM role.
  2. Attach the IAM role to an existing EC2 instance that was originally launched without an IAM role.
  3. Replace the attached IAM role.

For the purpose of this post, I will use the placeholder, YourNewRole, to denote the newly created IAM role; the placeholder, YourNewRole-Instance-Profile, to denote the instance profile associated with this role; and the placeholder, YourInstanceId, to denote the existing instance. Be sure to replace these placeholders with the resource names from your account.

This post assumes you have set up the AWS Command Line Interface (CLI), have permissions to create an IAM role, and have permissions to call EC2 APIs.

Create an IAM role

Note: If you want to attach an existing IAM role, skip ahead to the “Attach the IAM role to an existing EC2 instance that was originally launched without an IAM role” section of this post. You also can create an IAM role using the console, and then skip ahead to the same section.

Before you can create an IAM role from the AWS CLI, you must create a trust policy. A trust policy permits AWS services such as EC2 to assume an IAM role on behalf of your application. To create the trust policy, copy the following policy and paste it in a text file that you save with the name, YourNewRole-Trust-Policy.json.

{
  "Version": "2012-10-17",
  "Statement": [
    {
      "Effect": "Allow",
      "Principal": {
        "Service": "ec2.amazonaws.com"
      },
      "Action": "sts:AssumeRole"
    }
  ]
}

Now that you have created the trust policy, you are ready to create an IAM role that you can then attach to an existing EC2 instance.

To create an IAM role from the AWS CLI:

  1. Open the AWS CLI and call the create-role command to create the IAM role, YourNewRole, based on the trust policy, YourNewRole-Trust-Policy.json.
    $aws iam create-role --role-name YourNewRole --assume-role–policy-document file://YourNewRole-Trust-Policy.json
    
  2. Call the attach-role-policy command to grant this IAM role permission to access resources in your account. In this example, I assume your application requires read-only access to all Amazon S3 buckets in your account and objects inside the buckets. Therefore, I will use the AmazonS3ReadOnlyAccess AWS managed policy. For more information about AWS managed policies, see Working with Managed Policies.
    $aws iam attach-role-policy --role-name YourNewRole --policy-arn arn:aws:iam::aws:policy/AmazonS3ReadOnlyAccess
  3. Call the create-instance-profile command, followed by the add-role-to-instance-profile command to create the IAM instance profile, YourNewRole-Instance-Profile. The instance profile allows EC2 to pass the IAM role, YourNewRole, to an EC2 instance. To learn more, see Using Instance Profiles.
    $aws iam create-instance-profile --instance-profile-name YourNewRole-Instance-Profile
    $aws iam add-role-to-instance-profile --role-name YourNewRole --instance-profile-name YourNewRole-Instance-Profile

You have successfully created the IAM role, YourNewRole.

Attach the IAM role to an existing EC2 instance that was originally launched without an IAM role

You are now ready to attach the IAM role, YourNewRole, to the EC2 instance, YourInstanceId. To attach the role:

  1. Call the associate-iam-instance-profile command to attach the instance profile, YourNewRole-Instance-Profile, for the newly created IAM role, YourNewRole, to your EC2 instance, YourInstanceId.
    $aws ec2 associate-iam-instance-profile --instance-id YourInstanceId --iam-instance-profile Name=YourNewRole-Instance-Profile
  2. You can verify that the IAM role is now attached to the instance by calling the describe-iam-instance-profile-association command.
    $aws ec2 describe-iam-instance-profile-associations
  3. Now, you can update your application to use the IAM role to access AWS resources and delete the long-term keys from your instance.

Replace the attached IAM role

If your role requirements change and you need to modify the permissions you granted your EC2 instance via the IAM role, you can replace the policy attached to the IAM role. However, this will also modify permissions for other EC2 instances that use this IAM role.

Instead, you could call replace-iam-instance-profile-association to replace the currently attached IAM role, YourNewRole, with another IAM role without terminating your EC2 instance. In the following example, I use the placeholder, YourCurrentAssociation-id, to denote the current iam-instance-profile-association instance, and the placeholder, YourReplacementRole-Instance-Profile, to denote the replacement instance profile you want to associate with that instance. Be sure to replace these placeholders with the appropriate association-id and the IAM instance profile name from your account.

$aws ec2 replace-iam-instance-profile-association --association-id YourCurrentAssociation-id --iam-instance-profile Name=YourReplacementRole-Instance-Profile 

Note: You can get YourCurrentAssociation-id by making the describe-iam-instance-profile-associations call.

Conclusion

As I have shown in this post, you can enable your applications to use temporary security credentials provided by AWS by attaching an IAM role to an existing EC2 instance, without relaunching the instance. You can also replace the IAM role attached to an EC2 instance, without terminating mission-critical workloads.

If you have comments about this post, submit them in the “Comments” section below. If you have questions or suggestions, please start a new thread on the IAM forum.

– Apurv

How to Easily Log On to AWS Services by Using Your On-Premises Active Directory

$
0
0

Post Syndicated from Ron Cully original https://aws.amazon.com/blogs/security/how-to-easily-log-on-to-aws-services-by-using-your-on-premises-active-directory/

AWS Directory Service for Microsoft Active Directory (Enterprise Edition), also known as Microsoft AD, now enables your users to log on with just their on-premises Active Directory (AD) user name—no domain name is required. This new domainless logon feature makes it easier to set up connections to your on-premises AD for use with applications such as Amazon WorkSpaces and Amazon QuickSight, and it keeps the user logon experience free from network naming. This new interforest trusts capability is now available when using Microsoft AD with Amazon WorkSpaces and Amazon QuickSight Enterprise Edition.

In this blog post, I explain how Microsoft AD domainless logon works with AD interforest trusts, and I show an example of setting up Amazon WorkSpaces to use this capability.

To follow along, you must have already implemented an on-premises AD infrastructure. You will also need to have an AWS account with an Amazon Virtual Private Cloud (Amazon VPC). I start with some basic concepts to explain domainless logon. If you have prior knowledge of AD domain names, NetBIOS names, logon names, and AD trusts, you can skip the following “Concepts” section and move ahead to the “Interforest Trust with Domainless Logon” section.

Concepts: AD domain names, NetBIOS names, logon names, and AD trusts

AD directories are distributed hierarchical databases that run on one or more domain controllers. AD directories comprise a forest that contains one or more domains. Each forest has a root domain and a global catalog that runs on at least one domain controller. Optionally, a forest may contain child domains as a way to organize and delegate administration of objects. The domains contain user accounts each with a logon name. Domains also contain objects such as groups, computers, and policies; however, these are outside the scope of this blog post. When child domains exist in a forest, root domains are frequently unused for user accounts. The global catalog contains a list of all user accounts for all domains within the forest, similar to a searchable phonebook listing of all domain accounts. The following diagram illustrates the basic structure and naming of a forest for the company example.com.

Diagram of basic structure and naming of forest for example.com

Domain names

AD domains are Domain Name Service (DNS) names, and domain names are used to locate user accounts and other objects in the directory. A forest has one root domain, and its name consists of a prefix name and a suffix name. Often administrators configure their forest suffix to be the registered DNS name for their organization (for example, example.com) and the prefix is a name associated with their forest root domain (for example, us). Child domain names consist of a prefix followed by the root domain name. For example, let’s say you have a root domain us.example.com, and you created a child domain for your sales organization with a prefix of sales. The FQDN is the domain prefix of the child domain combined with the root domain prefix and the organization suffix, all separated by periods (“.”). In this example, the FQDN for the sales domain is sales.us.example.com.

NetBIOS names

NetBIOS is a legacy application programming interface (API) that worked over network protocols. NetBIOS names were used to locate services in the network and, for compatibility with legacy applications, AD associates a NetBIOS name with each domain in the directory. Today, NetBIOS names continue to be used as simplified names to find user accounts and services that are managed within AD and must be unique within the forest and any trusted forests (see “Interforest trusts” section that follows). NetBIOS names must be 15 or fewer characters long.

For this post, I have chosen the following strategy to ensure that my NetBIOS names are unique across all domains and all forests. For my root domain, I concatenate the root domain prefix with the forest suffix, without the .com and without the periods. In this case, usexample is the NetBIOS name for my root domain us.example.com. For my child domains, I concatenate the child domain prefix with the root domain prefix without periods. This results in salesus as the NetBIOS name for the child domain sales.us.example.com. For my example, I can use the NetBIOS name salesus instead of the FQDN sales.us.example.com when searching for users in the sales domain.

Logon names

Logon names are used to log on to Active Directory and must be 20 or fewer characters long (for example, jsmith or dadams). Logon names must be unique within a domain, but they do not have to be unique between different domains in the same forest. For example, there can be only one dadams in the sales.us.example.com (salesus) domain, but there could also be a dadams in the hr.us.example.com (hrus) domain. When possible, it is a best practice for logon names to be unique across all forests and domains in your AD infrastructure. By doing so, you can typically use the AD logon name as a person’s email name (the local-part of an email address), and your forest suffix as the email domain (for example, dadams@example.com). This way, end users only have one name to remember for email and logging on to AD. Failure to use unique logon names results in some people having different logon and email names.

For example, let’s say there is a Daryl Adams in hrus with a logon name of dadams and a Dale Adams in salesus with a logon name of dadams. The company is using example.com as its email domain. Because email requires addresses to be unique, you can only have one dadams@example.com email address. Therefore, you would have to give one of these two people (let’s say Dale Adams) a different email address such as daleadams@example.com. Now Dale has to remember to logon to the network as dadams (the AD logon name) but have an email name of daleadams. If unique user names were assigned instead, Dale could have a logon name of daleadams and an email name of daleadams.

Logging on to AD

To allow AD to find user accounts in the forest during log on, users must include their logon name and the FQDN or the NetBIOS name for the domain where their account is located. Frequently, the computers used by people are joined to the same domain as the user’s account. The Windows desktop logon screen chooses the computer’s domain as the default domain for logon, so users typically only need to type their logon name and password. However, if the computer is joined to a different domain than the user, the user’s FQDN or NetBIOS name are also required.

For example, suppose jsmith has an account in sales.us.example.com, and the domain has a NetBIOS name salesus. Suppose jsmith tries to log on using a shared computer that is in the computers.us.example.com domain with a NetBIOS name of uscomputers. The computer defaults the logon domain to uscomputers, but jsmith does not exist in the uscomputers domain. Therefore, jsmith must type her logon name and her FQDN or NetBIOS name in the user name field of the Windows logon screen. Windows supports multiple syntaxes to do this including NetBIOS\username (salesus\jsmith) and FQDN\username (sales.us.com\jsmith).

Interforest trusts

Most organizations have a single AD forest in which to manage user accounts, computers, printers, services, and other objects. Within a single forest, AD uses a transitive trust between all of its domains. A transitive trust means that within a trust, domains trust users, computers, and services that exist in other domains in the same forest. For example, a printer in printers.us.example.com trusts sales.us.example.com\jsmith. As long as jsmith is given permissions to do so, jsmith can use the printer in printers.us.example.com.

An organization at times might need two or more forests. When multiple forests are used, it is often desirable to allow a user in one forest to access a resource, such as a web application, in a different forest. However, trusts do not work between forests unless the administrators of the two forests agree to set up a trust.

For example, suppose a company that has a root domain of us.example.com has another forest in the EU with a root domain of eu.example.com. The company wants to let users from both forests share the same printers to accommodate employees who travel between locations. By creating an interforest trust between the two forests, this can be accomplished. In the following diagram, I illustrate that us.example.com trusts users from eu.example.com, and the forest eu.example.com trusts users from us.example.com through a two-way forest trust.

Diagram of a two-way forest trust

In rare cases, an organization may require three or more forests. Unlike domain trusts within a single forest, interforest trusts are not transitive. That means, for example, that if the forest us.example.com trusts eu.example.com, and eu.example.com trusts jp.example.com, us.example.com does not automatically trust jp.example.com. For us.example.com to trust jp.example.com, an explicit, separate trust must be created between these two forests.

When setting up trusts, there is a notion of trust direction. The direction of the trust determines which forest is trusting and which forest is trusted. In a one-way trust, one forest is the trusting forest, and the other is the trusted forest. The direction of the trust is from the trusting forest to the trusted forest. A two-way trust is simply two one-way trusts going in opposite directions; in this case, both forests are both trusting and trusted.

Microsoft Windows and AD use an authentication technology called Kerberos. After a user logs on to AD, Kerberos gives the user’s Windows account a Kerberos ticket that can be used to access services. Within a forest, the ticket can be presented to services such as web applications to prove who the user is, without the user providing a logon name and password again. Without a trust, the Kerberos ticket from one forest will not be honored in a different forest. In a trust, the trusting forest agrees to trust users who have logged on to the trusted forest, by trusting the Kerberos ticket from the trusted forest. With a trust, the user account associated with the Kerberos ticket can access services in the trusting forest if the user account has been granted permissions to use the resource in the trusting forest.

Interforest Trust with Domainless Logon

For many users, remembering domain names or NetBIOS names has been a source of numerous technical support calls. With the new updates to Microsoft AD, AWS applications such as Amazon WorkSpaces can be updated to support domainless logon through interforest trusts between Microsoft AD and your on-premises AD. Domainless logon eliminates the need for people to enter a domain name or a NetBIOS name to log on if their logon name is unique across all forests and all domains.

As described in the “Concepts” section earlier in this post, AD authentication requires a logon name to be presented with an FQDN or NetBIOS name. If AD does not receive an FQDN or NetBIOS name, it cannot find the user account in the forest. Windows can partially hide domain details from users if the Windows computer is joined to the same domain in which the user’s account is located. For example, if jsmith in salesus uses a computer that is joined to the sales.us.example.com domain, jsmith does not have to remember her domain name or NetBIOS name. Instead, Windows uses the domain of the computer as the default domain to try when jsmith enters only her logon name. However, if jsmith is using a shared computer that is joined to the computers.us.example.com domain, jsmith must log on by specifying her domain of sales.us.example.com or her NetBIOS name salesus.

With domainless logon, Microsoft AD takes advantage of global catalogs, and because most user names are unique across an entire organization, the need for an FQDN or NetBIOS name for most users to log on is eliminated.

Let’s look at how domainless logon works.

AWS applications that use Directory Service use a similar AWS logon page and identical logon process. Unlike a Windows computer joined to a domain, the AWS logon page is associated with a Directory Service directory, but it is not associated with any particular domain. When Microsoft AD is used, the User name field of the logon page accepts an FQDN\logon name, NetBIOS\logon name, or just a logon name. For example, the logon screen will accept sales.us.example.com\jsmith, salesus\jsmith, or jsmith.

In the following example, the company example.com has a forest in the US and EU, and one in AWS using Microsoft AD. To make NetBIOS names unique, I use my naming strategy described earlier in the section “NetBIOS names.” For the US root domain, the FQDN is us.example.com,and the NetBIOS name is usexample. For the EU, the FQDN is eu.example.com and the NetBIOS is euexample. For AWS, the FQDN is aws.example.com and the NetBIOS awsexample. Continuing with my naming strategy, my unique child domains have the NetBIOS names salesus, hrus, saleseu, hreu. Each of the forests has a global catalog that lists all users from all domains within the forest. The following graphic illustrates the forest configuration.

Diagram of the forest configuration

As shown in the preceding diagram, the global catalog for the US forest contains a jsmith in sales and dadams in hr. For the EU, there is a dadams in sales and a tpella in hr, and the AWS forest has a bharvey. The users shown in green type (jsmith, tpella, and bharvey) have unique names across all forests in the trust and qualify for domainless logon. The two dadams shown in red do not qualify for domainless logon because the user name is not unique across all trusted forests.

As shown in the following diagram, when a user types in only a logon name (such as jsmith or dadams) without an FQDN or NetBIOS name, domainless logon simultaneously searches for a matching logon name in the global catalogs of the Microsoft AD forest (aws.example.com) and all trusted forests (us.example.com and eu.example.com). For jsmith, the domainless logon finds a single user account that matches the logon name in sales.us.example.com and adds the domain to the logon name before authenticating. If no accounts match the logon name, authentication fails before attempting to authenticate. If dadams in the EU attempts to use only his logon name, domainless logon finds two dadams users, one in hr.us.example.com and one in sales.eu.example.com. This ambiguity prevents domainless logon. To log on, dadams must provide his FQDN or NetBIOS name (in other words, sales.eu.example.com\dadams or saleseu\dadams).

Diagram showing when a user types in only a logon name without an FQDN or NetBIOS name

Upon successful logon, the logon page caches in a cookie the logon name and domain that were used. In subsequent logons, the end user does not have to type anything except their password. Also, because the domain is cached, the global catalogs do not need to be searched on subsequent logons. This minimizes global catalog searching, maximizes logon performance, and eliminates the need for users to remember domains (in most cases).

To maximize security associated with domainless logon, all authentication failures result in an identical failure notification that tells the user to check their domain name, user name, and password before trying again. This prevents hackers from using error codes or failure messages to glean information about logon names and domains in your AD directory.

If you follow best practices so that all user names are unique across all domains and all forests, domainless logon eliminates the requirement for your users to remember their FQDN or NetBIOS name to log on. This simplifies the logon experience for end users and can reduce your technical support resources that you use currently to help end users with logging on.

Solution overview

In this example of domainless logon, I show how Amazon WorkSpaces can use your existing on-premises AD user accounts through Microsoft AD. This example requires:

  1. An AWS account with an Amazon VPC.
  2. An AWS Microsoft AD directory in your Amazon VPC.
  3. An existing AD deployment in your on-premises network.
  4. A secured network connection from your on-premises network to your Amazon VPC.
  5. A two-way AD trust between your Microsoft AD and your on-premises AD.

I configure Amazon WorkSpaces to use a Microsoft AD directory that exists in the same Amazon VPC. The Microsoft AD directory is configured to have a two-way trust to the on-premises AD. Amazon WorkSpaces uses Microsoft AD and the two-way trust to find users in your on-premises AD and create Amazon WorkSpaces instances. After the instances are created, I send end users an invitation to use their Amazon WorkSpaces. The invitation includes a link for them to complete their configuration and a link to download an Amazon WorkSpaces client to their directory. When the user logs in to their Amazon WorkSpaces account, the user specifies the login name and password for their on-premises AD user account. Through the two-way trust between Microsoft AD and the on-premises AD, the user is authenticated and gains access to their Amazon WorkSpaces desktop.

Getting started

Now that we have covered how the pieces fit together and you understand how FQDN, NetBIOS, and logon names are used, let’s walk through the steps to use Microsoft AD with domainless logon to your on-premises AD for Amazon WorkSpaces.

Step 1 – Set up your Microsoft AD in your Amazon VPC

If you already have a Microsoft AD directory running, skip to Step 2. If you do not have a Microsoft AD directory to use with Amazon WorkSpaces, you can create the directory in the Directory Service console and attach to it from the Amazon WorkSpaces console, or you can create the directory within the Amazon WorkSpaces console.

To create the directory from Amazon WorkSpaces (as shown in the following screenshot):

  1. Sign in to the AWS Management Console.
  2. Under All services, choose WorkSpaces from the Desktop & App Streaming section.
  3. Choose Get Started Now.
  4. Choose Launch next to Advanced Setup, and then choose Create Microsoft AD.

To create the directory from the Directory Service console:

  1. Sign in to the AWS Management Console.
  2. Under Security & Identity, choose Directory Service.
  3. Choose Get Started Now.
  4. Choose Create Microsoft AD.
    Screenshot of choosing "Create Microsoft AD"

In this example, I use example.com as my organization name. The Directory DNS is the FQDN for the root domain, and it is aws.example.com in this example. For my NetBIOS name, I follow the naming model I showed earlier and use awsexample. Note that the Organization Name shown in the following screenshot is required only when creating a directory from Amazon WorkSpaces; it is not required when you create a Microsoft AD directory from the AWS Directory Service workflow.

Screenshot of establishing directory details

For more details about Microsoft AD creation, review the steps in AWS Directory Service for Microsoft Active Directory (Enterprise Edition). After entering the required parameters, it may take up to 40 minutes for the directory to become active so that you might want to exit the console and come back later.

Note: First-time directory users receive 750 free directory hours.

Step 2 – Create a trust relationship between your Microsoft AD and on-premises domains

To create a trust relationship between your Microsoft AD and on-premises domains:

  1. From the AWS Management Console, open Directory Service.
  2. Locate the Microsoft AD directory to use with Amazon WorkSpaces and choose its Directory ID link (as highlighted in the following screenshot).
    Screenshot of Directory ID link
  3. Choose the Trust relationships tab for the directory and follow the steps in Create a Trust Relationship (Microsoft AD) to create the trust relationships between your Microsoft AD and your on-premises domains.

For details about creating the two-way trust to your on-premises AD forest, see Tutorial: Create a Trust Relationship Between Your Microsoft AD on AWS and Your On-Premises Domain.

Step 3 – Create Amazon Workspaces for on-premises users

For details about getting started with Amazon WorkSpaces, see Getting Started with Amazon WorkSpaces. The following are the setup steps.

  1. From the AWS Management Console, choose
  2. Choose Directories in the left pane.
  3. Locate and select the Microsoft AD directory that you set up in Steps 1 and 2.
  4. If the Registered status for the directory says No, open the Actions menu and choose Register.
    Screenshot of "Register" in "Actions" menu
  5. Wait until the Registered status changes to Yes. The status change should take only a few seconds.
  6. Choose the WorkSpaces in the left pane.
  7. Choose Launch WorkSpaces.
  8. Select the Microsoft AD directory that you set up in Steps 1 and 2 and choose Next Step.
    Screenshot of choosing the Microsoft AD directory
  1. In the Select Users from Directory section, type a partial or full logon name, email address, or user name for an on-premises user for whom you want to create an Amazon WorkSpace and choose Search. The returned list of users should be the users from your on-premises AD forest.
  2. In the returned results, scroll through the list and select the users for whom to create an Amazon WorkSpace and choose Add Selected. You may repeat the search and select processes until up to 20 users appear in the Amazon WorkSpaces list at the bottom of the screen. When finished, choose Next Step.
    Screenshot of identifying users for whom to create a WorkSpace
  3. Select a bundle to be used for the Amazon WorkSpaces you are creating and choose Next Step.
  4. Choose the Running Mode, Encryption settings, and configure any Tags. Choose Next Step.
  5. Review the configuration of the Amazon WorkSpaces and click Launch WorkSpaces. It may take up to 20 minutes for the Amazon WorkSpaces to be available.
    Screenshot of reviewing the WorkSpaces configuration

Step 4 – Invite the users to log in to their Amazon Workspaces

  1. From the AWS Management Console, choose WorkSpaces from the Desktop & App Streaming section.
  2. Choose the WorkSpaces menu item in the left pane.
  3. Select the Amazon WorkSpaces you created in Step 3. Then choose the Actions menu and choose Invite User. A login email is sent to the users.
  4. Copy the text from the Invite screen, then paste the text into an email to the user.

Step 5 – Users log in to their Amazon WorkSpace

  1. The users receive their Amazon WorkSpaces invitations in email and follow the instructions to launch the Amazon WorkSpaces login screen.
  2. Each user enters their user name and password.
  3. After a successful login, future Amazon WorkSpaces logins from the same computer will present what the user last typed on the login screen. The user only needs to provide their password to complete the login. If only a login name were provided by the user in the last successful login, the domain for the user account is silently added to the subsequent login attempt.

To learn more about Directory Service, see the AWS Directory Service home page. If you have questions about Directory Service products, please post them on the Directory Service forum. To learn more about Amazon WorkSpaces, visit the Amazon WorkSpaces home page. For questions related to Amazon WorkSpaces, please post them on the Amazon WorkSpaces forum.

– Ron

CSIS’s Cybersecurity Agenda

$
0
0

Post Syndicated from Bruce Schneier original https://www.schneier.com/blog/archives/2017/02/csiss_cybersecu.html

The Center for Strategic and International Studies (CSIS) published “From Awareness to Action: A Cybersecurity Agenda for the 45th President” (press release here). There’s a lot I agree with — and some things I don’t — but these paragraphs struck me as particularly insightful:

The Obama administration made significant progress but suffered from two conceptual problems in its cybersecurity efforts. The first was a belief that the private sector would spontaneously generate the solutions needed for cybersecurity and minimize the need for government action. The obvious counter to this is that our problems haven’t been solved. There is no technological solution to the problem of cybersecurity, at least any time soon, so turning to technologists was unproductive. The larger national debate over the role of government made it difficult to balance public and private-sector responsibility and created a sense of hesitancy, even timidity, in executive branch actions.

The second was a misunderstanding of how the federal government works. All White Houses tend to float above the bureaucracy, but this one compounded the problem with its desire to bring high-profile business executives into government. These efforts ran counter to what is needed to manage a complex bureaucracy where greatly differing rules, relationships, and procedures determine the success of any initiative. Unlike the private sector, government decisionmaking is more collective, shaped by external pressures both bureaucratic and political, and rife with assorted strictures on resources and personnel.

BitTorrent Expert Report Slams Movie Piracy Evidence

$
0
0

Post Syndicated from Ernesto original https://torrentfreak.com/bittorrent-expert-report-slams-movie-piracy-evidence-170210/

In recent years many people have accused so-called ‘copyright trolls’ of using dubious tactics and shoddy evidence, to extract cash settlements from alleged movie pirates.
As the most active copyright litigant in the United States, adult entertainment outfit Malibu Media has been subjected to these allegations as well.

The company, widely known for its popular “X-Art” brand, has gone after thousands of alleged offenders in recent years earning millions of dollars in the process. While many of its targets eventually pay up, now and then the company faces fierce resistance.

This is also true in the case Malibu launched against the Californian Internet subscriber behind the IP-address 76.126.99.126. This defendant has put up quite a fight in recent months and invested some healthy resources into it.

A few days ago, the defendant’s lawyer submitted a motion (pdf) for summary judgment, pointing out several flaws in the rightsholder’s complaint. While this kind of pushback is not new, the John Doe backed them up with a very detailed expert report.

The 74-page report provides an overview of the weaknesses in Malibu’s claims and the company’s evidence. It was put together by Bradley Witteman, an outside expert who previously worked as Senior Director Product Management at BitTorrent Inc.

In common with other aspects, Malibu’s file-sharing evidence was also carefully inspected. Like many other rightsholders, the adult company teamed up with the German outfit Excipio which collects data through its custom monitoring technology.

According to Witteman’s expert analysis, the output of this torrent tracking system is unreliable.

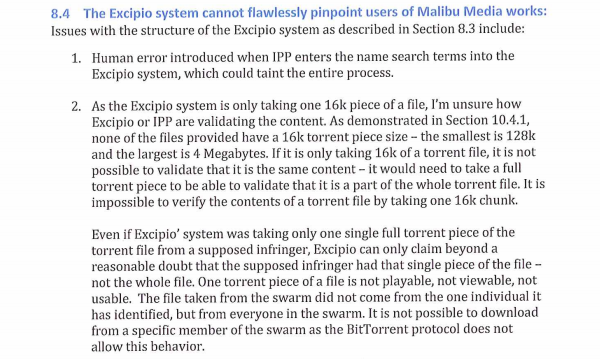
One of the major complaints is that the tracking system only takes 16k blocks from the target IP addresses, not the entire file. This means that they can’t prove that the defendant actually downloaded a full copy of the infringing work. In addition, they can’t do a proper hash comparison to verify the contents of the file.

From the expert report

That’s only part of the problem, as Mr. Witteman lists a range of possible issues in his conclusions, arguing that the reliability of the system can’t be guaranteed.

  • Human error when IPP enters information from Malibu Media into the Excipio system.
  • Mr. Patzer stated that the Excipio system does not know if the user has a complete copy of the material.
  • The Excipio system only take 16k blocks from the target IP addresses.
  • There has not been any description of the chain of custody of the IPP verification affidavits nor that the process is valid and secure.
  • IP address false positives can occur in the system.
  • The user’s access point could have been incorrectly secured.
  • The user’s computer or network interface may have been compromised and is being used as a conduit for another user’s traffic.
  • VPN software could produce an inaccurate IP address of a swarm member.
  • The fuzzy name search of file names as described by Mr. Patzer could not have identified the file kh4k52qr.125.mp4 as the content “Romp at the Ranch.”
  • Proprietary BitTorrent Client may or may not be properly implemented.
  • Claim of “zero bugs” is suspect when one of the stated components has had 5 over 431 bugs, 65 currently unresolved.
  • Zero duration data transfer times on two different files.
  • The lack of any available academic paper on, or security audit of, the software system in question.

In addition to the technical evidence, the expert report also sums up a wide range of other flaws.

Many files differ from the one’s deposited at the Copyright Office, for example, and the X-Art videos themselves don’t display a proper copyright notice. On top of that, Malibu also made no effort to protect its content with DRM.

Based on the expert review the John Doe asks the court to rule in his favor. Malibu is not a regular rightsholder, the lawyer argues, but an outfit that’s trying to generate profits through unreliable copyright infringement accusations.

“The only conclusion one can draw is that Malibu does not operate like a normal studio – make films and charge for them. Instead Malibu makes a large chunk of its money using unreliable bittorrent monitoring software which only collects a deminimus amount of data,” the Doe’s lawyer writes.

Stepping it up a notch, the lawyer likens Malibu’s operation to Prenda Law, whose principals were recently indicted and charged with conspiracy to commit fraud, money laundering, and perjury by the US Government.

“Malibu is no different than ‘Prenda Law’ in form and function. They cleverly exploit the fact that most people will settle for 5-10K when sued despite the fact that the system used to ‘capture’ their IP address is neither robust nor valid,” the motion reads.

Whether the court will agree has yet to be seen, but it’s clear that the expert report can be used as a new weapon to combat these and other copyright infringement claims.

Of course, one has to keep in mind that there are always two sides to a story.

At the same time the John Doe submitted his motion, Malibu moved ahead with a motion (pdf) for sanctions and a default judgment. The adult entertainment outfit argues that the defendant destroyed evidence on hard drives, concealed information, and committed perjury on several occasions.

To be continued…

Source: TF, for the latest info on copyright, file-sharing, torrent sites and ANONYMOUS VPN services.

AWS Direct Connect Update – Link Aggregation Groups, Bundles, and re:Invent Recap

$
0
0

Post Syndicated from Jeff Barr original https://aws.amazon.com/blogs/aws/aws-direct-connect-update-link-aggregation-groups-bundles-and-reinvent-recap/

AWS Direct Connect helps our large-scale customers to create private, dedicated network connections to their office, data center, or colocation facility. Our customers create 1 Gbps and 10 Gbps connections in order to reduce their network costs, increase data transfer throughput, and to get a more consistent network experience than is possible with an Internet-based connection.

Today I would like to tell you about a new Link Aggregation feature for Direct Connect. I’d also like to tell you about our new Direct Connect Bundles and to tell you more about how we used Direct Connect to provide a first-class customer experience at AWS re:Invent 2016.

Link Aggregation Groups
Some of our customers would like to set up multiple connections (generally known as ports) between their location and one of the 46 Direct Connect locations. Some of them would like to create a highly available link that is resilient in the face of network issues outside of AWS; others simply need more data transfer throughput.

In order to support this important customer use case, you can now purchase up to 4 ports and treat them as a single managed connection, which we call a Link Aggregation Group or LAG. After you have set this up, traffic is load-balanced across the ports at the level of individual packet flows. All of the ports are active simultaneously, and are represented by a single BGP session. Traffic across the group is managed via Dynamic LACP (Link Aggregation Control Protocol – or ISO/IEC/IEEE 8802-1AX:2016). When you create your group, you also specify the minimum number of ports that must be active in order for the connection to be activated.

You can order a new group with multiple ports and you can aggregate existing ports into a new group. Either way, all of the ports must have the same speed (1 Gbps or 10 Gbps).

All of the ports in as group will connect to the same device on the AWS side. You can add additional ports to an existing group as long as there’s room on the device (this information is now available in the Direct Connect Console). If you need to expand an existing group and the device has no open ports, you can simply order a new group and migrate your connections.

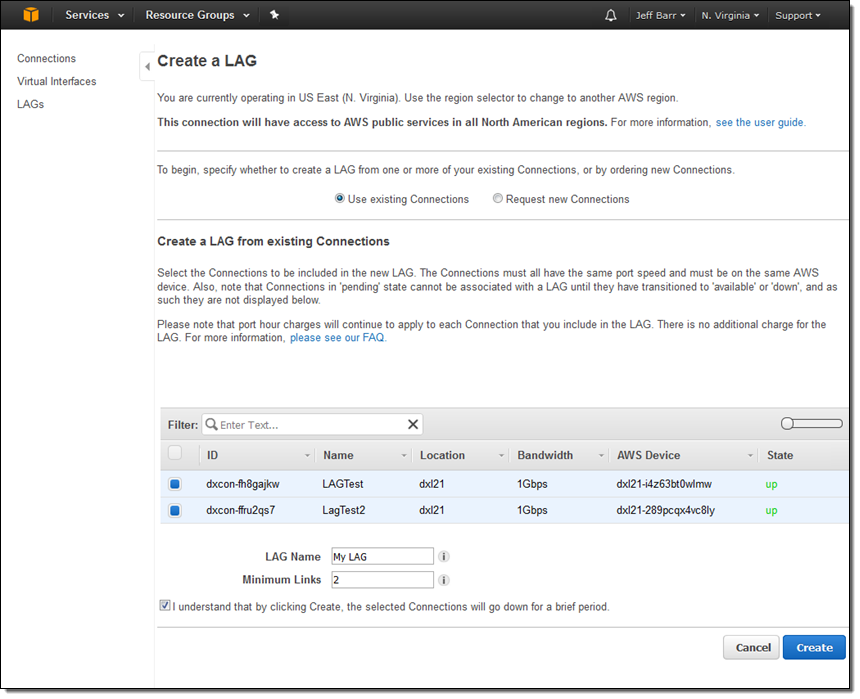
Here’s how you can make use of link aggregation from the Console. First, creating a new LAG from scratch:

And second, creating a LAG from existing connections:


Link Aggregation Groups are now available in the US East (Northern Virginia), US West (Northern California), US East (Ohio), US West (Oregon), Canada (Central), South America (São Paulo), Asia Pacific (Mumbai), and Asia Pacific (Seoul) Regions and you can create them today. We expect to make them available in the remaining regions by the end of this month.

Direct Connect Bundles
We announced some powerful new Direct Connect Bundles at re:Invent 2016. Each bundle is an advanced, hybrid reference architecture designed to reduce complexity and to increase performance. Here are the new bundles:

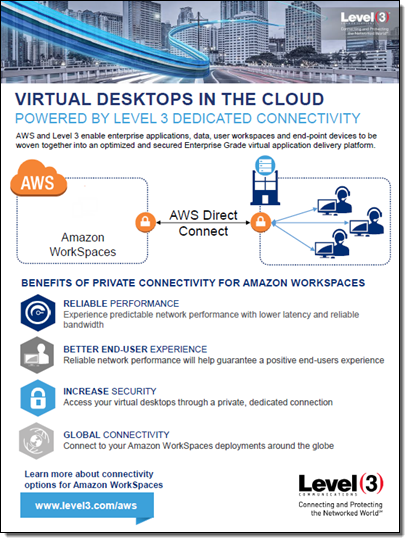
Level 3 Communications Powers Amazon WorkSpaces – Connects enterprise applications, data, user workspaces, and end-point devices to offer reliable performance and a better end-user experience:

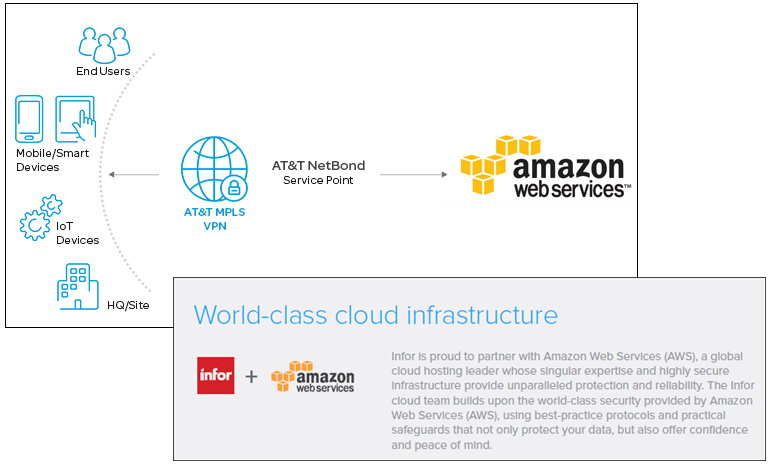
SaaS Architecture enhanced by AT&T NetBond – Enhances quality and user experience for applications migrated to the AWS Cloud:

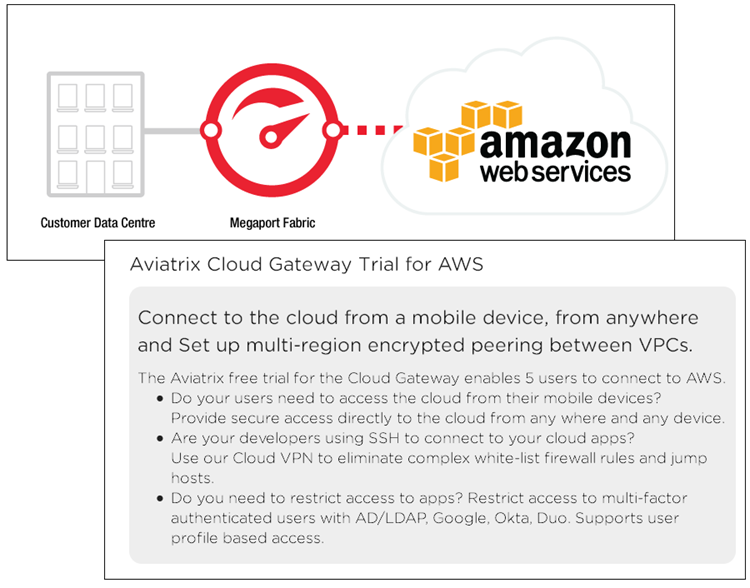
Aviatrix User Access Integrated with Megaport DX – Supports encrypted connectivity between AWS Cloud Regions, between enterprise data centers and AWS, and on VPN access to AWS:

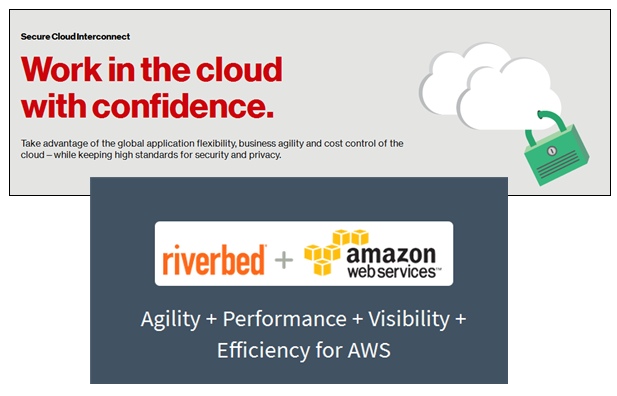
Riverbed Hybrid SDN/NFV Architecture over Verizon Secure Cloud Interconnect – Allows enterprise customers to provide secure, optimized access to AWS services in a hybrid network environment:

Direct Connect at re:Invent 2016
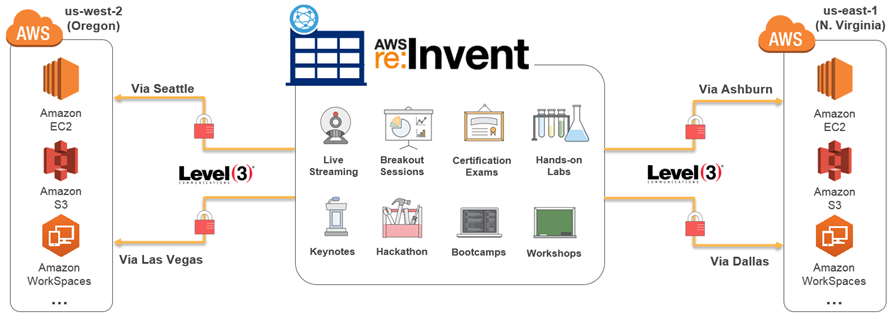
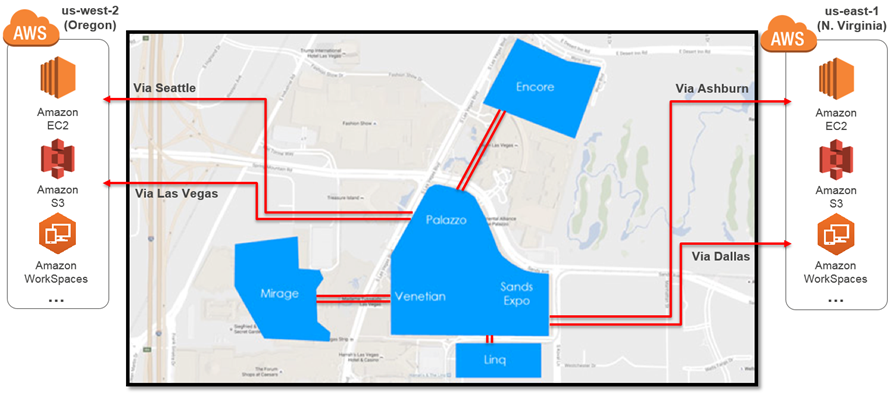
In order to provide a top-notch experience for attendees and partners at re:Invent, we worked with Level 3 to set up a highly available and fully redundant set of connections. This network was used to support breakout sessions, certification exams, the hands-on labs, the keynotes (including the live stream to over 25,000 viewers in 122 countries), the hackathon, bootcamps, and workshops. The re:Invent network used four 10 Gbps connections, two each to US West (Oregon) and US East (Northern Virginia):

It supported all of the re:Invent venues:

Here are some video resources that will help you to learn more about how we did this, and how you can do it yourself:

Jeff;

Amazon EBS Update – New Elastic Volumes Change Everything

$
0
0

Post Syndicated from Jeff Barr original https://aws.amazon.com/blogs/aws/amazon-ebs-update-new-elastic-volumes-change-everything/

It is always interesting to speak with our customers and to learn how the dynamic nature of their business and their applications drives their block storage requirements. These needs change over time, creating the need to modify existing volumes to add capacity or to change performance characteristics. Today’s 24×7 operating models leaves no room for downtime; as a result, customers want to make changes without going offline or otherwise impacting operations.

Over the years, we have introduced new EBS offerings that support an ever-widening set of use cases. For example, we introduced two new volume types in 2016 – Throughput Optimized HDD (st1) and Cold HDD (sc1). Our customers want to use these volume types as storage tiers, modifying the volume type to save money or to change the performance characteristics, without impacting operations.

In other words, our customers want their EBS volumes to be even more elastic!

New Elastic Volumes
Today we are launching a new EBS feature we call Elastic Volumes and making it available for all current-generation EBS volumes attached to current-generation EC2 instances. You can now increase volume size, adjust performance, or change the volume type while the volume is in use. You can continue to use your application while the change takes effect.

This new feature will greatly simplify (or even eliminate) many of your planning, tuning, and space management chores. Instead of a traditional provisioning cycle that can take weeks or months, you can make changes to your storage infrastructure instantaneously, with a simple API call.

You can address the following scenarios (and many more that you can come up with on your own) using Elastic Volumes:

Changing Workloads – You set up your infrastructure in a rush and used the General Purpose SSD volumes for your block storage. After gaining some experience you figure out that the Throughput Optimized volumes are a better fit, and simply change the type of the volume.

Spiking Demand – You are running a relational database on a Provisioned IOPS volume that is set to handle a moderate amount of traffic during the month, with a 10x spike in traffic  during the final three days of each month due to month-end processing.  You can use Elastic Volumes to dial up the provisioning in order to handle the spike, and then dial it down afterward.

Increasing Storage – You provisioned a volume for 100 GiB and an alarm goes off indicating that it is now at 90% of capacity. You increase the size of the volume and expand the file system to match, with no downtime, and in a fully automated fashion.

Using Elastic Volumes
You can manage all of this from the AWS Management Console, via API calls, or from the AWS Command Line Interface (CLI).

To make a change from the Console, simply select the volume and choose Modify Volume from the Action menu:

Then make any desired changes to the volume type, size, and Provisioned IOPS (if appropriate). Here I am changing my 75 GiB General Purpose (gp2) volume into a 400 GiB Provisioned IOPS volume, with 20,000 IOPS:

When I click on Modify I confirm my intent, and click on Yes:

The volume’s state reflects the progress of the operation (modifying, optimizing, or complete):

The next step is to expand the file system so that it can take advantage of the additional storage space. To learn how to do that, read Expanding the Storage Space of an EBS Volume on Linux or Expanding the Storage Space of an EBS Volume on Windows. You can expand the file system as soon as the state transitions to optimizing (typically a few seconds after you start the operation). The new configuration is in effect at this point, although optimization may continue for up to 24 hours. Billing for the new configuration begins as soon as the state turns to optimizing (there’s no charge for the modification itself).

Automatic Elastic Volume Operations
While manual changes are fine, there’s plenty of potential for automation. Here are a couple of ideas:

Right-Sizing – Use a CloudWatch alarm to watch for a volume that is running at or near its IOPS limit. Initiate a workflow and approval process that could provision additional IOPS or change the type of the volume. Or, publish a “free space” metric to CloudWatch and use a similar approval process to resize the volume and the filesystem.

Cost Reduction – Use metrics or schedules to reduce IOPS or to change the type of a volume. Last week I spoke with a security auditor at a university. He collects tens of gigabytes of log files from all over campus each day and retains them for 60 days. Most of the files are never read, and those that are can be scanned at a leisurely pace. They could address this use case by creating a fresh General Purpose volume each day, writing the logs to it at high speed, and then changing the type to Throughput Optimized.

As I mentioned earlier, you need to resize the file system in order to be able to access the newly provisioned space on the volume. In order to show you how to automate this process, my colleagues built a sample that makes use of CloudWatch Events, AWS Lambda, EC2 Systems Manager, and some PowerShell scripting. The rule matches the modifyVolume event emitted by EBS and invokes the logEvents Lambda function:

The function locates the volume, confirms that it is attached to an instance that is managed by EC2 Systems Manager, and then adds a “maintenance tag” to the instance:

def lambda_handler(event, context):
    volume =(event['resources'][0].split('/')[1])
    attach=ec2.describe_volumes(VolumeIds=[volume])['Volumes'][0]['Attachments']
    if len(attach)>0:
        instance = attach[0]['InstanceId']
        filter={'key': 'InstanceIds', 'valueSet': [instance]}
        info = ssm.describe_instance_information(InstanceInformationFilterList=[filter])['InstanceInformationList']
        if len(info)>0:
            ec2.create_tags(Resources=[instance],Tags=[tags])
            print (info[0]['PlatformName']+' Instance '+ instance+ ' has been tagged for maintenance' )

Later (either manually or on a schedule), EC2 Systems Manager is used to run a PowerShell script on all of the instances that are tagged for maintenance. The script looks at the instance’s disks and partitions, and resizes all of the drives (filesystems) to the maximum allowable size. Here’s an excerpt:

foreach ($DriveLetter in $DriveLetters) {
	$Error.Clear()
        $SizeMax = (Get-PartitionSupportedSize -DriveLetter $DriveLetter).SizeMax
}

To learn more, take a look at the [[Elastic Volume Sample]].

Available Today
The Elastic Volumes feature is available today and you can start using it right now!

To learn about some important special cases and a few limitations on instance types, read Considerations When Modifying EBS Volumes.

Jeff;

PS – If you would like to design and build cool, game-changing storage services like EBS, take a look at our EBS Jobs page!


Lifelong Learning

$
0
0

Post Syndicated from Matt Richardson original https://www.raspberrypi.org/blog/lifelong-learning/

This column is from The MagPi issue 54. You can download a PDF of the full issue for free, or subscribe to receive the print edition in your mailbox or the digital edition on your tablet. All proceeds from the print and digital editions help the Raspberry Pi Foundation achieve its charitable goals.

When you contemplate the Raspberry Pi Foundation’s educational mission, you might first think of young people learning how to code, how computers work, and how to make things with computers. You might also think of teachers leveraging our free resources and training in order to bring digital making to their students in the classroom. Getting young people excited about computing and digital making is an enormous part of what we’re all about.

Last year we trained over 540 Certified Educators in the UK and USA.

We all know that learning doesn’t only happen in the classroom – it also happens in the home, at libraries, code clubs, museums, Scout troop meetings, and after-school enrichment centres. At the Raspberry Pi Foundation, we acknowledge that and try hard to get young people learning about computer science and digital making in all of these contexts. It’s the reason why many of our Raspberry Pi Certified Educators aren’t necessarily classroom teachers, but also educate in other environments.

Raspberry Pis are used as teaching aids in libraries, after-school clubs, and makerspaces across the globe

Even though inspiring and educating young people in and out of the classroom is a huge part of what we set out to do, our mission doesn’t limit us to only the young. Learning can happen at any age and, of course, we love to see kids and adults using Raspberry Pi computers and our learning resources. Although our priority is educating young people, we know that we have a strong community of adults who make, learn, and experiment with Raspberry Pi.

I consider myself among this community of lifelong learners. Ever since I first tried Raspberry Pi in 2012, I’ve learned so much with this affordable computer by making things with it. I may not have set out to learn more about programming and algorithms, but I learned them as a by-product of trying to create an interesting project that required them. This goes beyond computing, too. For instance, I needed to give myself a quick maths refresher when working on my Dynamic Bike Headlight project. I had to get the speed of my bike in miles per hour, knowing the radius of the wheel and the revolutions per minute from a sensor. I suspect that – like me – a lot of adults out there using Raspberry Pi for their home and work projects are learning a lot along the way.

Internet of Tutorials

Even if you’re following a tutorial to build a retro arcade machine, set up a home server, or create a magic mirror, then you’re learning. There are tons of great tutorials out there that don’t just tell you what to type in, but also explain what you’re doing and why you’re doing it at each step along the way. Hopefully, it also leaves room for a maker to experiment and learn.

Many people also learn with Raspberry Pi when they use it as a platform for experimental computing. This experimentation can come from personal curiosity or from a professional need.

They may want to set up a sandbox to test out things such as networking, servers, cluster computing, or containers. Raspberry Pi makes a good platform for this because of its affordability and its universality. In other words, Raspberry Pis have become so common in the world that there’s usually someone out there who has at least attempted to figure out how to do what you want with it.

MAAS Theremin Raspberry Pi

A Raspberry Pi is used in an interactive museum exhibit, and kept on display for visitors to better understand the inner workings of what they’re seeing.

To take it back to the young people, it’s critical to show them that we, as adults, aren’t always teachers. Sometimes we’re learning right beside them. Sometimes we’re even learning from them. Show them that learning doesn’t stop after they graduate. We must show young people that none of us stops learning.

The post Lifelong Learning appeared first on Raspberry Pi.


Implementing Serverless Manual Approval Steps in AWS Step Functions and Amazon API Gateway

$
0
0

Post Syndicated from Bryan Liston original https://aws.amazon.com/blogs/compute/implementing-serverless-manual-approval-steps-in-aws-step-functions-and-amazon-api-gateway/


Ali Baghani, Software Development Engineer

A common use case for AWS Step Functions is a task that requires human intervention (for example, an approval process). Step Functions makes it easy to coordinate the components of distributed applications as a series of steps in a visual workflow called a state machine. You can quickly build and run state machines to execute the steps of your application in a reliable and scalable fashion.

In this post, I describe a serverless design pattern for implementing manual approval steps. You can use a Step Functions activity task to generate a unique token that can be returned later indicating either approval or rejection by the person making the decision.

Key steps to implementation

When the execution of a Step Functions state machine reaches an activity task state, Step Functions schedules the activity and waits for an activity worker. An activity worker is an application that polls for activity tasks by calling GetActivityTask. When the worker successfully calls the API action, the activity is vended to that worker as a JSON blob that includes a token for callback.

At this point, the activity task state and the branch of the execution that contains the state is paused. Unless a timeout is specified in the state machine definition, which can be up to one year, the activity task state waits until the activity worker calls either SendTaskSuccess or SendTaskFailure using the vended token. This pause is the first key to implementing a manual approval step.

The second key is the ability in a serverless environment to separate the code that fetches the work and acquires the token from the code that responds with the completion status and sends the token back, as long as the token can be shared, i.e., the activity worker in this example is a serverless application supervised by a single activity task state.

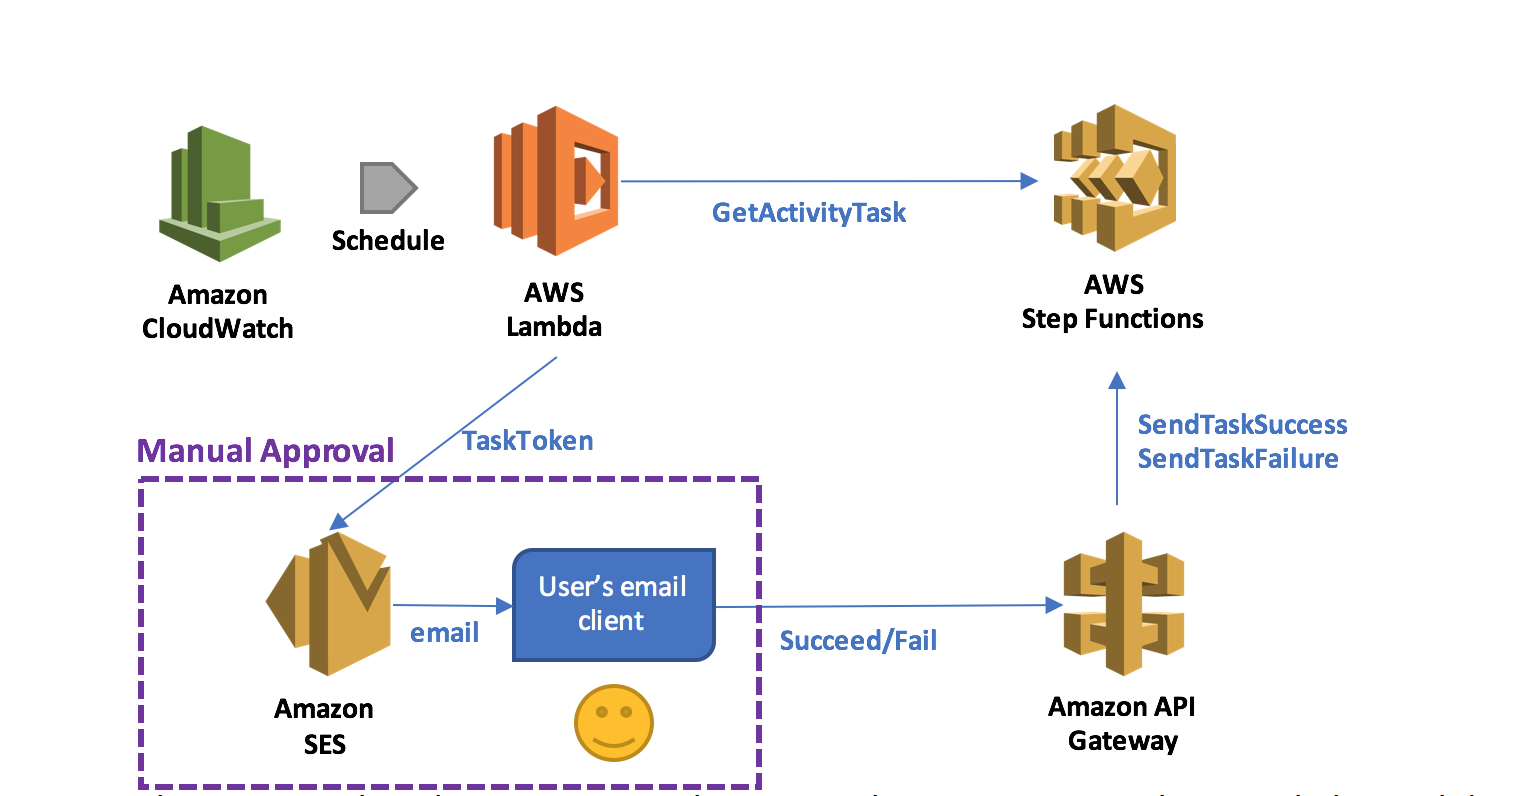
In this walkthrough, you use a short-lived AWS Lambda function invoked on a schedule to implement the activity worker, which acquires the token associated with the approval step, and prepares and sends an email to the approver using Amazon SES.

It is very convenient if the application that returns the token can directly call the SendTaskSuccess and SendTaskFailure API actions on Step Functions. This can be achieved more easily by exposing these two actions through Amazon API Gateway so that an email client or web browser can return the token to Step Functions. By combining a Lambda function that acquires the token with the application that returns the token through API Gateway, you can implement a serverless manual approval step, as shown below.

In this pattern, when the execution reaches a state that requires manual approval, the Lambda function prepares and sends an email to the user with two embedded hyperlinks for approval and rejection.

If the authorized user clicks on the approval hyperlink, the state succeeds. If the authorized user clicks on the rejection link, the state fails. You can also choose to set a timeout for approval and, upon timeout, take action, such as resending the email request using retry/catch conditions in the activity task state.

Employee promotion process

As an example pattern use case, you can design a simple employee promotion process which involves a single task: getting a manager’s approval through email. When an employee is nominated for promotion, a new execution starts. The name of the employee and the email address of the employee’s manager are provided to the execution.

You’ll use the design pattern to implement the manual approval step, and SES to send the email to the manager. After acquiring the task token, the Lambda function generates and sends an email to the manager with embedded hyperlinks to URIs hosted by API Gateway.

In this example, I have administrative access to my account, so that I can create IAM roles. Moreover, I have already registered my email address with SES, so that I can send emails with the address as the sender/recipient. For detailed instructions, see Send an Email with Amazon SES.

Here is a list of what you do:

  1. Create an activity
  2. Create a state machine
  3. Create and deploy an API
  4. Create an activity worker Lambda function
  5. Test that the process works

Create an activity

In the Step Functions console, choose Tasks and create an activity called ManualStep.

stepfunctionsfirst_1.png

Remember to keep the ARN of this activity at hand.

stepfunctionsfirst_2.png

Create a state machine

Next, create the state machine that models the promotion process on the Step Functions console. Use StatesExecutionRole-us-east-1, the default role created by the console. Name the state machine PromotionApproval, and use the following code. Remember to replace the value for Resource with your activity ARN.

{
  "Comment": "Employee promotion process!",
  "StartAt": "ManualApproval",
  "States": {
    "ManualApproval": {
      "Type": "Task",
      "Resource": "arn:aws:states:us-east-1:ACCOUNT_ID:activity:ManualStep",
      "TimeoutSeconds": 3600,
      "End": true
    }
  }
}

Create and deploy an API

Next, create and deploy public URIs for calling the SendTaskSuccess or SendTaskFailure API action using API Gateway.

First, navigate to the IAM console and create the role that API Gateway can use to call Step Functions. Name the role APIGatewayToStepFunctions, choose Amazon API Gateway as the role type, and create the role.

After the role has been created, attach the managed policy AWSStepFunctionsFullAccess to it.

stepfunctionsfirst_3.png

In the API Gateway console, create a new API called StepFunctionsAPI. Create two new resources under the root (/) called succeed and fail, and for each resource, create a GET method.

stepfunctionsfirst_4.png

You now need to configure each method. Start by the /fail GET method and configure it with the following values:

  • For Integration type, choose AWS Service.
  • For AWS Service, choose Step Functions.
  • For HTTP method, choose POST.
  • For Region, choose your region of interest instead of us-east-1. (For a list of regions where Step Functions is available, see AWS Region Table.)
  • For Action Type, enter SendTaskFailure.
  • For Execution, enter the APIGatewayToStepFunctions role ARN.

stepfunctionsfirst_5.png

To be able to pass the taskToken through the URI, navigate to the Method Request section, and add a URL Query String parameter called taskToken.

stepfunctionsfirst_6.png

Then, navigate to the Integration Request section and add a Body Mapping Template of type application/json to inject the query string parameter into the body of the request. Accept the change suggested by the security warning. This sets the body pass-through behavior to When there are no templates defined (Recommended). The following code does the mapping:

{
   "cause": "Reject link was clicked.",
   "error": "Rejected",
   "taskToken": "$input.params('taskToken')"
}

When you are finished, choose Save.

Next, configure the /succeed GET method. The configuration is very similar to the /fail GET method. The only difference is for Action: choose SendTaskSuccess, and set the mapping as follows:

{
   "output": "\"Approve link was clicked.\"",
   "taskToken": "$input.params('taskToken')"
}

The last step on the API Gateway console after configuring your API actions is to deploy them to a new stage called respond. You can test our API by choosing the Invoke URL links under either of the GET methods. Because no token is provided in the URI, a ValidationException message should be displayed.

stepfunctionsfirst_7.png

Create an activity worker Lambda function

In the Lambda console, create a Lambda function with a CloudWatch Events Schedule trigger using a blank function blueprint for the Node.js 4.3 runtime. The rate entered for Schedule expression is the poll rate for the activity. This should be above the rate at which the activities are scheduled by a safety margin.

The safety margin accounts for the possibility of lost tokens, retried activities, and polls that happen while no activities are scheduled. For example, if you expect 3 promotions to happen, in a certain week, you can schedule the Lambda function to run 4 times a day during that week. Alternatively, a single Lambda function can poll for multiple activities, either in parallel or in series. For this example, use a rate of one time per minute but do not enable the trigger yet.

stepfunctionsfirst_8.png

Next, create the Lambda function ManualStepActivityWorker using the following Node.js 4.3 code. The function receives the taskToken, employee name, and manager’s email from StepFunctions. It embeds the information into an email, and sends out the email to the manager.


'use strict';
console.log('Loading function');
const aws = require('aws-sdk');
const stepfunctions = new aws.StepFunctions();
const ses = new aws.SES();
exports.handler = (event, context, callback) => {

    var taskParams = {
        activityArn: 'arn:aws:states:us-east-1:ACCOUNT_ID:activity:ManualStep'
    };

    stepfunctions.getActivityTask(taskParams, function(err, data) {
        if (err) {
            console.log(err, err.stack);
            context.fail('An error occured while calling getActivityTask.');
        } else {
            if (data === null) {
                // No activities scheduled
                context.succeed('No activities received after 60 seconds.');
            } else {
                var input = JSON.parse(data.input);
                var emailParams = {
                    Destination: {
                        ToAddresses: [
                            input.managerEmailAddress
                            ]
                    },
                    Message: {
                        Subject: {
                            Data: 'Your Approval Needed for Promotion!',
                            Charset: 'UTF-8'
                        },
                        Body: {
                            Html: {
                                Data: 'Hi!<br />' +
                                    input.employeeName + ' has been nominated for promotion!<br />' +
                                    'Can you please approve:<br />' +
                                    'https://API_DEPLOYMENT_ID.execute-api.us-east-1.amazonaws.com/respond/succeed?taskToken=' + encodeURIComponent(data.taskToken) + '<br />' +
                                    'Or reject:<br />' +
                                    'https://API_DEPLOYMENT_ID.execute-api.us-east-1.amazonaws.com/respond/fail?taskToken=' + encodeURIComponent(data.taskToken),
                                Charset: 'UTF-8'
                            }
                        }
                    },
                    Source: input.managerEmailAddress,
                    ReplyToAddresses: [
                            input.managerEmailAddress
                        ]
                };

                ses.sendEmail(emailParams, function (err, data) {
                    if (err) {
                        console.log(err, err.stack);
                        context.fail('Internal Error: The email could not be sent.');
                    } else {
                        console.log(data);
                        context.succeed('The email was successfully sent.');
                    }
                });
            }
        }
    });
};

In the Lambda function handler and role section, for Role, choose Create a new role, LambdaManualStepActivityWorkerRole.

stepfunctionsfirst_9.png

Add two policies to the role: one to allow the Lambda function to call the GetActivityTask API action by calling Step Functions, and one to send an email by calling SES. The result should look as follows:

{
  "Version": "2012-10-17",
  "Statement": [
    {
      "Effect": "Allow",
      "Action": [
        "logs:CreateLogGroup",
        "logs:CreateLogStream",
        "logs:PutLogEvents"
      ],
      "Resource": "arn:aws:logs:*:*:*"
    },
    {
      "Effect": "Allow",
      "Action": "states:GetActivityTask",
      "Resource": "arn:aws:states:*:*:activity:ManualStep"
    },
    {
      "Effect": "Allow",
      "Action": "ses:SendEmail",
      "Resource": "*"
    }
  ]
}

In addition, as the GetActivityTask API action performs long-polling with a timeout of 60 seconds, increase the timeout of the Lambda function to 1 minute 15 seconds. This allows the function to wait for an activity to become available, and gives it extra time to call SES to send the email. For all other settings, use the Lambda console defaults.

stepfunctionsfirst_10.png

After this, you can create your activity worker Lambda function.

Test the process

You are now ready to test the employee promotion process.

In the Lambda console, enable the ManualStepPollSchedule trigger on the ManualStepActivityWorker Lambda function.

In the Step Functions console, start a new execution of the state machine with the following input:

{ "managerEmailAddress": "name@your-email-address.com", "employeeName" : "Jim" } 

Within a minute, you should receive an email with links to approve or reject Jim’s promotion. Choosing one of those links should succeed or fail the execution.

stepfunctionsfirst_11.png

Summary

In this post, you created a state machine containing an activity task with Step Functions, an API with API Gateway, and a Lambda function to dispatch the approval/failure process. Your Step Functions activity task generated a unique token that was returned later indicating either approval or rejection by the person making the decision. Your Lambda function acquired the task token by polling the activity task, and then generated and sent an email to the manager for approval or rejection with embedded hyperlinks to URIs hosted by API Gateway.

If you have questions or suggestions, please comment below.

AWS Marketplace Adds Healthcare & Life Sciences Category

$
0
0

Post Syndicated from Ana Visneski original https://aws.amazon.com/blogs/aws/aws-marketplace-adds-healthcare-life-sciences-category/

Wilson To and Luis Daniel Soto are our guest bloggers today, telling you about a new industry vertical category that is being added to the AWS Marketplace.Check it out!

-Ana


AWS Marketplace is a managed and curated software catalog that helps customers innovate faster and reduce costs, by making it easy to discover, evaluate, procure, immediately deploy and manage 3rd party software solutions.  To continue supporting our customers, we’re now adding a new industry vertical category: Healthcare & Life Sciences.

healthpost

This new category brings together best-of-breed software tools and solutions from our growing vendor ecosystem that have been adapted to, or built from the ground up, to serve the healthcare and life sciences industry.

Healthcare
Within the AWS Marketplace HCLS category, you can find solutions for Clinical information systems, population health and analytics, health administration and compliance services. Some offerings include:

  1. Allgress GetCompliant HIPAA Edition – Reduce the cost of compliance management and adherence by providing compliance professionals improved efficiency by automating the management of their compliance processes around HIPAA.
  2. ZH Healthcare BlueEHS – Deploy a customizable, ONC-certified EHR that empowers doctors to define their clinical workflows and treatment plans to enhance patient outcomes.
  3. Dicom Systems DCMSYS CloudVNA – DCMSYS Vendor Neutral Archive offers a cost-effective means of consolidating disparate imaging systems into a single repository, while providing enterprise-wide access and archiving of all medical images and other medical records.

Life Sciences

  1. National Instruments LabVIEW – Graphical system design software that provides scientists and engineers with the tools needed to create and deploy measurement and control systems through simple yet powerful networks.
  2. NCBI Blast – Analysis tools and datasets that allow users to perform flexible sequence similarity searches.
  3. Acellera AceCloud – Innovative tools and technologies for the study of biophysical phenomena. Acellera leverages the power of AWS Cloud to enable molecular dynamics simulations.

Healthcare and life sciences companies deal with huge amounts of data, and many of their data sets are some of the most complex in the world. From physicians and nurses to researchers and analysts, these users are typically hampered by their current systems. Their legacy software cannot let them efficiently store or effectively make use of the immense amounts of data they work with. And protracted and complex software purchasing cycles keep them from innovating at speed to stay ahead of market and industry trends. Data analytics and business intelligence solutions in AWS Marketplace offer specialized support for these industries, including:

  • Tableau Server – Enable teams to visualize across costs, needs, and outcomes at once to make the most of resources. The solution helps hospitals identify the impact of evidence-based medicine, wellness programs, and patient engagement.
  • TIBCO Spotfire and JasperSoft. TIBCO provides technical teams powerful data visualization, data analytics, and predictive analytics for Amazon Redshift, Amazon RDS, and popular database sources via AWS Marketplace.
  • Qlik Sense Enterprise. Qlik enables healthcare organizations to explore clinical, financial and operational data through visual analytics to discover insights which lead to improvements in care, reduced costs and delivering higher value to patients.

With more than 5,000 listings across more than 35 categories, AWS Marketplace simplifies software licensing and procurement by enabling customers to accept user agreements, choose pricing options, and automate the deployment of software and associated AWS resources with just a few clicks. AWS Marketplace also simplifies billing for customers by delivering a single invoice detailing business software and AWS resource usage on a monthly basis.

With AWS Marketplace, we can help drive operational efficiencies and reduce costs in these ways:

  • Easily bring in new solutions to solve increasingly complex issues, gain quick insight into the huge amounts of data users handle.
  • Healthcare data will be more actionable. We offer pay-as-you-go solutions that make it considerably easier and more cost-effective to ingest, store, analyze, and disseminate data.
  • Deploy healthcare and life sciences software with 1-Click ease — then evaluate and deploy it in minutes. Users can now speed up their historically slow cycles in software procurement and implementation.
  • Pay only for what’s consumed — and manage software costs on your AWS bill.
  • In addition to the already secure AWS Cloud, AWS Marketplace offers industry-leading solutions to help you secure operating systems, platforms, applications and data that can integrate with existing controls in your AWS Cloud and hybrid environment.

Click here to see who the current list of vendors are in our new Healthcare & Life Sciences category.

Come on In
If you are a healthcare ISV and would like to list and sell your products on AWS, visit our Sell in AWS Marketplace page.

– Wilson To and Luis Daniel Soto

Extending AWS CodeBuild with Custom Build Environments

$
0
0

Post Syndicated from John Pignata original https://aws.amazon.com/blogs/devops/extending-aws-codebuild-with-custom-build-environments/

AWS CodeBuild is a fully managed build service that compiles source code, runs tests, and produces software packages that are ready to deploy. CodeBuild provides curated build environments for programming languages and runtimes such as Java, Ruby, Python, Go, Node.js, Android, and Docker. It can be extended through the use of custom build environments to support many more.

Build environments are Docker images that include a complete file system with everything required to build and test your project. To use a custom build environment in a CodeBuild project, you build a container image for your platform that contains your build tools, push it to a Docker container registry such as Amazon EC2 Container Registry (ECR), and reference it in the project configuration. When building your application, CodeBuild will retrieve the Docker image from the container registry specified in the project configuration and use the environment to compile your source code, run your tests, and package your application.

In this post, we’ll create a build environment for PHP applications and walk through the steps to configure CodeBuild to use this environment.

Requirements

In order to follow this tutorial and build the Docker container image, you need to have the Docker platform, the AWS Command Line Interface, and Git installed.

Create the demo resources

To begin, we’ll clone codebuild-images from GitHub. It contains an AWS CloudFormation template that we’ll use to create resources for our demo: a source code repository in AWS CodeCommit and a Docker image repository in Amazon ECR. The repository also includes PHP sample code and tests that we’ll use to demonstrate our custom build environment.

  1. Clone the Git repository:
    git clone https://github.com/awslabs/codebuild-images.git
    cd codebuild-images
  2. Create the CloudFormation stack using the template.yml file. You can use the CloudFormation console to create the stack or you can use the AWS Command Line Interface:
    aws cloudformation create-stack \
     --stack-name codebuild-php \
     --parameters ParameterKey=EnvName,ParameterValue=php \
     --template-body file://template.yml > /dev/null && \
    aws cloudformation wait stack-create-complete \
     --stack-name codebuild-php && \
    aws cloudformation describe-stacks \
     --stack-name codebuild-php \
     --output table \
     --query Stacks[0].Outputs

After the stack has been created, CloudFormation will return two outputs:

  • BuildImageRepositoryUri: the URI of the Docker repository that will host our build environment image.
  • SourceCodeRepositoryCloneUrl: the clone URL of the Git repository that will host our sample PHP code.

Build and push the Docker image

Docker images are specified using a Dockerfile, which contains the instructions for assembling the image. The Dockerfile included in the PHP build environment contains these instructions:

FROM php:7

ARG composer_checksum=55d6ead61b29c7bdee5cccfb50076874187bd9f21f65d8991d46ec5cc90518f447387fb9f76ebae1fbbacf329e583e30
ARG composer_url=https://raw.githubusercontent.com/composer/getcomposer.org/ba0141a67b9bd1733409b71c28973f7901db201d/web/installer

ENV COMPOSER_ALLOW_SUPERUSER=1
ENV PATH=$PATH:vendor/bin

RUN apt-get update && apt-get install -y --no-install-recommends \
      curl \
      git \
      python-dev \
      python-pip \
      zlib1g-dev \
 && pip install awscli \
 && docker-php-ext-install zip \
 && curl -o installer "$composer_url" \
 && echo "$composer_checksum *installer" | shasum –c –a 384 \
 && php installer --install-dir=/usr/local/bin --filename=composer \
 && rm -rf /var/lib/apt/lists/*

This Dockerfile inherits all of the instructions from the official PHP Docker image, which installs the PHP runtime. On top of that base image, the build process will install Python, Git, the AWS CLI, and Composer, a dependency management tool for PHP. We’ve installed the AWS CLI and Git as tools we can use during builds. For example, using the AWS CLI, we could trigger a notification from Amazon Simple Notification Service (SNS) when a build is complete or we could use Git to create a new tag to mark a successful build. Finally, the build process cleans up files created by the packaging tools, as recommended in Best practices for writing Dockerfiles.

Next, we’ll build and push the custom build environment.

  1. Provide authentication details for our registry to the local Docker engine by executing the output of the login helper provided by the AWS CLI:
    aws ecr get-login
    
  2. Build and push the Docker image. We’ll use the repository URI returned in the CloudFormation stack output (BuildImageRepositoryUri) as the image tag:
    cd php
    docker build -t [BuildImageRepositoryUri] .
    docker push [BuildImageRepositoryUri]

After running these commands, your Docker image is pushed into Amazon ECR and ready to build your project.

Configure the Git repository

The repository we cloned includes a small PHP sample that we can use to test our PHP build environment. The sample function converts Roman numerals to Arabic numerals. The repository also includes a sample test to exercise this function. The sample also includes a YAML file called a build spec that contains commands and related settings that CodeBuild uses to run a build:

version: 0.1
phases:
  pre_build:
    commands:
      - composer install
  build:
    commands:
      - phpunit tests

This build spec configures CodeBuild to run two commands during the build:

We will push the sample application to the CodeCommit repo created by the CloudFormation stack. You’ll need to grant your IAM user the required level of access to the AWS services required for CodeCommit and you’ll need to configure your Git client with the appropriate credentials. See Setup for HTTPS Users Using Git Credentials in the CodeCommit documentation for detailed steps.

We’re going to initialize a Git repository for our sample, configure our origin, and push the sample to the master branch in CodeCommit.

  1. Initialize a new Git repository in the sample directory:
    cd sample
    git init
  2. Add and commit the sample files to the repository:
    git add .
    git commit -m "Initial commit"
  3. Configure the git remote and push the sample to it. We’ll use the repository clone URL returned in the CloudFormation stack output (SourceCodeRepositoryCloneUrl) as the remote URL:
    git remote add origin [SourceCodeRepositoryCloneUrl]
    git push origin master

Now that our sample application has been pushed into source control and our build environment image has been pushed into our Docker registry, we’re ready to create a CodeBuild project and start our first build.

Configure the CodeBuild project

In this section, we’ll walk through the steps for configuring CodeBuild to use the custom build environment.

Screenshot of the build configuration

  1. In the AWS Management Console, open the AWS CodeBuild console, and then choose Create project.
  2. In Project name, type php-demo.
  3. From Source provider, choose AWS CodeCommit.  From Repository, choose codebuild-sample-php.
  4. In Environment image, select Specify a Docker image. From Custom image type, choose Amazon ECR. From Amazon ECR Repository, choose codebuild/php.  From Amazon ECR image, choose latest.
  5. In Build specification, select Use the buildspec.yml in the source code root directory.
  6. In Artifacts type, choose No artifacts.
  7. Choose Continue and then choose Save and Build.
  8. On the next page, from Branch, choose master and then choose Start build.

CodeBuild will pull the build environment image from Amazon ECR and use it to test our application. CodeBuild will show us the status of each build step, the last 20 lines of log messages generated by the build process, and provide a link to Amazon CloudWatch Logs for more debugging output.

Screenshot of the build output

Summary

CodeBuild supports a number of platforms and languages out of the box. By using custom build environments, it can be extended to other runtimes. In this post, we built a PHP environment and demonstrated how to use it to test PHP applications.

We’re excited to see how customers extend and use CodeBuild to enable continuous integration and continuous delivery for their applications. Please leave questions or suggestions in the comments or share what you’ve learned extending CodeBuild for your own projects.

How to Audit Your AWS Resources for Security Compliance by Using Custom AWS Config Rules

$
0
0

Post Syndicated from Myles Hosford original https://aws.amazon.com/blogs/security/how-to-audit-your-aws-resources-for-security-compliance-by-using-custom-aws-config-rules/

AWS Config Rules enables you to implement security policies as code for your organization and evaluate configuration changes to AWS resources against these policies. You can use Config rules to audit your use of AWS resources for compliance with external compliance frameworks such as CIS AWS Foundations Benchmark and with your internal security policies related to the US Health Insurance Portability and Accountability Act (HIPAA), the Federal Risk and Authorization Management Program (FedRAMP), and other regimes.

AWS provides a number of predefined, managed Config rules. You also can create custom Config rules based on criteria you define within an AWS Lambda function. In this post, I will show how to create a custom rule that audits AWS resources for security compliance by enabling VPC Flow Logs for an Amazon Virtual Private Cloud (VPC). The custom rule meets requirement 4.3 of the CIS AWS Foundations Benchmark: “Ensure VPC flow logging is enabled in all VPCs.”

Solution overview

In this post, I walk through the process required to create a custom Config rule by following these steps:

  1. Create a Lambda function containing the logic to determine if a resource is compliant or noncompliant.
  2. Create a custom Config rule that uses the Lambda function created in Step 1 as the source.
  3. Create a Lambda function that polls Config to detect noncompliant resources on a daily basis and send notifications via Amazon SNS.

Prerequisite

You must set up Config before you start creating custom rules. Follow the steps on Set Up AWS Config Using the Console or Set Up AWS Config Using the AWS CLI to enable Config and send the configuration changes to Amazon S3 for storage.

Custom rule – Blueprint

The first step is to create a Lambda function that contains the logic to determine if the Amazon VPC has VPC Flow Logs enabled (in other words, it is compliant or noncompliant with requirement 4.3 of the CIS AWS Foundation Benchmark). First, let’s take a look at the components that make up a custom rule, which I will call the blueprint.

#
# Custom AWS Config Rule - Blueprint Code
#

import boto3, json

def evaluate_compliance(config_item, r_id):
    return 'NONCOMPLIANT'

def lambda_handler(event, context):

    # Create AWS SDK clients & initialize custom rule parameters
    config = boto3.client('config')
    invoking_event = json.loads(event['invokingEvent'])
    compliance_value = 'NOT_APPLICABLE'
    resource_id = invoking_event['configurationItem']['resourceId']

    compliance_value = evaluate_compliance(invoking_event['configurationItem'], resource_id)

    response = config.put_evaluations(
       Evaluations=[
            {
                'ComplianceResourceType': invoking_event['configurationItem']['resourceType'],
                'ComplianceResourceId': resource_id,
                'ComplianceType': compliance_value,
                'Annotation': 'Insert text here to detail why control passed/failed',
                'OrderingTimestamp': invoking_event['notificationCreationTime']
            },
       ],
       ResultToken=event['resultToken'])

The key components in the preceding blueprint are:

  1. The lambda_handler function is the function that is executed when the Lambda function invokes my function. I create the necessary SDK clients and set up some initial variables for the rule to use.
  2. The evaluate_compliance function contains my custom rule logic. This is the function that I will tailor later in the post to create the custom rule to detect whether the Amazon VPC has VPC Flow Logs enabled. The result (compliant or noncompliant) is assigned to the compliance_value.
  3. The Config API’s put_evaluations function is called to deliver an evaluation result to Config. You can then view the result of the evaluation in the Config console (more about that later in this post). The annotation parameter is used to provide supplementary information about how the custom evaluation determined the compliance.

Custom rule – Flow logs enabled

The example we use for the custom rule is requirement 4.3 from the CIS AWS Foundations Benchmark: “Ensure VPC flow logging is enabled in all VPCs.” I update the blueprint rule that I just showed to do the following:

  1. Create an AWS Identity and Access Management (IAM) role that allows the Lambda function to perform the custom rule logic and publish the result to Config. The Lambda function will assume this role.
  2. Specify the resource type of the configuration item as EC2 VPC. This ensures that the rule is triggered when there is a change to any Amazon VPC resources.
  3. Add custom rule logic to the Lambda function to determine whether VPC Flow Logs are enabled for a given VPC.

Create an IAM role for Lambda

To create the IAM role, I go to the IAM console, choose Roles in the navigation pane, click Create New Role, and follow the wizard. In Step 2, I select the service role AWS Lambda, as shown in the following screenshot.

In Step 4 of the wizard, I attach the following managed policies:

  • AmazonEC2ReadOnlyAccess
  • AWSLambdaExecute
  • AWSConfigRulesExecutionRole

Finally, I name the new IAM role vpcflowlogs-role. This allows the Lambda function to call APIs such as EC2 describe flow logs to obtain the result for my compliance check. I assign this role to the Lambda function in the next step.

Create the Lambda function for the custom rule

To create the Lambda function that contains logic for my custom rule, I go to the Lambda console, click Create a Lambda Function, and then choose Blank Function.

When I configure the function, I name it vpcflowlogs-function and provide a brief description of the rule: “A custom rule to detect whether VPC Flow Logs is enabled.”

For the Lambda function code, I use the blueprint code shown earlier in this post and add the additional logic to determine whether VPC Flow Logs is enabled (specifically within the evaluate_compliance and is_flow_logs_enabled functions).

#
# Custom AWS Config Rule - VPC Flow Logs
#

import boto3, json

def evaluate_compliance(config_item, r_id):
    if (config_item['resourceType'] != 'AWS::EC2::VPC'):
        return 'NOT_APPLICABLE'

    elif is_flow_logs_enabled(r_id):
        return 'COMPLIANT'
    else:
        return 'NON_COMPLIANT'

def is_flow_logs_enabled(vpc_id):
    ec2 = boto3.client('ec2')
    response = ec2.describe_flow_logs(
        Filter=[
            {
                'Name': 'resource-id',
                'Values': [
                    r_id,
                ]
            },
        ],
    )
    if len(response[u'FlowLogs']) != 0: return True

def lambda_handler(event, context):

    # Create AWS SDK clients & initialize custom rule parameters
    config = boto3.client('config')
    invoking_event = json.loads(event['invokingEvent'])
    compliance_value = 'NOT_APPLICABLE'
    resource_id = invoking_event['configurationItem']['resourceId']

    compliance_value = evaluate_compliance(invoking_event['configurationItem'], resource_id)

    response = config.put_evaluations(
       Evaluations=[
            {
                'ComplianceResourceType': invoking_event['configurationItem']['resourceType'],
                'ComplianceResourceId': resource_id,
                'ComplianceType': compliance_value,
                'Annotation': 'CIS 4.3 VPC Flow Logs',
                'OrderingTimestamp': invoking_event['notificationCreationTime']
            },
       ],
       ResultToken=event['resultToken'])

Below the Lambda function code, I configure the handler and role. As shown in the following screenshot, I select the IAM role I just created (vpcflowlogs-role) and create my Lambda function.

 When the Lambda function is created, I make a note of the Lambda Amazon Resource Name (ARN), which is the unique identifier used in the next step to specify this function as my Config rule source. (Be sure to replace placeholder value with your own value.)

Example ARN: arn:aws:lambda:ap-southeast-1:<your-account-id>:function:vpcflowlogs-function

Create a custom Config rule

The last step is to create a custom Config rule and use the Lambda function as the source. To do this, I go to the Config console, choose Add Rule, and choose Add Custom Rule. I give the rule a name, vpcflowlogs-configrule, and description, and I paste the Lambda ARN from the previous section.

Because this rule is specific to VPC resources, I set the Trigger type to Configuration changes and Resources to EC2: VPC, as shown in the following screenshot

I click Save to create the rule, and it is now live. Any VPC resources that are created or modified will now be checked against my VPC Flow Logs rule for compliance with the CIS Benchmark requirement.

From the Config console, I can now see if any resources do not comply with the control requirement, as shown in the following screenshot.

When I choose the rule, I see additional detail about the noncompliant resources (see the following screenshot). This allows me to view the Config timeline to determine when the resources became noncompliant, identify the resources’ owners, (if resources are following tagging best practices), and initiate a remediation effort.

Screenshot of the results of resources evaluated

Daily compliance assessment

Having created the custom rule, I now create a Lambda function to poll Config periodically to detect noncompliant resources. My Lambda function will run daily to assess for noncompliance with my custom rule. When noncompliant resources are detected, I send a notification by publishing a message to SNS.

Before creating the Lambda function, I create an SNS topic and subscribe to the topic for the email addresses that I want to receive noncompliance notifications. My SNS topic is called config-rules-compliance.

Note: The Lambda function will require permission to query Config and publish a message to SNS. For the purpose of this blog post, I created the following policy that allows publishing of messages to my SNS topic (config-rules-compliance), and I attached it to the vpcflowlogs-role role that my custom Config rule uses.

{
    "Version": "2012-10-17",
    "Statement": [
        {
            "Sid": "Stmt1485832788000",
            "Effect": "Allow",
            "Action": [
                "sns:Publish"
            ],
            "Resource": [
                "arn:aws:sns:ap-southeast-1:111111111111:config-rules-compliance"
            ]
        }
    ]
}

To create the Lambda function that performs the periodic compliance assessment, I go to the Lambda console, choose Create a Lambda Function and then choose Blank Function.

When configuring the Lambda trigger, I select CloudWatch Events – Schedule that allows the function to be executed periodically on a schedule I define. I then select rate(1 day) to get daily compliance assessments. For more information about scheduling events with Amazon CloudWatch, see Schedule Expressions for Rules.

scheduled-lambda-withborder

My Lambda function (see the following code) uses the vpcflowlogs-role IAM role that allows publishing of messages to my SNS topic.

'''
Lambda function to poll Config for noncompliant resources
'''

from __future__ import print_function

import boto3

# AWS Config settings
CONFIG_CLIENT = boto3.client('config')
MY_RULE = "vpcflowlogs-configrule"

# AWS SNS Settings
SNS_CLIENT = boto3.client('sns')
SNS_TOPIC = 'arn:aws:sns:ap-southeast-1:111111111111:config-rules-compliance'
SNS_SUBJECT = 'Compliance Update'

def lambda_handler(event, context):
    # Get compliance details
    non_compliant_detail = CONFIG_CLIENT.get_compliance_details_by_config_rule(\
    						ConfigRuleName=MY_RULE, ComplianceTypes=['NON_COMPLIANT'])

    if len(non_compliant_detail['EvaluationResults']) > 0:
        print('The following resource(s) are not compliant with AWS Config rule: ' + MY_RULE)
        non_complaint_resources = ''
        for result in non_compliant_detail['EvaluationResults']:
            print(result['EvaluationResultIdentifier']['EvaluationResultQualifier']['ResourceId'])
            non_complaint_resources = non_complaint_resources + \
    	    				result['EvaluationResultIdentifier']['EvaluationResultQualifier']['ResourceId'] + '\n'

        sns_message = 'AWS Config Compliance Update\n\n Rule: ' \
    				+ MY_RULE + '\n\n' \
     				+ 'The following resource(s) are not compliant:\n' \
     				+ non_complaint_resources

        SNS_CLIENT.publish(TopicArn=SNS_TOPIC, Message=sns_message, Subject=SNS_SUBJECT)

    else:
        print('No noncompliant resources detected.')

My Lambda function performs two key activities. First, it queries the Config API to determine which resources are noncompliant with my custom rule. This is done by executing the get_compliance_details_by_config_rule API call.

non_compliant_detail = CONFIG_CLIENT.get_compliance_details_by_config_rule(ConfigRuleName=MY_RULE, ComplianceTypes=['NON_COMPLIANT'])

Second, my Lambda function publishes a message to my SNS topic to notify me that resources are noncompliant, if they failed my custom rule evaluation. This is done using the SNS publish API call.

SNS_CLIENT.publish(TopicArn=SNS_TOPIC, Message=sns_message, Subject=SNS_SUBJECT)

This function provides an example of how to integrate Config and the results of the Config rules compliance evaluation into your operations and processes. You can extend this solution by integrating the results directly with your internal governance, risk, and compliance tools and IT service management frameworks.

Summary

In this post, I showed how to create a custom AWS Config rule to detect for noncompliance with security and compliance policies. I also showed how you can create a Lambda function to detect for noncompliance daily by polling Config via API calls. Using custom rules allows you to codify your internal or external security and compliance requirements and have a more effective view of your organization’s risks at a given time.

For more information about Config rules and examples of rules created for the CIS Benchmark, go to the aws-security-benchmark GitHub repository. If you have questions about the solution in this post, start a new thread on the AWS Config forum.

– Myles

Note: The content and opinions in this blog post are those of the author. This blog post is intended for informational purposes and not for the purpose of providing legal advice.

Announcing the first SHA1 collision

$
0
0

Post Syndicated from corbet original https://lwn.net/Articles/715348/rss

The Google security blog carries
the news
of the first deliberately constructed SHA-1 hash collision.
We started by creating a PDF prefix specifically crafted to allow us
to generate two documents with arbitrary distinct visual contents, but that
would hash to the same SHA-1 digest. In building this theoretical attack in
practice we had to overcome some new challenges. We then leveraged Google’s
technical expertise and cloud infrastructure to compute the collision which
is one of the largest computations ever completed.

The SHA-1 era is truly coming to an end, even if most attackers lack access
to the computing resources needed for this particular exploit.

Launch: AWS Elastic Beanstalk launches support for Custom Platforms

$
0
0

Post Syndicated from Tara Walker original https://aws.amazon.com/blogs/aws/launch-aws-elastic-beanstalk-launches-support-for-custom-platforms/

There is excitement in the air! I am thrilled to announce that customers can now create custom platforms in AWS Elastic Beanstalk. With this latest release of the AWS Elastic Beanstalk service, developers and systems admins can now create and manage their own custom Elastic Beanstalk platform images allowing complete control over the instance configuration. As you know, AWS Elastic Beanstalk is a service for deploying and scaling web applications and services on common web platforms. With the service, you upload your code and it automatically handles the deployment, capacity provisioning, load balancing, and auto-scaling.

Previously, AWS Elastic Beanstalk provided a set of pre-configured platforms of multiple configurations using various programming languages, Docker containers, and/or web containers of each aforementioned type. Elastic Beanstalk would take the selected configuration and provision the software stack and resources needed to run the targeted application on one or more Amazon EC2 instances. With this latest release, there is now a choice to create a platform from you own customized Amazon Machine Image (AMI). The custom image can be built from one of the supported operating systems of Ubuntu, RHEL, or Amazon Linux. In order to simplify the creation of these specialized Elastic Beanstalk platforms, machine images are now created using the Packer tool. Packer is an open source tool that runs on all major operating systems, used for creating machine and container images for multiple platforms from a single configuration.

Custom platforms allow you to manage and enforce standardization and best practices across your Elastic Beanstalk environments. For example, you can now create your own platforms on Ubuntu or Red Hat Enterprise and customize your instances with languages/frameworks currently not supported by Elastic Beanstalk e.g. Rust, Sinatra etc.

Creating a Custom Platform

In order to create your custom platform, you start with a Packer template. After the Packer template is created, you would create platform definition file, a platform.yaml file, platform hooks, which will define the builder type for the platform, and script files,. With these files in hand, you would create a zip archive file, called a platform definition archive, to package the files, associated scripts and/or additional items needed to build your Amazon Machine Image (AMI).  A sample of a basic folder structure for building a platform definition archive looks as follows:

|– builder Contains files used by Packer to create the custom platform
|– custom_platform.json Packer template
|– platform.yaml Platform definition file
|– ReadMe.txt Describes the sample

The best way to take a deeper look into the new custom platform feature of Elastic Beanstalk is to put the feature to the test and try to build a custom AMI and platform using Packer. To start the journey, I am going to build a custom Packer template. I go to the Packer site, and download the Packer tool and ensured that the binary is in my environment path.

Now let’s build the template. The Packer template is the configuration file in JSON format, used to define the image we want to build.   I will open up Visual Studio and use this as the IDE to create a new JSON file to build my Packer template.

The Packer template format has a set of keys designed for the configuration of various components of the image. The keys are:

  • variables (optional): one or more key/value strings defining user variables
  • builders (required): array that defines the builders used to create machine images and configuration of each
  • provisioners (optional): array defining provisioners to be used to install and configure software for the machine image
  • description (optional): string providing a description of template
  • min_packer_version (optional): string of minimum Packer version that is required to parse the template.
  • post-processors (optional): array defining post-processing steps to take once image build is completed

If you want a great example of the Packer template that can be used to create a custom image used for a custom Elastic Beanstalk platform, the Elastic Beanstalk documentation has samples of valid Packer templates for your review.

In the template, I will add a provisioner to run a build script to install Node with information about the script location and the command(s) needed to execute the script. My completed JSON file, tara-ebcustom-platform.json, looks as follows:

Now that I have my template built, I will validate the template with Packer on the command line.


What is cool is that my Packer template fails because, in the template, I specify a script, eb_builder.sh, that is located in a builder folder. However, I have not created the builder folder nor shell script noted in my Packer template. A little, confused that I am happy that my file failed? I believe that this is great news because I can catch errors in my template and/or missing files needed to build my machine image before uploading it to the Elastic Beanstalk service. Now I will fix these errors by building the folder and file for the builder script.

Using the sample of the scripts provided in the Elastic Beanstalk documentation, I build my Dev folder with the structure noted above. Within the context of Elastic Beanstalk custom platform creation, the aforementioned scripts are platform hooks. Platform Hooks are run during lifecycle events and in response to management operations.

An example of the builder script used in my custom platform implementation is shown below:

My builder folder structure holds the platform hooks and other scripts referred to as platform scripts used to build the custom platform. Platform scripts are the shell scripts that you can use to get environment variables and other information in platform hooks. The platform hooks are located in a subfolder of my builder folder and follows the structure shown below:

All of these items; Packer template, platform.yaml, builder script, platform hooks, setup, config files and platform scripts make up the platform definition contained in my builder folder you see below.

I will leverage the platform.yaml provided in the sample .yaml file and change it as appropriate for my Elastic Beanstalk custom platform implementation. The result is following completed platform.yaml file:

version: "1.0"

provisioner:
  type: packer
  template: tara-ebcustom-platform.json
  flavor: amazon

metadata:
  maintainer: TaraW
  description: Tara Sample NodeJs Container.
  operating_system_name: Amazon linux
  operating_system_version: 2016.09.1
  programming_language_name: ECMAScript
  programming_language_version: ECMA-262
  framework_name: NodeJs
  framework_version: 4.4.4
  app_server_name: "none"
  app_server_version: "none"

option_definitions:
  - namespace: "aws:elasticbeanstalk:container:custom:application"
    option_name: "NPM_START"
    description: "Default application startup command"
    default_value: "node application.js"

Now, I will validate my Packer template again on the command line.

The template has now validated successfully, and my folder structure is completed.

All that is left for me is to create the platform using the EB CLI. This functionality is available with EB CLI version 3.10.0 or later. You can install the EB CLI from here and follow the instructions for installation in the Elastic Beanstalk developer guide.

To use the EB CLI to create a custom platform, I would select the folder containing the files extracted from the platform definition archive. Within the context of that folder, I need perform the following steps:

  1. Use the EB CLI to initialize the platform repository and follow the prompts
    • eb platform init or ebp init
  2. Launch the Packer environment with the template and scripts
    • eb platform create or ebp create
  3. Validate an IAM role was successfully created for the instance. This instance profile role will be automatically created via the EB create process.
    • aws-elasticbeanstalk-custom-platform-ec2-role
  4. Verify status of platform creation
    • eb platform status or ebp status

I will now go to the Command Line and use EB CLI command to initialize the platform by running the eb platform init command.

Next step is to create the custom platform using the EB CLI, so I’ll run the shortened command, ebp create, in my platform folder.

Success! A custom Elastic Beanstalk platform has been created and we can deploy this platform for our web solution. It is important to remember that when you create a custom platform, you launch a single instance environment without an EIP that runs Packer, and additionally you can reuse this environment for multiple platforms, as well as, multiple versions of each platform. Additionally, custom platforms are region-specific, therefore, you must create your platforms separately in each region if you use Elastic Beanstalk in multiple regions.

Deploying Custom Platforms

With the custom platform now created, you can deploy an application either via the AWS CLI or via the AWS Elastic Beanstalk Console. The ability to create an environment with an already created custom platform is only available for the new environment wizard.

You can select an already created custom platform on the Create a new environment web page by selecting the Custom Platform radio option under Platform. You would then select the custom platform you previously created from the list of available custom platforms.

Additionally, the EB CLI can be used to deploy the latest version of your custom platform. Using the command line to deploy the previously created custom platform would look as follows:

  • eb deploy -p tara-ebcustom-platform

Summary

You can get started building your own custom platforms for Elastic Beanstalk today. To learn more about Elastic Beanstalk or custom platforms by going the AWS Elastic Beanstalk product page or the Elastic Beanstalk developer guide.


Tara


Harmonize, Search, and Analyze Loosely Coupled Datasets on AWS

$
0
0

Post Syndicated from Ryan Jancaitis original https://aws.amazon.com/blogs/big-data/harmonize-search-and-analyze-loosely-coupled-datasets-on-aws/

You have come up with an exciting hypothesis, and now you are keen to find and analyze as much data as possible to prove (or refute) it. There are many datasets that might be applicable, but they have been created at different times by different people and don’t conform to any common standard. They use different names for variables that mean the same thing and the same names for variables that mean different things. They use different units of measurement and different categories. Some have more variables than others. And they all have data quality issues (for example, badly formed dates and times, invalid geographic coordinates, and so on).

You first need a way to harmonize these datasets, to identify the variables that mean the same thing and make sure that these variables have the same names and units. You also need to clean up or remove records with invalid data.

After the datasets are harmonized, you need to search through the data to find the datasets you’re interested in. Not all of them have records that are relevant to your hypothesis, so you want to filter on a number of important variables to narrow down the datasets and verify they contain enough matching records to be significant.

Having identified the datasets of interest, you are ready to run your custom analyses on the data they contain so that you can prove your hypothesis and create beautiful visualizations to share with the world!

In this blog post, we will describe a sample application that illustrates how to solve these problems. You can install our sample app, which will:

  • Harmonize and index three disparate datasets to make them searchable.
  • Present a data-driven, customizable UI for searching the datasets to do preliminary analysis and to locate relevant datasets.
  • Integrate with Amazon Athena and Amazon QuickSight for custom analysis and visualization.

Example data

The Police Data Initiative seeks to improve community and law enforcement relations through the public availability of data related to police activity. Datasets from participating cities, available through the Public Safety Open Data Portal, have many of the problems just outlined. Despite the commonality of crime and location metadata, there is no standard naming or value scheme. Datasets are stored in various locations and in various formats. There is no central search and discovery engine. To gain insights and value from this data, you have to analyze datasets city by city.

Although the focus of this post is police incident data, the same approach can be used for datasets in other domains, such as IoT, personalized medicine, news, weather, finance, and much more.

Architecture

Our architecture uses the following AWS services:

The diagram below illustrates the solution architecture:

HarmonizeSearch_1

Install and configure the sample solution

Use this CloudFormation button to launch your own copy of the sample application in AWS region us-east-1:

HarmonizeSearch_2

The source code is available in our GitHub repository.

Enter an EC2 key pair and a password you will use to access Jupyter notebooks on your new EMR cluster. (You can create a key pair in the EC2 console.)

HarmonizeSearch_3

The master CloudFormation stack uses several nested stacks to create the following resources in your AWS account:

  • VPC with public and private subnets in two Availability Zones.
  • Amazon ES domain (2 x t2.small master nodes and 2 x t2.small data nodes) to store indexes and process search queries. Cost approx. $0.12/hr.
  • S3 bucket for storing datasets and EMR logs.
  • EMR cluster (1 x m4.2xlarge master node, 2 x m4.2xlarge core nodes) with Apache Spark, Jupyter Notebooks, and the aws-es-kibana proxy server (courtesy of santthosh) to sign Elasticsearch service requests. Cost approx. $1.80/hr.
  • ECS cluster (2 x t2.large nodes) and tasks that run the search and discover web service containers and the aws-es-kibana proxy server to sign Amazon ES requests. Cost approx. $0.20/hr.
  • IAM roles with policies to apply least-privilege principles to instance roles used on ECS and EMR instances.

You will be billed for these resources while they are running. In the us-east-1 region, expect to pay a little more than $2 per hour.

The EMR cluster is the most significant contributor to the compute cost. After you have harmonized the datasets, you can terminate the EMR cluster because it’s used only for harmonization. You can create a new cluster later when you need to harmonize new data.

It can take between 30-60 minutes for CloudFormation to set up the resources. When CREATE_COMPLETE appears in the Status column for the main stack, examine the Outputs tab for the stack. Here you will find the links you need to access the Jupyter harmonization notebooks and the dataset search page UI.

HarmonizeSearch_4

Harmonize sample datasets

  1. Launch the Jupyter Notebook UI with the JupyterURL shown on the Outputs tab.
  2. Type the password you used when you launched the stack.
  3. Open the datasearch-blog folder:

HarmonizeSearch_5

Here you see the harmonization notebooks for the three cities we use to illustrate the sample app: Baltimore, Detroit, and Los Angeles. The lib folder contains Python classes used to abstract common indexing and harmonization methods used by the harmonization notebooks. The html folder contains read-only HTML copies of each notebook created and published during notebook execution. The kibana-content folder holds the definitions for the default search dashboard pane and scripts for importing and exporting the dashboard to and from Amazon Elasticsearch Service.

Now you’re ready to run the harmonization notebooks.

  1. Click Baltimore-notebook.ipynb to open the Baltimore notebook. To modify the sample to work with different datasets or to implement additional features, you need to understand how these files work. For now, we’ll just run the three sample notebooks to download and harmonize some datasets.

You can use Show/Hide Code to toggle the display of cells that contain Python code.

  1. From the Cell menu, choose Run All to run the notebook:

HarmonizeSearch_6

You can see the execution progress by monitoring the cells in the notebook. As each cell completes execution, output is displayed under the cell. The Notebook Execution Complete message appears at the bottom of the notebook:

HarmonizeSearch_7

At this point, the dataset for Baltimore has been downloaded and stored in S3. The data has been harmonized and a dictionary was generated. The dataset and the dictionary were stored in Elasticsearch indexes to power the search page and in S3 to facilitate later detailed analysis.

  1. Scroll through the sections in the notebook and read the embedded documentation to understand what it’s doing. The sample code is written in Python using the PySpark modules to leverage the power of Apache Spark running on the underlying EMR cluster.

PySpark allows you to easily scale the technique to process much larger datasets. R, Scala, and other languages can also be supported, as described in Tom Zeng’s excellent blog post, Run Jupyter Notebook and JupyterHub on Amazon EMR.

  1. To complete the sample dataset harmonization processes, open and execute the other two city notebooks, Detroit-notebook.ipynb and LosAngeles-notebook.ipynb.

Note: If you’d like to explore our sample harmonization notebooks without installing the application, you can browse them here: Baltimore-notebook, Detroit-notebook, LosAngeles-notebook.

Search and discovery

Now that the police incident datasets have been harmonized and indexed into Amazon Elasticsearch Service, you can use the solution’s search and discovery UI to visualize and explore the full set of combined data.

Page layout

Launch the search UI using the SearchPageURL on the Outputs tab of the CloudFormation stack.

HarmonizeSearch_8

The search page has two components:

  • An embedded Kibana dashboard helps you visualize aggregate information from your datasets as you apply filters:
    • The sample dashboard is designed for the harmonized police incident datasets, but you can easily implement and substitute your own dashboards to provide alternative visualizations to support different datasets and variables.
    • You can interact with the dashboard elements to zoom in on the map views and apply filters by selecting geographic areas or values from the visualizations.
  • A filter sidebar with accordion elements shows groups of variables that you can use to apply filters to the dashboard:
    • The filter sidebar is built dynamically from the dictionary metadata that was indexed in Amazon Elasticsearch Service by the harmonization process.
    • Use Jupyter to examine the lib/harmonizeCrimeIncidents.py file to see how each harmonized variable is associated with a vargroup, which is used to group associated variables into the accordion folders in the UI. Variables that aren’t explicitly assigned are implicitly assigned to a default vargroup. For example, the accordion labelled Baltimore (Unharmonized) is the default group for the Baltimore dataset. It contains the original dataset variables.

Filter sidebar components

The filter sidebar code dynamically chooses the UI component type to use for each variable based on dictionary metadata. If you look again at the code in lib/harmonizeCrimeIncidents.py, you will see that each harmonized variable is assigned a type that determines the UI component type. Variables that aren’t explicitly typed by the harmonization code are implicitly assigned a type when the dataset dictionary is built (based on whether the variable contains strings or numbers) and on the distribution of values.

In the filter sidebar, open the Date and Time accordion. Select the datetime check box and click in the From or To fields to open the date/time calendar component:

HarmonizeSearch_9

Select the dayofweek check box to see a multi-valued picklist:

HarmonizeSearch_10

Other variable types include:

Ranges:

HarmonizeSearch_11

Boolean:

HarmonizeSearch_12

Text (with as-you-type automatic suggestions):

HarmonizeSearch_13

Take some time to experiment with the filters. The dashboard view is dynamically updated as you apply and remove filters. The count displayed for each dataset changes to reflect the number of records that match your filter criteria. A summary of your current filters is displayed in the query bar at the top of the dashboard.

Dataset documentation/transparency

The example dashboard provides Notebook links for each dataset:

HarmonizeSearch_14

Click the Notebook link for Baltimore to open a browser tab that displays a read-only copy of the Baltimore notebook. Examine the sections listed in Contents:

HarmonizeSearch_15

Use this mechanism to document your datasets and to provide transparency and reproducibility by encapsulating dataset documentation, harmonization code, and output in one accessible artifact.

Search example

Let’s say your hypothesis relates specifically to homicide incidents occurring on weekends during the period 2007-2015.

Use the search UI to apply the search filters on dayofweek, year, and description:

HarmonizeSearch_16

You’ll see the city of Detroit has the largest number of incidents matching your criteria. Baltimore has a few matching records too, so you may want to narrow in on those two datasets.

Analyze

Having used the search UI to locate datasets, you now need to explore further to create rich analyses and custom visualizations to prove and present your hypothesis.

There are many tools you can use for your analysis.

One option is to use Kibana to build new queries, visualizations, and dashboards to show data patterns and trends in support of your hypothesis.

Or you could reuse the harmonization (Jupyter on EMR/Spark) environment to create new Jupyter notebooks for your research, leveraging your knowledge of Python or R to do deep statistical and predictive analytics on the harmonized dataset stored in S3. Create beautiful notebooks that contain your documentation and code, with stunning inline visualizations generated by using libraries like matplotlib or ggplot2.

Two recently launched AWS analytics services, Amazon Athena and Amazon QuickSight, provide an attractive, serverless option for many research and analytics tasks. Let’s explore how you can use these services to analyze our example police incident data.

Amazon Athena

Open the Amazon Athena console in region us-east-1.  From DATABASE, choose incidents. You’ll see the tables for our datasets are already loaded into the Athena catalog. Choose the preview icon for any of these tables to see some records.

HarmonizeSearch_17

How did the tables for our datasets get loaded into the Athena catalog? If you explored the harmonization notebooks, you may know the answer. Our sample harmonization notebooks save the harmonized datasets and dictionaries to S3 as Parquet files and register these datasets as external tables with the Amazon Athena service using Athena’s JDBC driver (example).

Amazon QuickSight

Amazon QuickSight can use Athena as a data source to build beautiful, interactive visualizations. To do this:

  1. Open and sign in to the QuickSight console. If this is your first time using QuickSight, create an account.

Note: Your QuickSight account must have permissions to access Amazon Athena and the S3 bucket(s) where your harmonized datasets are stored.

  1. Follow the steps in the console to create an Athena data source.
  1. After the data source is created, choose the incidents database, and then choose Edit/Preview data:

HarmonizeSearch_18

  1. Build a custom query to combine the separate harmonized city datasets into a single dataset for analysis. Open the Tables accordion and click Switch to Custom SQL tool:

HarmonizeSearch_19

  1. The following example combines the harmonized variables datetime, city, and description from all three of our sample datasets:

HarmonizeSearch_20

  1. Explore the data preview, modify the analysis label, then choose Save and Visualize to store your dataset and open the visualization editor:

HarmonizeSearch_21

  1. Select datetime and description to display a default visualization that shows incident counts over time for each incident description:

HarmonizeSearch_22

Take some time to explore QuickSight’s features by building visualizations, stories, and dashboards. You can find tutorials and examples in the QuickSight UI and in other blog posts.

Customization

This post and the companion sample application are intended to illustrate concepts and to provide you with a framework you can customize.

Code repository and continuous build and deployment

The sample solution installs a pipeline in AWS CodePipeline in your account. The pipeline  monitors the source code archive in the aws-big-data-blog S3 bucket (s3://aws-bigdata-blog/artifacts/harmonize-search-analyze/src.zip). Any changes to this source archive will trigger AWS CodePipeline to automatically rebuild and redeploy the UI web application in your account.

Fork our GitHub repository and review the README.md file to learn how to create and publish the solution templates and source code to your own S3 artifact bucket.

Use CloudFormation to launch the solution master stack from your new S3 bucket and verify that your pipeline now monitors the source code archive from your bucket.

You are ready to start customizing the solution.

Customize harmonization

Using the examples as a guide, harmonize and index your own datasets by creating your own Jupyter notebooks. Our sample notebooks and Python classes contain embedded notes and comments to guide you as you make changes. Use the harmonization process to control:

  • Variable names
  • Variable values, categories, units of measurements
  • New variables used to create searchable dataset tags
  • New variables to enrich data
  • Data quality checks and filters/corrections
  • The subset of variables that are indexed and made searchable
  • How variables are grouped and displayed on the search UI
  • The data dictionary used to describe variables and preserve data lineage
  • Dataset documentation, publish and make accessible from search UI

Customize search UI

Customize the web search UI dashboard to reflect the variables in your own datasets and embed/link the dashboard page into your own website.

The main search page panel is an embedded Kibana dashboard. You can use Kibana to create your own customized dashboard, which you can link to the search page by editing ./services/webapp/src/config.js to replace the value of dashboardEmbedUrl.

The filter sidebar is a Bootstrap Javascript application. You won’t need to modify the sidebar code to handle new datasets or variables because it is fully data-driven from the dataset dictionary indexes saved to Amazon Elasticsearch Service during harmonization.

For more information about how to build and test the web UI, see the README.md file in our GitHub repository.

Integration with other AWS services

Consider using the recently launched Data Lake Solution on AWS to create a data lake to organize and manage your datasets in S3. The APIs can be used to register and track your harmonized datasets. The solution’s console can be used to manage your dataset lifecycles and access control.

Use Amazon CloudWatch (logs, metrics, alarms) to monitor the web UI container logs, the ECS cluster, the Elasticsearch domain, and the EMR cluster.

You might also want to store your harmonized datasets into an Amazon Redshift data warehouse, run predictive analytics on harmonized variables using Amazon Machine Learning, and much more. Explore the possibilities!

Cleanup

You will be charged an hourly fee while the resources are running, so don’t forget to delete the resources when you’re done!

  • Delete the master datasearch-blog CloudFormation stack
  • Use the S3 console to delete the S3 bucket: datasearch-blog-jupyterspark
  • Use the Athena console to manually delete the incidents database
  • Finally, use the QuickSight console to remove the data source and visualization that you created to analyze these datasets

Summary

In this blog post, we have described an approach that leverages AWS services to address many of the challenges of integrating search and analysis across multiple, loosely coupled datasets. We have provided a sample application that you can use to kick the tires. Try customizing the approach to meet your own needs.

If you have questions or suggestions, please leave your feedback in the comments. We would love to hear from you!


About the Authors


Oliver Atoa and Bob Strahan are Senior Consultants for AWS Professional Services. They work with our customers to provide leadership on a variety of projects, helping them shorten their time to value when using AWS.

OliverAtoa_pic_resized

BobStrahan_pic_resized


Ryan Jancaitis is the Sr. Product Manager for the Envision Engineering Center at AWS. He works with our customers to enable their cloud journey through rapid prototyping and innovation to solve core business challenges.

RyanJ_pic_resized


 Related

Derive Insights from IoT in Minutes using AWS IoT, Amazon Kinesis Firehose, Amazon Athena, and Amazon QuickSight

Related_thumbnail_Harmonize


Pirate Bay Prosecution In Trouble, Time Runs Out For Investigators

$
0
0

Post Syndicated from Ernesto original https://torrentfreak.com/pirate-bay-prosecution-trouble-time-runs-investigators-170227/

pirate bayDecember 2014, The Pirate Bay went dark after police raided the Nacka station, a nuclear-proof datacenter built into a mountain complex near Stockholm.

The hosting facility reportedly offered services to The Pirate Bay, EZTV and several other torrent related sites, which were pulled offline as a result.

The authorities later announced that 50 servers were seized during the raid. And not without success, it seemed. The raid resulted in the longest ever period of downtime for The Pirate Bay, nearly two months, and led to chaos and a revolt among the site’s staffers.

However, despite a new criminal investigation into The Pirate Bay, the site has been operating as usual for a while now. As it now transpires, the raid may not result in any future prosecutions.

According to prosecutor Henrik Rasmusson, who took over the case from Fredrik Ingblad last year, time is running out. Some of the alleged crimes date back more than five years, which is outside the statute of limitations.

“Some of the suspected crimes are from 2011, although the seizures are from 2014. And the statute of limitations on them are five years,” prosecutor Henrik Rasmusson told IDG.

While several years have passed, there’s not much progress to report. The police provided the prosecutor with some updates along the way, but it’s not clear when the investigation will be completed.

“I have over time received new information from the police, but I have not received any clear indication of when the investigation will be completed,” the prosecutor said.

Even if the investigation is finalized, there are still a lot of steps to take before any indictments are ready. Meanwhile, the quality of the evidence isn’t getting any better. Based on his comments, the prosecutor isn’t very optimistic in this regard.

“The oral evidence could get worse because people forget. There may be difficulties with other monitoring data that may have changed or disappeared, such as registers and data restorations,” he said.

This isn’t the first setback for the authorities. Previously, they had to drop one of the main suspects from the case as they lacked sufficient resources to analyze the data that were seized during the raid.

On top of that, people from the Pirate Bay team itself said that if they were indeed the target, the police didn’t have much on them.

According to the TPB team, only one of their servers was confiscated in 2014, and this one was hosted at a different location. The server in question was operated by the moderators and used as a communication channel for TPB matters.

The team said that it chose to pull their actual site offline as a precaution but that relocating to a new home proved to be harder than expected, hence the prolonged downtime.

Source: TF, for the latest info on copyright, file-sharing, torrent sites and ANONYMOUS VPN services.

Megaupload Case Takes Toll on Finn Batato, But He’ll Keep Fighting

$
0
0

Post Syndicated from Andy original https://torrentfreak.com/megaupload-case-takes-toll-on-finn-batato-but-hell-keep-fighting-170227/

Whenever there’s a new headline about the years-long prosecution of Megaupload, it is usually Kim Dotcom’s image adorning publications around the world. In many ways, the German-born entrepreneur is the face of the United States’ case against the defunct storage site, and he appears to like it that way.

Thanks to his continuous presence on Twitter, regular appearances in the media, alongside promotion of new file-sharing platforms, one might be forgiven for thinking Dotcom was fighting the US single-handedly. But quietly and very much in the background, three other men are also battling for their freedom.

Megaupload programmers Mathias Ortmann and Bram van der Kolk face a similar fate to Dotcom but have stayed almost completely silent since their arrests in 2012. Former site advertising manager Finn Batato, whose name headlines the entire case (US v. Finn Batato) has been a little more vocal though, and from recent comments we learn that the US prosecution is taking its toll.

Seven years ago before the raid, Batato was riding the crest of a wave as Megaupload’s CMO. According to the FBI he pocketed $630,000 in 2010 and was regularly seen out with Dotcom having fun, racing around the Nürburgring’s Nordschleife track with Formula 1 star Kimi Raikkonen, for example. But things are different now.

Finn with Kimi Raikkonen

While still involved with Mega, the new file-sharing site that Dotcom founded and then left after what appears to be an acrimonious split, Batato is reportedly feeling the pressure. In a new interview with Newshub, the marketing expert says that his marriage is on the rocks, a direct result of the US case against him.

According to Batato, he’s now living in someone else’s house, something he hasn’t done “for 25 years.” It’s a far cry from the waterside luxury being enjoyed by Dotcom.

Batato met wife Anastasia back in 2012, not long after the raid and while he was still under house arrest. The pair married in 2015 and have two children, Leo and Oskar.

“The constant pressure over your head – not knowing what is there to come, is very hard, very tough,” Batato said in an earlier interview with NZHerald.

“Everything that happens in our life happens with that big black cloud over our heads which especially has an impact on me and my mood because I can’t just switch it off. If everything goes down the hill, maybe I will see [my sons] once every month in a prison cell. That breaks my heart. I can’t enjoy it as much as I would want to. It’s highly stressful.”

Since then, Batato has been busy. While working as Mega’s Chief Marketing Officer, the German citizen has been learning about the law. He’s had to. Unlike Dotcom who can retain the best lawyers in the game, Batato says he has few resources.

What savings he had were seized on the orders of the United States in Hong Kong back in 2012, and he previously admitted to having to check his bank account before buying groceries. As a result he’s been conducting his own legal defense for almost two years.

In 2015 he reportedly received praise while doing so, with lawyers appearing for his co-defendants commending him when he stood up to argue a point during a Megaupload hearing. “I was kind of proud about that,” he said.

Like Dotcom (with whom he claims to be on “good terms”), Batato insists that he’s done nothing wrong. He shares his former colleague’s optimism that he won’t be extradited and will take his case to the Supreme Court, should all else fail.

That may be necessary. Last week, the New Zealand High Court determined that Batato and his co-defendants can be extradited to the US, albeit not on copyright grounds. Justice Murray Gilbert agreed with the US Government’s position that their case has fraud at its core, an extraditable offense.

In the short term, the case is expected to move to the Court of Appeal and, depending on the outcome there, potentially to the Supreme Court. Either way, this case still has years to run with plenty more legal appearances for Batato. He won’t be doing it with the legal backup enjoyed by Dotcom but he’ll share his determination.

Source: TF, for the latest info on copyright, file-sharing, torrent sites and ANONYMOUS VPN services.

AWS Organizations – Policy-Based Management for Multiple AWS Accounts

$
0
0

Post Syndicated from Jeff Barr original https://aws.amazon.com/blogs/aws/aws-organizations-policy-based-management-for-multiple-aws-accounts/

Over the years I have found that many of our customers are managing multiple AWS accounts. This situation can arise for several reasons. Sometimes they adopt AWS incrementally and organically, with individual teams and divisions making the move to cloud computing on a decentralized basis. Other companies grow through mergers and acquisitions and take on responsibility for existing accounts. Still others routinely create multiple accounts in order to meet strict guidelines for compliance or to create a very strong isolation barrier between applications, sometimes going so far as to use distinct accounts for development, testing, and production.

As these accounts proliferate, our customers find that they would like to manage them in a scalable fashion. Instead of dealing with a multitude of per-team, per-division, or per-application accounts, they have asked for a way to define access control policies that can be easily applied to all, some, or individual accounts. In many cases, these customers are also interested in additional billing and cost management, and would like to be able to control how AWS pricing benefits such as volume discounts and Reserved Instances are applied to their accounts.

AWS Organizations Emerges from Preview
To support this increasingly important use case, we are moving AWS Organizations from Preview to General Availability today. You can use Organizations to centrally manage multiple AWS accounts, with the ability to create a hierarchy of Organizational Units (OUs), assign each account to an OU, define policies, and then apply them to the entire hierarchy, to select OUs, or to specific accounts. You can invite existing AWS accounts to join your organization and you can also create new accounts. All of these functions are available from the AWS Management Console, the AWS Command Line Interface (CLI), and through the AWS Organizations API.

Here are some important terms and concepts that will help you to understand Organizations (this assumes that you are the all-powerful, overall administrator of your organization’s AWS accounts, and that you are responsible for the Master account):

An Organization is a consolidated set of AWS accounts that you manage. Newly-created Organizations offer the ability to implement sophisticated, account-level controls such as Service Control Policies. This allows Organization administrators to manage lists of allowed and blocked AWS API functions and resources that place guard rails on individual accounts. For example, you could give your advanced R&D team access to a wide range of AWS services, and then be a bit more cautious with your mainstream development and test accounts. Or, on the production side, you could allow access only to AWS services that are eligible for HIPAA compliance.

Some of our existing customers use a feature of AWS called Consolidated Billing. This allows them to select a Payer Account which rolls up account activity from multiple AWS Accounts into a single invoice and provides a centralized way of tracking costs. With this launch, current Consolidated Billing customers now have an Organization that provides all the capabilities of Consolidated Billing, but by default does not have the new features (like Service Control Policies) we’re making available today. These customers can easily enable the full features of AWS Organizations. This is accomplished by first enabling the use of all AWS Organization features from the Organization’s master account and then having each member account authorize this change to the Organization. Finally, we will continue to support creating new Organizations that support only the Consolidated Billing capabilities. Customers that wish to only use the centralized billing features can continue to do so, without allowing the master account administrators to enforce the advanced policy controls on member accounts in the Organization.

An AWS account is a container for AWS resources.

The Master account is the management hub for the Organization and is also the payer account for all of the AWS accounts in the Organization. The Master account can invite existing accounts to join the Organization, and can also create new accounts.

Member accounts are the non-Master accounts in the Organization.

An Organizational Unit (OU) is a container for a set of AWS accounts. OUs can be arranged into a hierarchy that can be up to five levels deep. The top of the hierarchy of OUs is also known as the Administrative Root.

A Service Control Policy (SCP) is a set of controls that the Organization’s Master account can apply to the Organization, selected OUs, or to selected accounts. When applied to an OU, the SCP applies to the OU and to any other OUs beneath it in the hierarchy. The SCP or SCPs in effect for a member account specify the permissions that are granted to the root user for the account. Within the account, IAM users and roles can be used as usual. However, regardless of how permissive the user or the role might be, the effective set of permissions will never extend beyond what is defined in the SCP. You can use this to exercise fine-grained control over access to AWS services and API functions at the account level.

An Invitation is used to ask an AWS account to join an Organization. It must be accepted within 15 days, and can be extended via email address or account ID. Up to 20 Invitations can be outstanding at any given time. The invitation-based model allows you to start from a Master account and then bring existing accounts into the fold. When an Invitation is accepted, the account joins the Organization and all applicable policies become effective. Once the account has joined the Organization, you can move it to the proper OU.

AWS Organizations is appropriate when you want to create strong isolation boundaries between the AWS accounts that you manage. However, keep in mind that AWS resources (EC2 instances, S3 buckets, and so forth) exist within a particular AWS account and cannot be moved from one account to another. You do have access to many different cross-account AWS features including VPC peering, AMI sharing, EBS snapshot sharing, RDS snapshot sharing, cross-account email sending, delegated access via IAM roles, cross-account S3 bucket permissions, and cross-acount access in the AWS Management Console.

Like consolidated billing, AWS Organizations also provides several benefits when it comes to the use of EC2 and RDS Reserved Instances. For billing purposes, all of the accounts in the Organization are treated as if they are one account and can receive the hourly cost benefit of an RI purchased by any other account in the same Organization (in order for this benefit to be applied as expected, the Availability Zone and other attributes of the RI must match the attributes of the EC2 or RDS instance).

Creating an Organization
Let’s create an Organization from the Console, create some Organizational Units, and then create some accounts. I start by clicking on Create organization:

Then I choose ENABLE ALL FEATURES and click on Create organization:

My Organization is ready in seconds:

I can create a new account by clicking on Add account, and then selecting Create account:

Then I supply the details (the IAM role is created in the new account and grants enough permissions for the account to be customized after creation):

Here’s what the console looks like after I have created Dev, Test, and Prod accounts:

At this point all of the accounts are at the top of the hierarchy:

In order to add some structure, I click on Organize accounts, select Create organizational unit (OU), and enter a name:

I do the same for a second OU:

Then I select the Prod account, click on Move accounts, and choose the Operations OU:

Next, I move the Dev and Test accounts into the Development OU:

At this point I have four accounts (my original one plus the three that I just created) and two OUs. The next step is to create one or more Service Control Policies by clicking on Policies and selecting Create policy. I can use the Policy Generator or I can copy an existing SCP and then customize it. I’ll use the Policy Generator. I give my policy a name and make it an Allow policy:

Then I use the Policy Generator to construct a policy that allows full access to EC2 and S3, and the ability to run (invoke) Lambda functions:

Remember, that this policy defines the full set of allowable actions within the account. In order to allow IAM users within the account to be able to use these actions, I would still need to create suitable IAM policies and attach them to the users (all within the member account). I click on Create policy and my policy is ready:

Then I create a second policy for development and testing. This one also allows access to AWS CodeCommit, AWS CodeBuild, AWS CodeDeploy, and AWS CodePipeline:

Let’s recap. I have created my accounts and placed them into OUs. I have created a policy for the OUs. Now I need to enable the use of policies, and attach the policy to the OUs. To enable the use of policies, I click on Organize accounts and select Home (this is not the same as the root because Organizations was designed to support multiple, independent hierarchies), and then click on the checkbox in the Root OU. Then I look to the right, expand the Details section, and click on Enable:

Ok, now I can put all of the pieces together! I click on the Root OU to descend in to the hierarchy, and then click on the checkbox in the Operations OU. Then I expand the Control Policies on the right and click on Attach policy:

Then I locate the OperationsPolicy and click on Attach:

Finally, I remove the FullAWSAccess policy:

I can also attach the DevTestPolicy to the Development OU.

All of the operations that I described above could have been initiated from the AWS Command Line Interface (CLI) or by making calls to functions such as CreateOrganization, CreateAccount, CreateOrganizationalUnit, MoveAccount, CreatePolicy, AttachPolicy, and InviteAccountToOrganization. To see the CLI in action, read Announcing AWS Organizations: Centrally Manage Multiple AWS Accounts.

Best Practices for Use of AWS Organizations
Before I wrap up, I would like to share some best practices for the use of AWS Organizations:

Master Account – We recommend that you keep the Master Account free of any operational AWS resources (with one exception). In addition to making it easier for you to make high-quality control decision, this practice will make it easier for you to understand the charges on your AWS bill.

CloudTrail – Use AWS CloudTrail (this is the exception) in the Master Account to centrally track all AWS usage in the Member accounts.

Least Privilege – When setting up policies for your OUs, assign as few privileges as possible.

Organizational Units – Assign policies to OUs rather than to accounts. This will allow you to maintain a better mapping between your organizational structure and the level of AWS access needed.

Testing – Test new and modified policies on a single account before scaling up.

Automation – Use the APIs and a AWS CloudFormation template to ensure that every newly created account is configured to your liking. The template can create IAM users, roles, and policies. It can also set up logging, create and configure VPCs, and so forth.

Learning More
Here are some resources that will help you to get started with AWS Organizations:

Things to Know
AWS Organizations is available today in all AWS regions except China (Beijing) and AWS GovCloud (US) and is available to you at no charge (to be a bit more precise, the service endpoint is located in US East (Northern Virginia) and the SCPs apply across all relevant regions). All of the accounts must be from the same seller; you cannot mix AWS and AISPL (the local legal Indian entity that acts as a reseller for AWS services accounts in India) in the same Organization.

We have big plans for Organizations, and are currently thinking about adding support for multiple payers, control over allocation of Reserved Instance discounts, multiple hierarchies, and other control policies. As always, your feedback and suggestions are welcome.

Jeff;

AWS Week in Review – February 20, 2017

$
0
0

Post Syndicated from Jeff Barr original https://aws.amazon.com/blogs/aws/aws-week-in-review-february-20-2017/

By popular demand, I am producing this “micro” version of the AWS Week in Review. I have included all of our announcements, content from all of our blogs, and as much community-generated AWS content as I had time for. Going forward I hope to bring back the other sections, as soon as I get my tooling and automation into better shape.

Monday

February 20

Tuesday

February 21

Wednesday

February 22

Thursday

February 23

Friday

February 24

Saturday

February 25

Jeff;


Some notes on space heaters (GPU rigs)

$
0
0

Post Syndicated from Robert Graham original http://blog.erratasec.com/2017/02/some-notes-on-space-heaters-gpu-rigs.html

So I carried my GPU rig up to my bedroom to act as a space heater. I thought I’d write some notes on it.

This is a “GPU rig”, containing five graphics cards. Graphics cards have highly parallel processors (GPUs) with roughly 10 times the performance of a CPU — but only for highly parallel problems.

Two such problems are password cracking [*] and cryptocurrency mining.

Password cracking is something cybersecurity professionals regularly need to do. When doing a pentest, or assessment, we’ll get lists of passwords we need to crack. Having a desktop computer with a couple of graphics cards is a useful thing to have.

There are three popular cryptocurrencies: Bitcoin, Ethereum, and ZCash. Everyone is using ASICs for Bitcoin, so you can’t mine them on a GPU any more, but GPUs are still useful for Ethereum and ZCash.

The trick to building a rig with lots of GPU is to get a PCIe 1x extender, so that you can mount the card far away from the motherboard for better cooling. They cost around $10 each. You then need to buy a motherboard with lots of PCIe slots. One with lots of 1x slots will do — we don’t need a lot of bandwidth to the cards.

You then need to buy either a single high-end power supply, or team together two cheaper power supplies. The limitation will be the power from the wall socket, which ranges from around 1600 watts to 1900 watts.

If you don’t want to build a rig, but just stick one or two GPUs in your desktop computer, then here are some things to consider.

There are two vendors of GPUs: nVidia and AMD/Radeon. While nVidia has a better reputation for games and high-end supercomputer math (floating point), Radeon’s have been better with the integer math used for crypto. So you want Radeon cards.

Older cards work well. The 5-year-old Radeon 7970 is actually a pretty good card for this sort of work. You may find some for free from people discarding them in favor of newer cards for gaming.

If buying newer cards, the two you care about are either the Radeon R9 Fury/Nano, or the Radeon RX 470/480. The Fury/Nano cards are slightly faster, the RX 470/480 are more power efficient.

You want to get at least 4 gigabytes of memory per card, which I think is what they come with anyway. You might consider 8 gigabytes. The reason for this is that Ethereum is designed to keep increasing memory requirements, to avoid the way ASICs took over in Bitcoin mining. At some point in the future, 4 gigabytes won’t be enough and you’ll need 8 gigabytes. This is many years away, but seeing how old cards remaining competitive for many years, it’s something to consider.

With all this said, if you’ve got a desktop and want to add a card, or if you want to build a rig, then I suggest the following card:

  • AMD Radeon RX 480 w/ 8gigs or RAM for $199 at Newegg [*]

A few months from now, things will of course change, but it’s a good choice for now. This is especially useful for rigs: 6 Fury cards in a rig risks overloading the wall socket, so that somebody innocently turning on a light could crash your rig. In contrast, a rig 6 RX480 cards fit well within the power budget of a single socket.

Now let’s talk software. For password cracking, get Hashcat. For mining, choose a mining pool, and they’ll suggest software. The resources at zcash.flypool.org are excellent for either Windows or Linux mining. Though, on Windows, I couldn’t get mining to work unless I also went back to older video drivers, which was a pain.

Let’s talk electrical power consumption. Mining profitability is determined by your power costs. Where I live, power costs $0.05/kwh, except during summer months (June through September). This is extremely cheap. In California, power costs closer to $0.15/kwh. The difference is significant. I make a profit at the low rates, but would lose money at the higher rates.

Because everyone else is doing it, you can never make money at mining. Sure, if you run the numbers now, you may convince yourself that you’ll break even after a year, but that assumes everything stays static. Other people are making the same calculation, and will buy new GPUs to enter the market, driving down returns, so nobody ever breaks even. The only time mining is profitable is when the price of the cryptocurrency goes up — but in that case, you’d have made even more money just buying the cryptocurrency instead of a mining rig.

The reason I mine is that I do it over TOR, the Onion Router that hides my identity. This mines clean, purely anonymous Bitcoins that I can use (in theory) to pay for hosting services anonymously. I haven’t done that yet, but I’ll have several Bitcoins worth of totally anonymous currency to use if I ever need them.

Otherwise, I use the rig for password cracking. The trick to password cracking is being smarter (knowing what to guess), not being more powerful. But having a powerful rig helps, too, especially since I can just start it up and let it crunch unattended for days.

Conclusion

You probably don’t want to build a rig, unless you are geek like me who enjoys playing with technology. You’ll never earn back what you invest in it, and it’s a lot of hassle setting up.

On the other hand, if you have a desktop computer, you might want to stick in an extra graphics card for password cracking and mining in the background. This is especially true if you want to generate anonymous Bitcoin.

Viewing all 771 articles
Browse latest View live